Amazon SmartConnect
1 - Introduction
Welcome to our guide on the Amazon SmartConnect Integration with NCompass.
This guide will go over the basics of how to list a product onto the SmartConnect platform, and the process of delivering these items to a customer.
If at any point you have questions about topics in this guide, do not hesitate to reach out to our Support Team on the normal channels.
2 - Requirements
Before you can begin using this Integration, there are a few things to note:
- Your NCompass system must already be linked up to your Amazon Seller Central Account
- You have signed the relevant paperwork provided by our Sales/Admin teams to add the SmartConnect Module to your NCompass Package
- You have been invited to join the SmartConnect Program by your Amazon Representative
- You have been advised by the Calculus Support Team, and your Amazon Representative that your system is now linked to Amazon SmartConnect, and you are ready to start listing products onto the platform
Note: Both Calculus and Amazon need to carry out preparation work in the background to get this all setup and ready for you, which is why you require the go ahead from both parties before you can proceed with the listing process.
Amazon will typically ask that you list a small number or low volume products at the start of the migration, and ask that you slowly ramp this up overall several weeks before you entire Catalogue is listed on the platform. Your Amazon Rep will discuss this with you in more detail in the leadup to starting the Listing Process.
3 - How to list products on SmartConnect
3.1 - Create an Amazon Price
NCompass knows that a product is linked to Amazon by the fact it has a Amazon Retail price against it. This is the case for all types of Amazon listings, Smart Connect ones included.
So Product Info > Financial > retail prices > create a new price for the Amazon customer category.
At the time of writing, you can not have different Amazon Prices for different listing types (so for example you can't have one SmartConnect Price, one FBA Price and one MFN Price. It all comes under one central Amazon Price)
However, should you need to be able to do this, then you can do the following:
-
Create your product with your SmartConnect listing (section 3.2 on how to List a product) and price.
-
Create a new soft-bundle product, which contains just that main product.
-
List that soft-bundle product against your MFN channel, and set a different price for the bundle.
Soft bundles auto-inherit stock from their contents, and will therefore keep stock in sync for the bundle listing based upon the product within it.
Due to how SmartConnect works, you should use the primary listing for SmartConnect, and the bundle for other listings like MFN, rather than the other way around.
3.2 - Listing Items on SmartConnect
Before you attempt to list an item, you must first check that the item is already not listed on the old SellerFlex platform
Note if you are currently not on the SellerFlex platform then this step can be skipped, and you can jump to the section below about listing the item within NCompass.
Otherwise, please read the notes below
If the item is on the old SellerFlex platform, then you must to do the below:
-
Delist the product from the old SellerFlex platform. Amazon can assist you on how to do this if you are unsure.
-
Wait a few minutes for the stock quantity of the product to show as 0 in SellerFlex
-
Then proceed with following the steps below to re-list the product.
Amazon have made it clear to us that following the above steps are absolutely VITAL if you used the SellerFlex platform, and are now migrating to the new SmartConnect platform.
If you have a product listed on both SellerFlex and SmartConnect at the same time it will cause issues with stock levels in the back end of Seller Central Amazon’s end that can have an impact on future listings created through NCompass.
If the product is now delisted and the stock is showing 0 on the old SellerFlex platform/was not on the old Sellerflex platform to begin with, you can then proceed with the below:
Go to Product Info > Web > Web/Multi Channel settings > Amazon
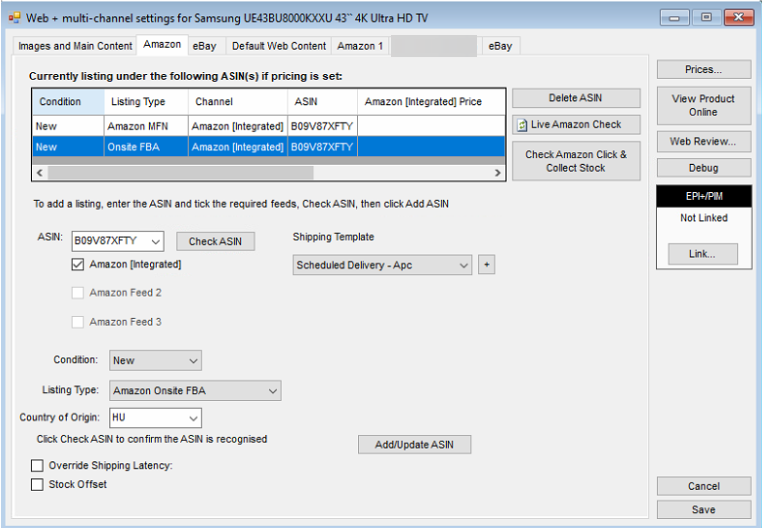
This is the screen where you list an item regardless of if it is Sellerflex, FBA or MFN. So, for those that already use Amazon via NCompass, this screen will likely look familiar.
To add a new listing to a product:
-
Acquire the ASIN of the product from within Amazon’s Seller Central.
-
Add the ASIN into the ASIN box in NCompass. Pressing check ASIN will do a quick check with Amazon to make sure that the ASIN entered is a valid one.
-
The Condition allows you to say if the item is New/Used/etc..
Unless you are listing graded items, leave this as New (which is the default). -
Listing type needs to be set to On Site FBA
-
Country of Origin needs to be set and match what Amazon believes to be the Country of Origin per the listing information in Seller Central.
If this is not set, or set incorrectly, Amazon will not allow the item to be listed. -
Shipping Template needs to match an existing Shipping template being used in Seller Central.
-
When ready, press Add/Update ASIN, and then Save to list it on Sellerflex.
This should then appear in Amazon SellerCentral after about 10-15 mins as an MFN Listing
Note: the exact time it takes to appear in SellerCentral is entirely dependant on how quickly Amazon process the information we send them.
We have found, especially during peak trading periods that this can take in excess of 20 minutes. So please plan around this accordingly
Once it has appeared, change the listing type on Seller Central itself to Onsite FBA. At this point you may be required to fill out some type of form (like a Hazmat form) before you can convert the listing.
If this is not done, NCompass will not be fully linked to the listing. And will prevent stock and prices changes made against the product in NCompass from pushing up to Amazon.
When this has been done, NCompass is now linked to this listing in SellerCentral.
3.3 - Stock Levels on SmartConnect
Anytime you Goods In, Dispose of, or Transfer items into these stock rooms, NCompass will send up the new stock quantity for that product up to Amazon. So the Amazon listing is kept up to date with your stock levels in NCompass.
However, you may see a scenario where NCompass shows quantity X of a product in stock, but in Amazon it is showing quantity Y, this will be due to how Amazon calculates free stock.
As mentioned, when you list an item in NCompass, NCompass will tell Amazon the stock quantities of that product. Amazon then take that quantity, and do their own calculations with it, to say what the true stock quantity of that product is in thier eyes.
Amazon have not given us the specifics of the calculations they do, but this will include things like Amazon being aware of orders that NCompass has not been told about yet, or being aware of how many people have the item in their basket but have not placed the order yet.
This means that it is expected that there may be a discrepancy in stock levels for listings.
To mitigate this, or to adjust what you want the stock level of an item to appear as in Seller Central, you can add a Stock Offset.
This can either be done on a listing per listing basis by setting the below:
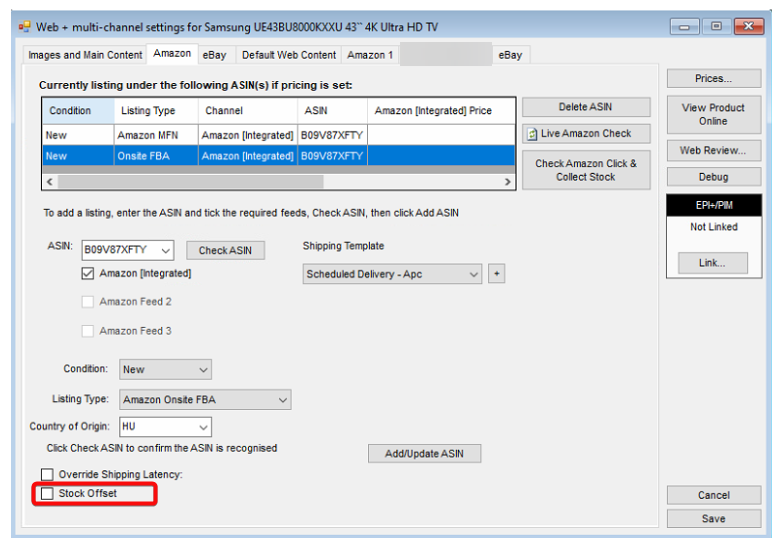
Or setting a Global stock Cap against all listings, which is something the Support team will be able to change for you if required.
Note: This Global Cap will affect all Amazon listing types if used, not just SmartConnect.
4 - Seeing your SmartConnect Sales in NCompass
When a sale is placed by a customer in Seller Central, Amazon will create something called a Shipment for that sale.
Once that shipment has been created, and not before, NCompass will then import that order into your system, and a Field Call linked to it.
When that happens, it will do so against a customer called Amazon Sellerflex, and with no payment against it:
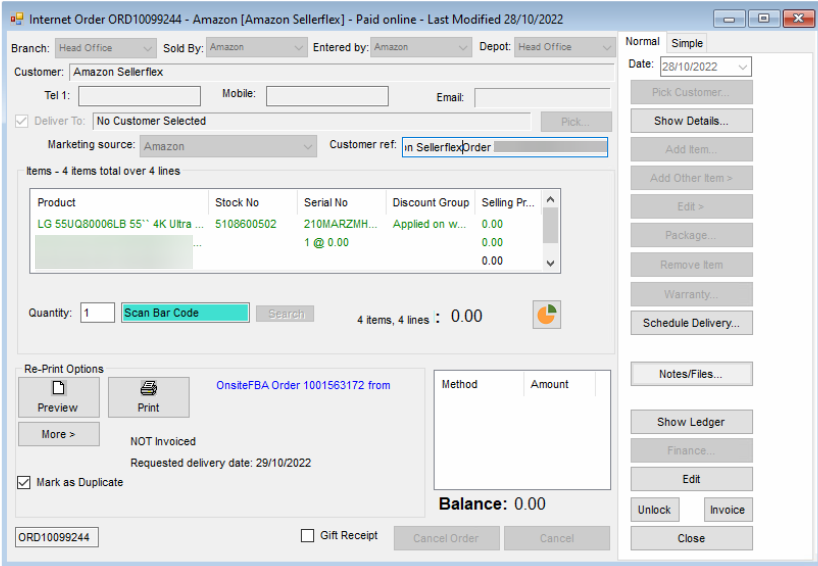
It is by design that Amazon will not tell NCompass any details on the sale, apart from the product(s) on it, until the Sale has been marked as Shipped, which we'll go into more details below.
This is a requirement set by, and enforced by, Amazon.
Once it has been marked as Shipped, NCompass will then automatically update the sale to show the genuine Customer details, and the payment method.
Warning: If the sale is marked as Cancelled in SellerCentral at any point, it will automatically Cancel the sale in NCompass
5 - Marking your Items as shipped.
5.1 - Picking and Labelling
At various intervals during a day, an Amazon Lorry will arrive at your Shop/Warehouse to collect stock that needs to be delivered to the customer on that day. Amazon will discuss the exact timings of this with you in more detail during the on boarding process.
Before the Lorry arrives, you will need to prepare the pick, pack and label your stock so it's ready to be moved.
To do that, find a list of all the Amazon SmartConnect field calls that are due to be collected today, which can be done by:
-
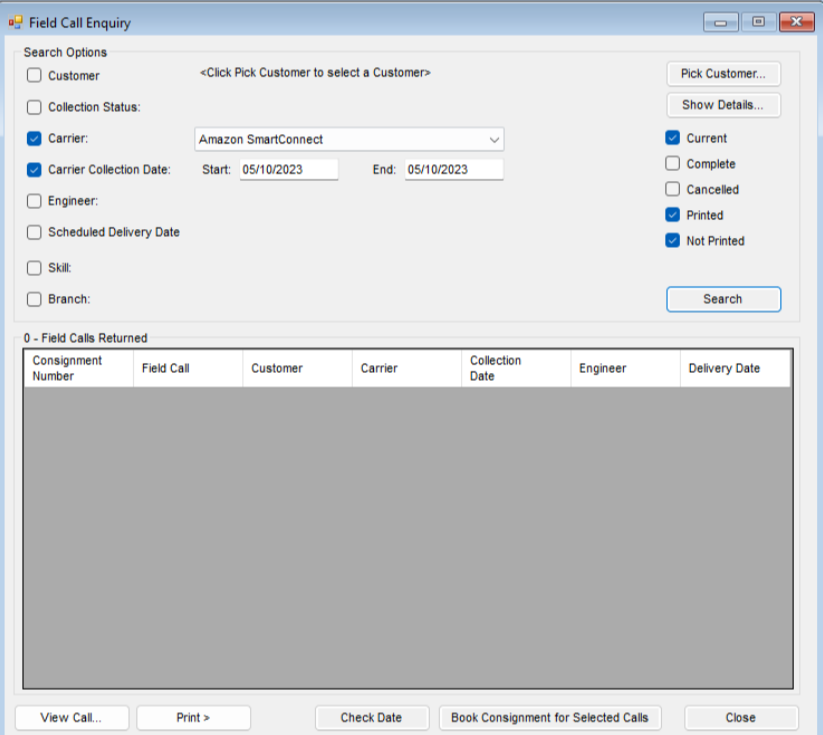
Go to Field Calls > Field Call Enquiry, you’ll be presented with the below screen:
-
Set the Carrier to be Amazon Smartconnect
-
Set Carrier Collection Date to the Date Amazon are coming to the collect the items (so todays date).
-
Click Search, and you’ll be presented with a list of field calls which we will want to be picking stock for.

Next, we need to generate a label for these items, which is done via:
- Field Calls > Goods Dispatch > Pack Items Ready for Dispatch
- Scan the Field Call number into the Barcode box at the bottom of the screen
- Scan the stock number of the item you need to generate a label for
- Press Packing Finished
- NCompass will then print off a label for you to stick on the product
- Move the item to the required location in your Shop/Warehouse in preparation for the Amazon Lorry's arrival
- Repeat this process for each item you need to make a label for
5.2 - Marking as Shipped
When the Amazon Lorry arrives, load all of our items that we printed labels off for onto the Lorry.
Once that has been done, we need to tell Amazon that they have been Shipped.
We do this by simply marking the Field Call as completed. It is at this point that Amazon know the item has been marked as Shipped.
You can either do this by going into each individual Field Call and marking it as completed.
Or, using the preferred method of:
- Field Calls > Batch Complete
- Scan the Amazon Consignment Number into the Bar-code box
- This will load all the field calls that we have just shipped out into this window
- Press Complete All
Note: The Field Call must be manually marked as completed to tell Amazon the item has been marked as Shipped. NCompass will not do this automatically for you.
Repeat that process for each item that is being loaded onto the Amazon Lorry, and then you're finished!