WebPresence
Managing your Calculus provided website.
- Special Offer Text
- Adding Images to Sub-Category Pages in Magento
- Enhancing the Date Picker with AM/PM Delivery Slots
- Embedding videos on your product pages
- Magento Email Change Request
- Product Advisor
Special Offer Text
Introduction
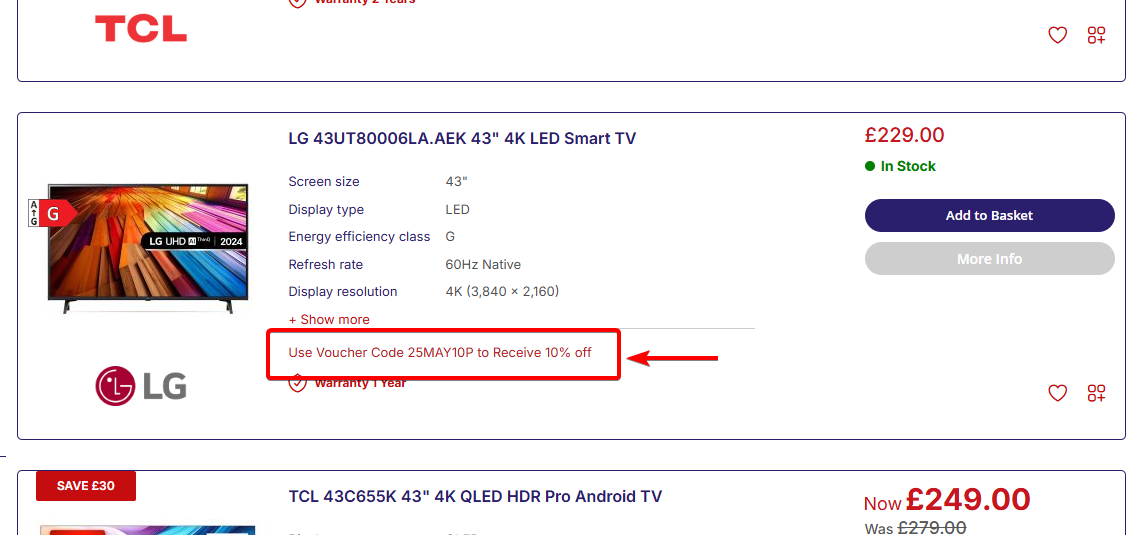
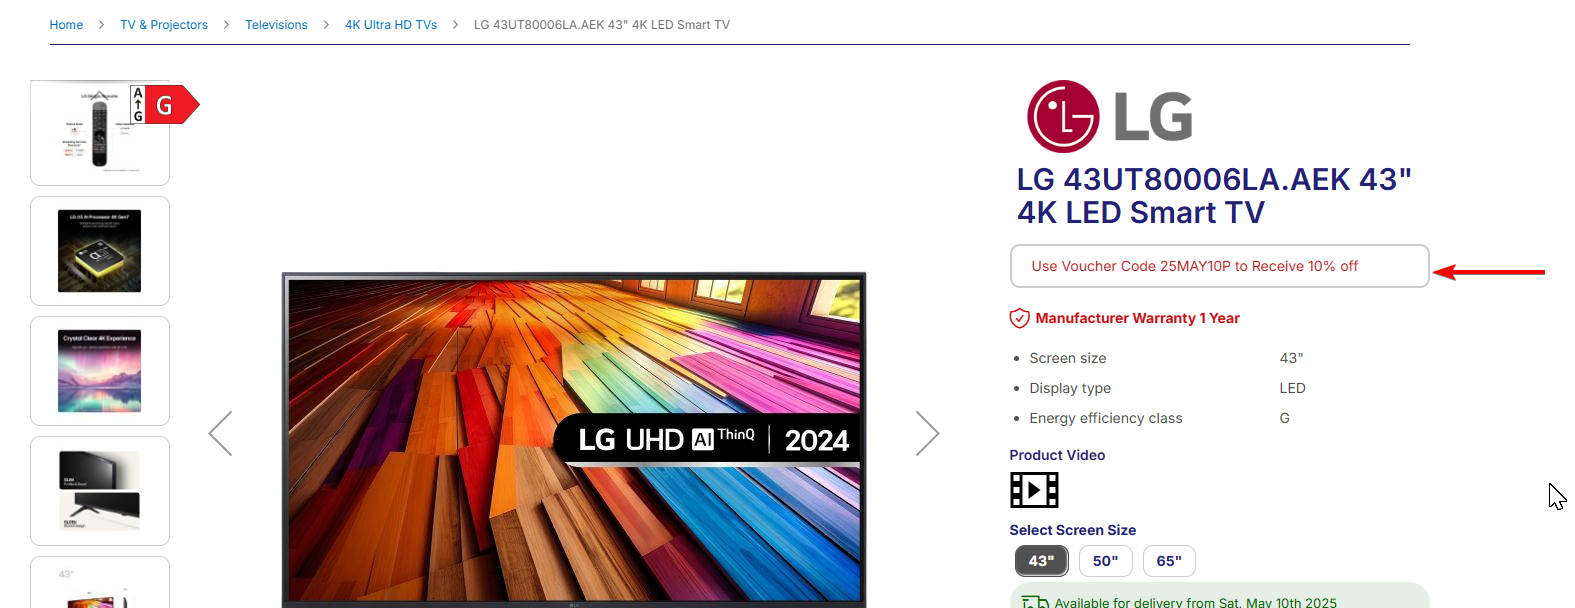
The following guide will take you through how to setup Special Offer Text to display on listings in both list view and product pages. These can be used to advertise voucher codes available to the product, or simply just a way to present any kind of promotion to your customer using this effective strategy which can be applied on both your product and catalogue pages.
Configuring your feature
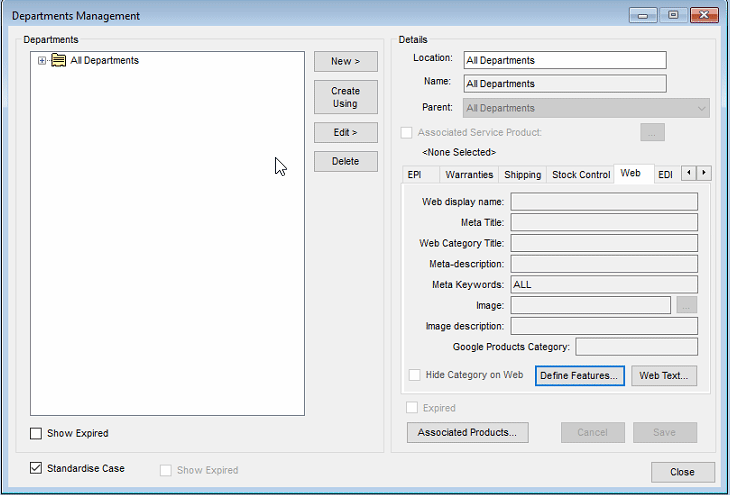
Open NCompass and navigate to Administration > Department Management
Select the top category known as All Departments > open the Web tab from the right hand side menu, and select Define Features in that section of the menu.

Now follow this step carefully. If you select Create New from the middle menu buttons, populate exactly as defined in the below steps 1 through 4,
Display Name: Special Offers Text 1
Use as filter: Unchecked
Feature Type: Dropdown
Display Priority: -1
Map To Web Attribute ID: special_offer_text_1
For marker number 5 in the below screenshot, you will notice that you can use this same feature up to 5 times, simply change the Display Name and Map To Web Attribute IDs number from 1, to 2 all the way through to 5 for each feature will allow you to stack multiple special offers.
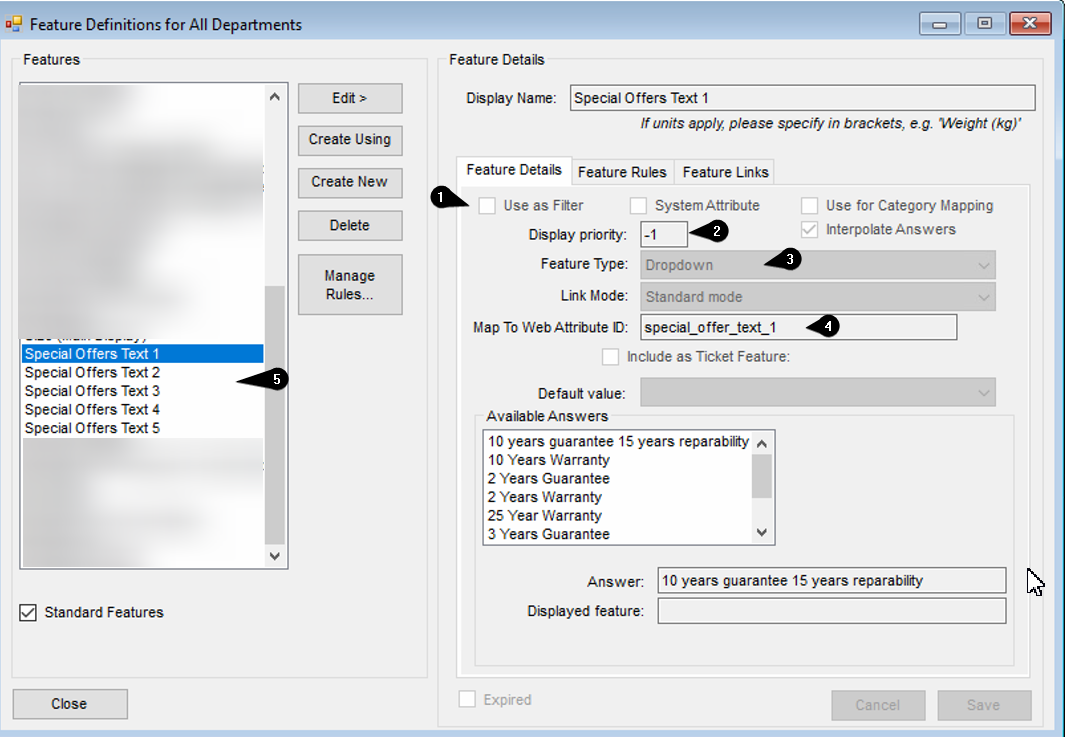
The Available answers will be what you would like to show on the website. if you'd like to know more about feature answers, please refer to the main webpresence documentation by clicking here
Applying Special Offer text to your products
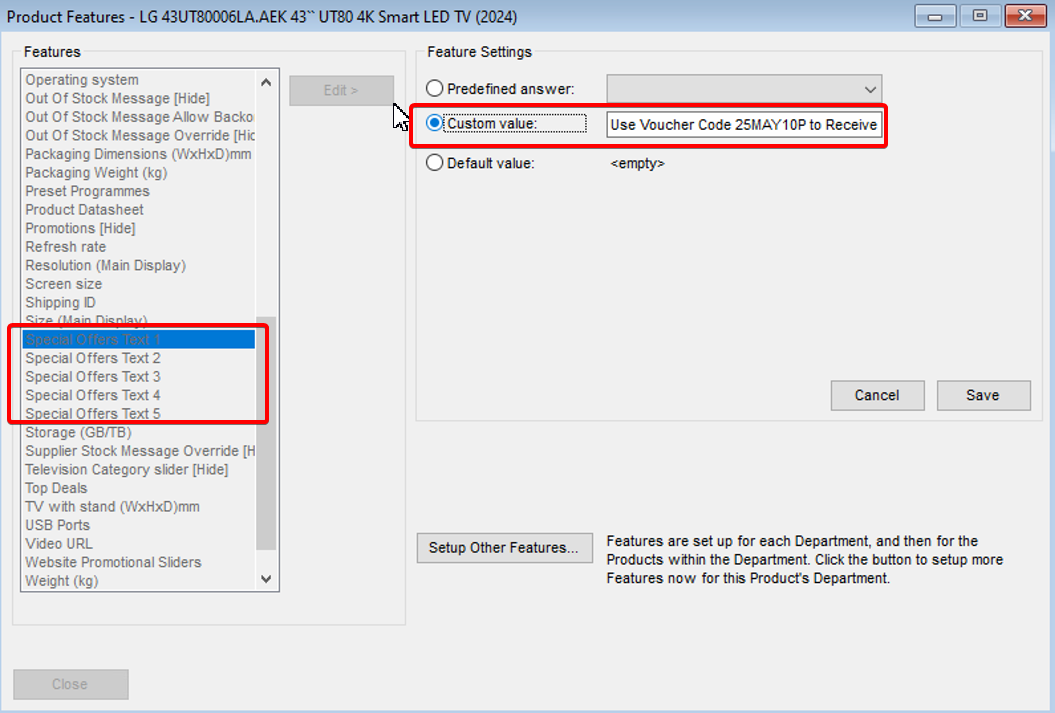
Again within NCompass, open a designated product of your choice by navigating to Products > Enquiry, search for any product and open the product info for the item.
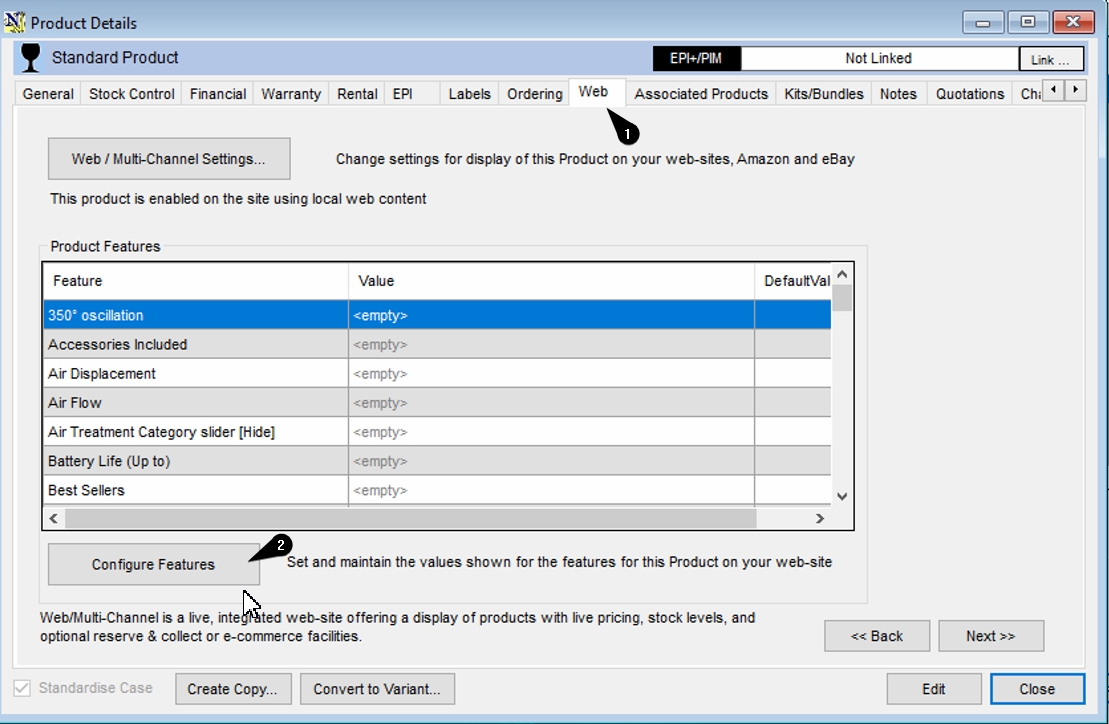
From the list of features available to you, find your special offer text features from the left hand menu, and select edit from the middle section of this window. You may either use Predefined answer, or custom value, populate the value with what you wish to display in your catalogue/product pages. You can see i've set a custom value here which allows me to write anything i'd like in this field. be sure to click save found in the bottom right of the window to set the feature.
if you'd like to know how to use predefined answer, please refer to the webpresence management guide mentioned earlier in this guide.
These changes will now be sync to the website and you will see the special offer text now displays on the product listing, or catalogue page.
Changing the Appearance
Now we have the special offer text showing on the website, we can begin to adjust how the text is displayed. This is done in Magento Admin.
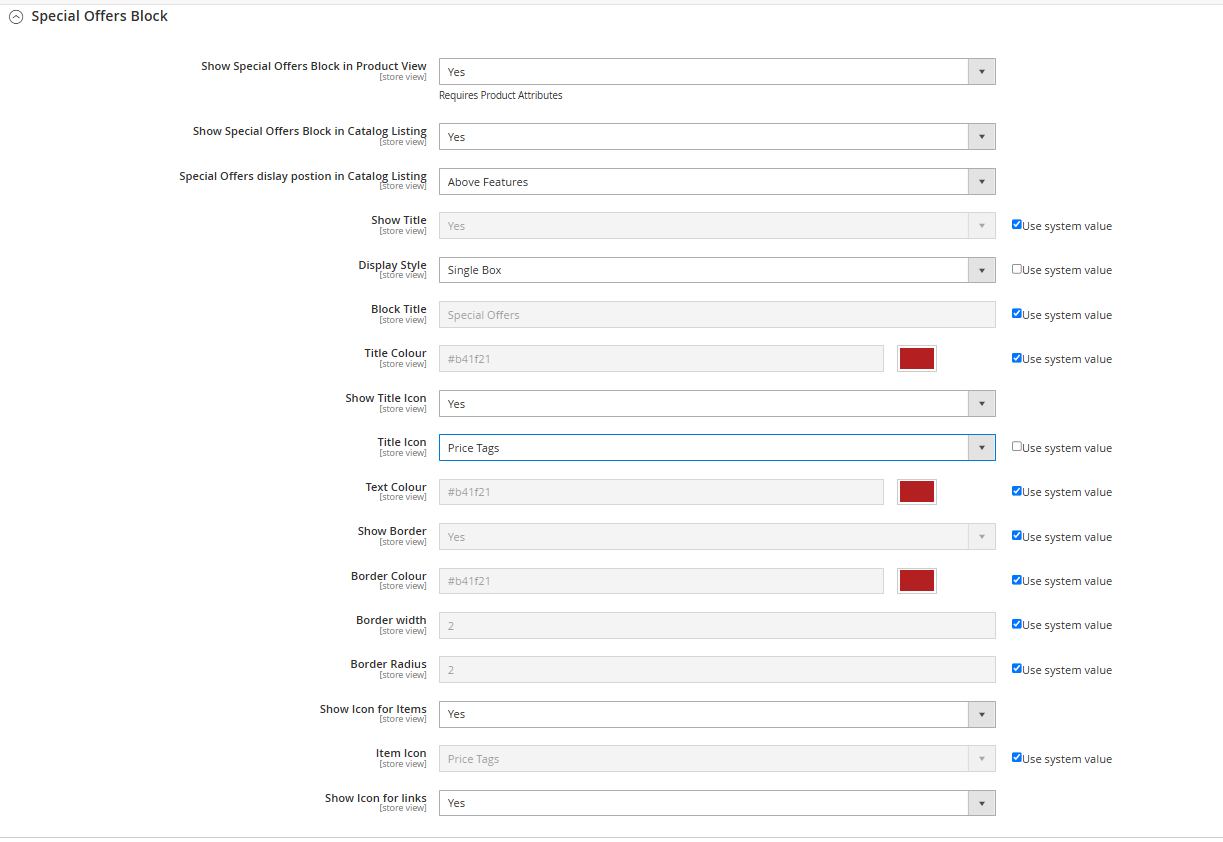
Special Offers Block Configuration (Field-by-Field Explanation)
This configuration panel allows you to control the appearance and behaviour of the Special Offers Block on product and catalogue pages.
Visibility & Positioning
-
Show Special Offers Block in Product View
Enables or disables the Special Offers block on individual product pages. Requires that the appropriate product attributes are set. -
Show Special Offers Block in Catalogue Listing
Controls whether the block appears on catalogue listing pages (e.g., category views). -
Special Offers display position in Catalogue Listing
Defines where the block appears relative to other product details. Options include "Above Features" or "Below Features".
Title and Display Style
-
Show Title
Toggles the visibility of the Special Offers block title. -
Display Style
Choose how the offers are displayed:-
Single Box: All offers are grouped in one styled container.
-
Individual Boxes: Each offer is displayed in a separate box with its own border.
-
-
Block Title
Set the text that appears as the heading for the block, e.g., “Special Offers”. -
Title Colour
Choose the colour of the block title text. -
Show Title Icon
Enables an icon next to the block title. -
Title Icon
Select an icon to display beside the title. Options include Price Tags, Thumbs Up, Tick, Recycle, etc.
Offer Content Styling
-
Text Colour
Defines the colour used for the offer text within the block. -
Show Border
Enables a border around each offer (or the entire block, depending on the Display Style). -
Border Colour
Sets the colour of the border. -
Border Width
Determines how thick the border line appears (in pixels). -
Border Radius
Controls the roundness of the corners on the offer box(es). Higher values result in more rounded corners.
Icons for Offers and Links
-
Show Icon for Items
Displays an icon before each individual offer item (not just the title). -
Item Icon
Choose the icon used for each item (same list of options as the Title Icon field). -
Show Icon for Links
If links are included in your offer content, this option toggles whether an icon should appear next to those links.
After making changes, press save config in the top right of the magento dashboard,
A cache flush may be required before changes are reflected on the website. This can be done by navigating to System > Cache Management from the left hand menu
Adding Images to Sub-Category Pages in Magento
This guide explains how to add images to your sub-category pages, giving your customers a more visual and intuitive navigation experience. The process is straightforward and requires minimal effort to set up.
Step 1: Log in to Magento’s Backend
-
Open your browser and go to your admin panel.
Example:mywebsite.co.uk/cssadmin -
Enter your provided username and password.
Step 2: Navigate to Categories
-
In the left-hand menu, go to Catalogue > Categories.
-
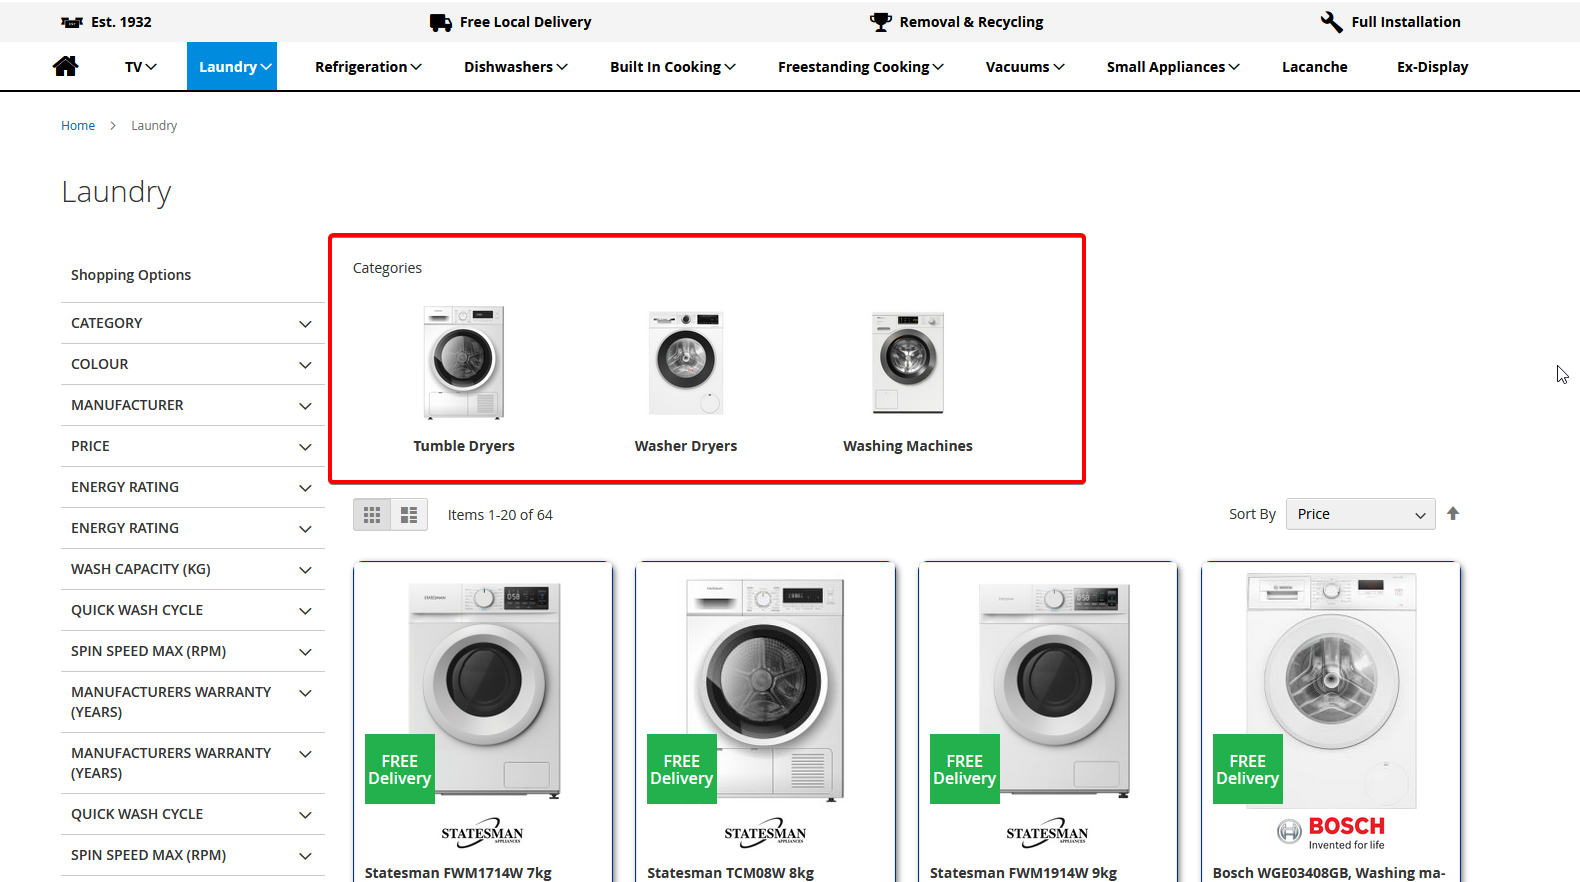
Select the parent category you want to enhance (e.g., Laundry).
For example, if “Laundry” has child categories such as Washing Machines, Washer Dryers, and Tumble Dryers, you can assign images to each child category.
Step 3: Add an Image
-
With your chosen category selected, expand the Content section.
-
Locate the image box. You can either:
-
Click the box and upload an image from your local computer, or
-
Drag and drop the image file directly onto the box.
-
Image guidelines:
-
Use square images for the best results.
-
Recommended maximum size: 300 × 300 pixels.
-
Format: JPG or PNG.
Step 4: Save Your Changes
-
Once the image has been added, click Save at the top right.
Step 5: Clear Magento’s Cache
-
Go to System > Cache Management.
-
Click Flush Magento Cache.
Step 6: View on the Frontend
After the cache is cleared, the images you’ve added will appear on the front end of your website, enhancing your category navigation.
Enhancing the Date Picker with AM/PM Delivery Slots
This enhancement adds AM/PM delivery slots to the Date Picker module.
Note: The Date Picker module is a chargeable feature and requires NCompass Engineer Area Management AND WebPresence Delivery Datepicker Modules to function.
If you do not currently offer delivery dates on your website but wish to start doing so, please contact the admin team by clicking the provided button link.
Before You Begin
-
If you do not have the Date Picker set up, please follow the setup documentation before continuing.
Reach out to support@findesolutions.com to obtain the most up-to-date setup guide. -
If you already have the Date Picker installed and are familiar with configuring shipping options in NCompass, you can proceed with the steps below.
Step 1: Navigate to Shipping Options
-
Open NCompass.
-
Go to Field Calls > Shipping Options.
You should already see existing services such as AM and PM delivery options (if previously set up).
Step 2: Create Additional AM/PM Services (if needed)
If you’d like to add new AM/PM delivery services:
-
Duplicate an existing service, such as Next Day Delivery or Anytime.
-
Rename the duplicated service to represent the new time slot (e.g., Next Day AM or Next Day PM).
-
Associate a new delivery product with each new shipping option you create.

Step 3: Configure “Schedule As”
Within the Shipping Option Detail tab:
-
Locate the Schedule As field.
-
Select the appropriate option:
-
AM Anytime
-
PM Anytime
-
This ensures the slot is categorised correctly.

Step 4: Result on the Website
Once configured:
-
The new AM/PM delivery options will appear alongside existing shipping methods at checkout.
-
Availability logic:
-
AM/PM slots are only offered if engineers are available for those slots in NCompass.
-
The Anytime option always appears, as long as there are delivery points available for that day.
-
Google Promotions ID
This guide explains how to associate products in NCompass with the promotion_id attribute required for Google Merchant Center promotions. This allows you to run targeted promotions for groups of products as outlined in Google’s documentation:
Google Merchant Promotions - About the promotion_id attribute
Step 1: Create the promotion_id Attribute in NCompass
To begin, you need to create a new attribute that links products to Google’s promotion_id.
Instructions:
-
Log in to NCompass.
-
Navigate to Department Management.
-
Highlight the "All Departments" category.
-
Click the Web tab.
-
Select Define Features.
-
In the new window, click Create New and enter the following details:
Field Value Display Name Google Promotion ID [Hide] Use as Filter Unchecked Display Priority -1 Feature Type Dropdown Map To Web Attribute ID googlepromoid
💡 Tip: The
[Hide]tag in the Display Name ensures this feature doesn’t appear on the frontend filter panel.
Video Walkthrough
A short video demonstrating how to create this attribute in the Department Administration panel is available below.
Step 2: Assign Promotion IDs to Products
Once the attribute is created, you can assign promotion IDs to individual or bulk product listings using the new googlepromoid field either through ncompass price import facility, OR assigning the feature manually on a product level basis. If you require further information on how to manage your price imports , or managing features on products, please reach out to our support email on support@findesolutions.com
Once you syncronise products to your website with the value inside that attribute, these will correctly display in the merchant feed with a promotion_id value against the product
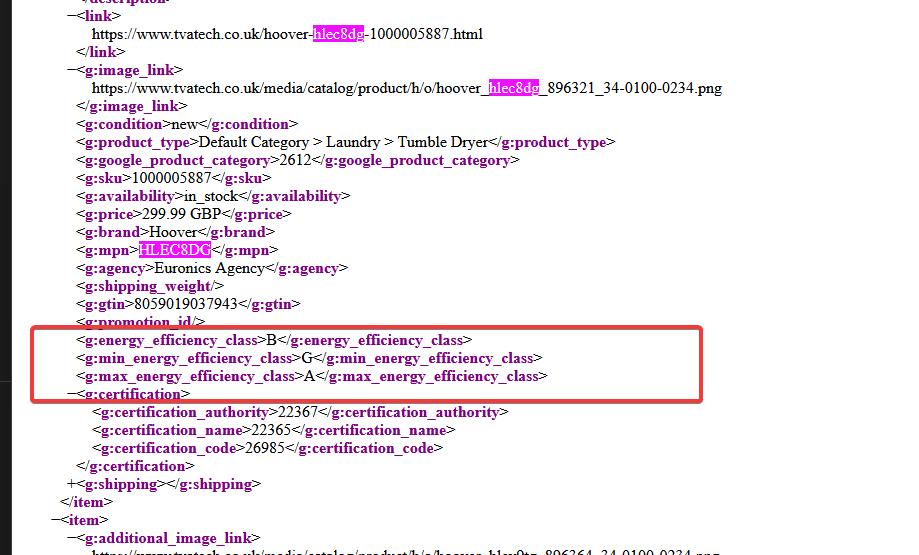
Min/Max Energy Efficiency Class Google Feed Support
Where you might not be using our energy rating service (this would be setup for you as part of this energy rating service which is a chargeable module) you can reach out to admin@findesolutions.com to find out more information on this.
This setup enables your Google product feed to include the following optional energy efficiency attributes, which are used to define the range of energy classes available for a product:
-
min_energy_efficiency_class: Indicates the lowest energy efficiency class within the product range.
Example:"min_energy_efficiency_class": "D" -
max_energy_efficiency_class: Indicates the highest energy efficiency class within the product range.
Example:"max_energy_efficiency_class": "A++"
These values help Google display more detailed energy information for applicable products, improving compliance and visibility in search results.
1. Attribute Configuration Instructions
To enable this in your system:
-
Open NCompass and navigate to: Administration >Department Management
-
Select the "All Departments" category.
-
On the right panel, click on "Web".
-
Scroll down to "Define Features".
-
Click "Create New" from the central list of buttons.
Fill in the following fields:
-
Display Name:
Energy Rating Group -
Use as filter: Unchecked
-
Display Priority:
-1 -
Feature Type:
Free Text -
Map To Web Attribute ID:
energyrating_eprlgroup
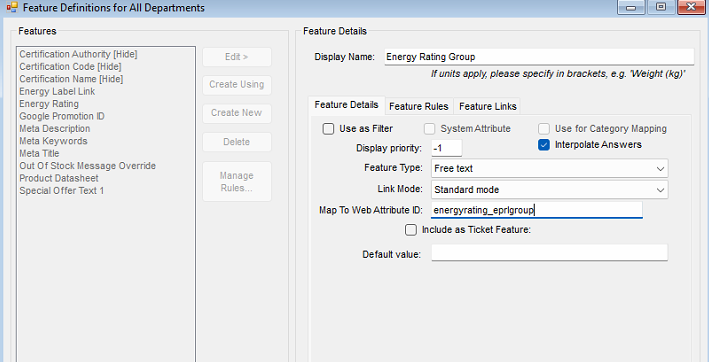
-
Click Save.
2. Applying Energy Rating Values to Products
Once set up, assign values based on the energy class range used:
| Range Used | Value to Input |
|---|---|
| A to G (newer scale) | 2019 |
| A+++ to D (older scale) | 2013 |
-
Apply the relevant value to the Energy Rating Group feature for each product like so.
Under the Product Information > Web tab for the item, locate the new feature created, and populate with the required value.
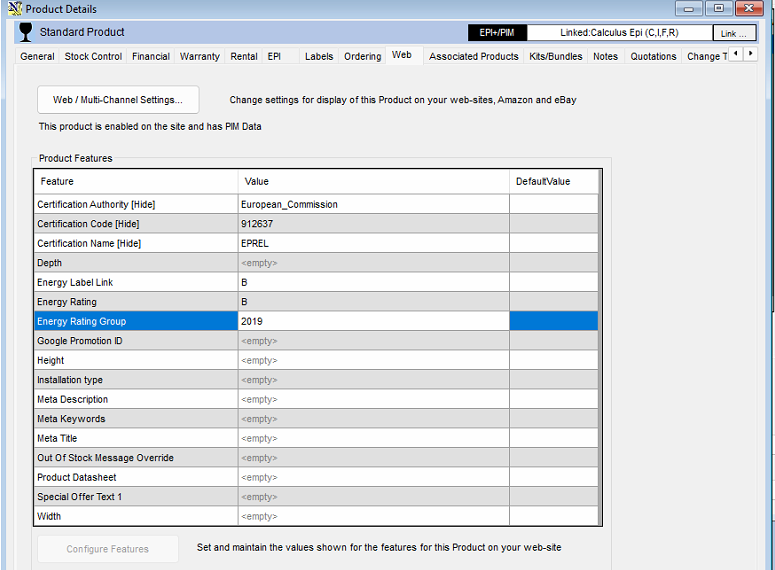
This will then appear in the feed like the following for use by google merchant centre, or any other agency required to use the min/max efficiency class.
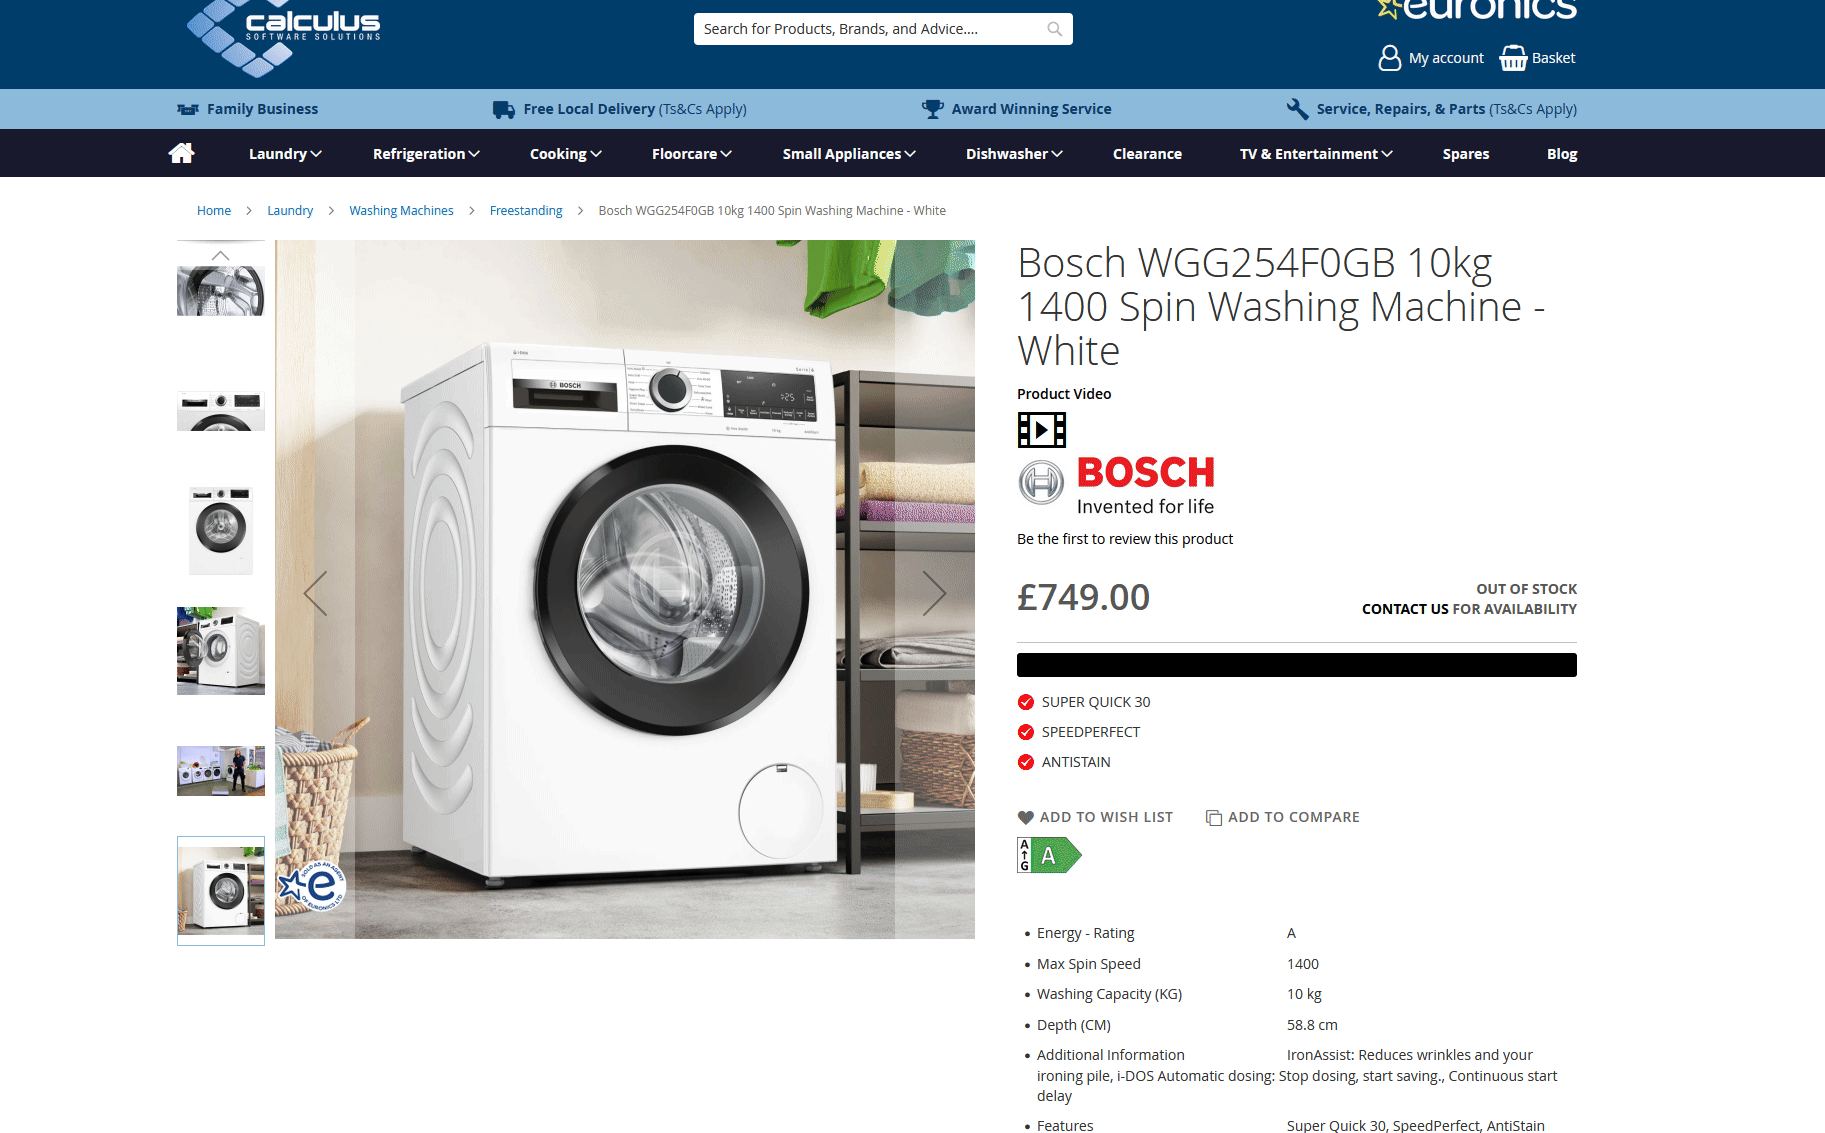
Embedding videos on your product pages
This feature is not enabled by default. Please contact the web team and request this feature be enabled.
NOTE: The video will need to be uploaded to a third party hosting platform like Youtube or Vimeo. This cannot be achieved with the raw video file.
It is possible to embed a video on your product pages using the video's URL.
Step 1: Setup
Setup for this takes place in NCompass
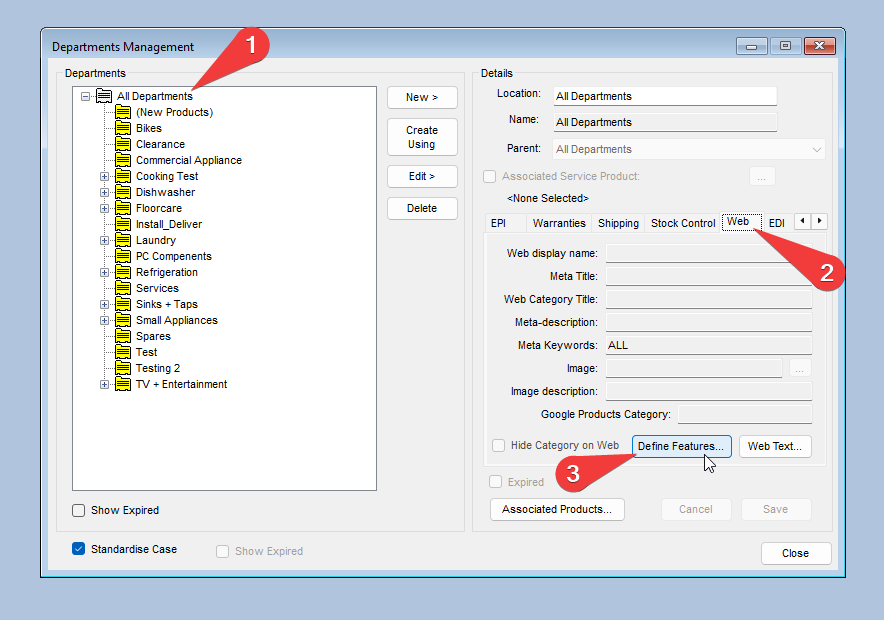
In this window create a new feature using the Create New button.
Populate the following fields befroe pressing Save
| Field | Value |
| Display Name | Video URL |
| Use as Filder | Unchcked |
| Display Priority | -1 |
| Featur Type | Free Text |
| Map To Web Attribute ID | video_url |
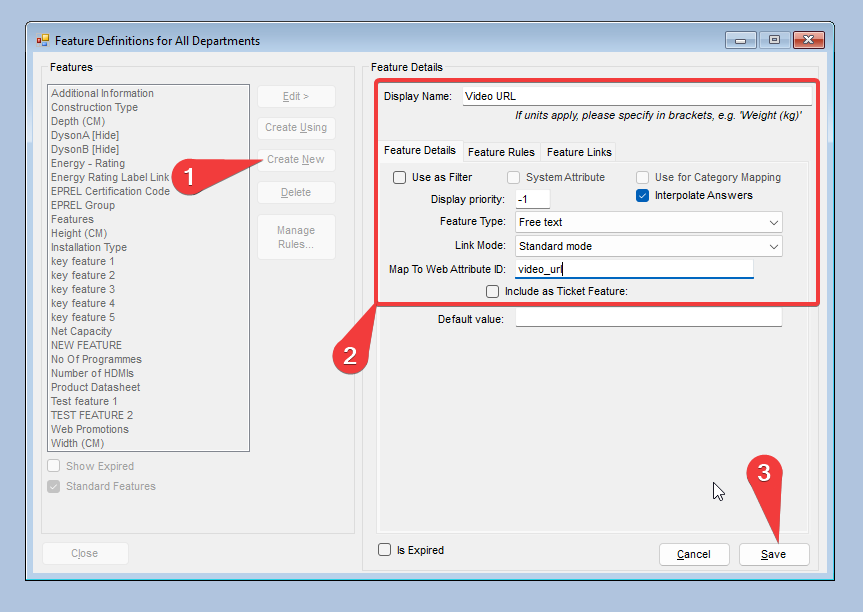
Setup Complete
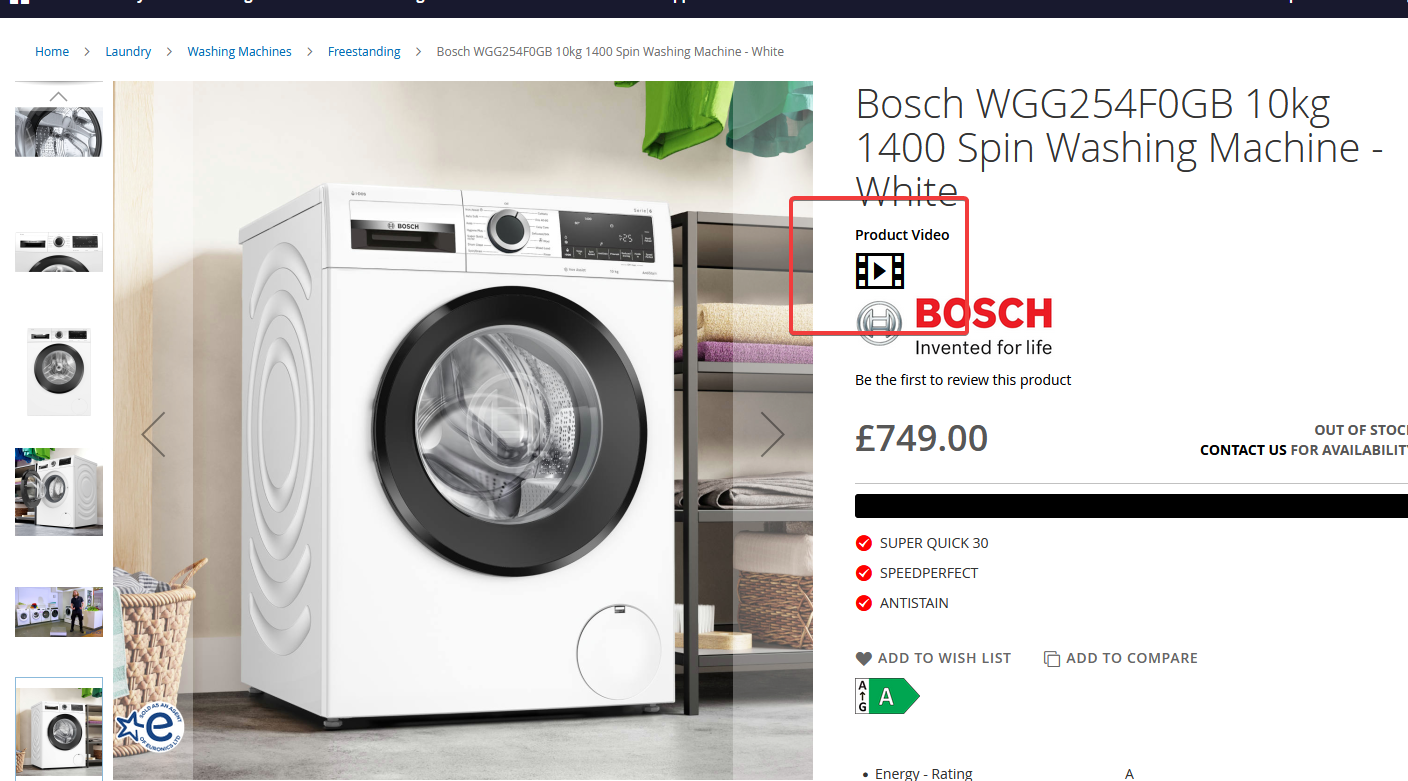
Step 2: Linking My Video
As the warning at the top of this guide states, you can only embed a video URL to your product pages. We do not currently support the upload of RAW video files.
Press Edit and then select the Custom Value: radio button, pasting in the URL for your hosted video
NOTE: If you are using a YouTube video you will need to use the /embed URL instead of the stardard /watch URL found in the address bar.

Once your product has synced to the website you will not see a video icon on the product display page which will open a popup containing your video.
Magento Email Change Request
This guide explains where staff should check and update email addresses in Magento Admin when a customer requests an email-address change for their website.
Purpose
Customer email changes can affect several different parts of a Magento site. Some email addresses control outgoing transactional emails, some receive form submissions, and some are only visible content shown in the footer or store-location pages.
Use this guide as a checklist so the requested email is updated in the right places and existing unrelated email addresses are not changed by mistake.
Before You Start
- Confirm the old email address and the new email address in writing from the customer.
- Ask whether the change is for visible website content, outgoing email senders, form recipients, or all of these.
- Check the correct store view or website scope before saving configuration changes.
- If the site has multiple store locations, check each relevant location block or page separately.
- Take a screenshot or note the original value before changing live configuration.
Quick Checklist
- Stores > Configuration > Sales > Sales Emails.
- Stores > Configuration > General > Store Email Addresses.
- Stores > Configuration > General > Contacts, if the Contact Us form recipient needs changing.
- Calculus custom form modules, such as Multi Buy, Product Enquiry, In Stock Alert, and Product Quote Request.
- Content > Blocks filtered by footer, if the email appears in the website footer.
- Content > Blocks searched by email, if the email appears on store-location content.
- Content > Pages searched by the old email address, if no matching CMS block is found.
- Frontend QA and cache flush after saving.
Core Magento Email Locations
Start with the standard Magento configuration. These settings control most of the normal email behaviour on the site.
Sales Emails
Magento Admin path: Stores > Configuration > Sales > Sales Emails.
Check this area when the customer asks about order confirmation, invoice, shipment, credit memo, or sales update emails.
Open the correct scope from the top-left scope selector before editing.
Check each expanded section under Sales Emails, including Order, Invoice, Shipment, Credit Memo, and their comment/update sections.
Look for Sender, Send Order Email Copy To, Copy Method, Enabled, and Template fields.
If the field uses an Email Sender identity, update the actual email address under Store Email Addresses rather than only changing Sales Emails.
Save Config when complete.
Store Email Addresses
Magento Admin path: Stores > Configuration > General > Store Email Addresses.
This is the main place to update sender identities used by Magento and by many custom modules.
Check General Contact, Sales Representative, Customer Support, Custom Email 1, and Custom Email 2.
Update both Sender Name and Sender Email where the customer has asked for a full identity change.
Make sure the scope is correct. Some sites use different sender emails per website or store view.
Save Config after changing the values.
Contact Form Recipient
Magento Admin path: Stores > Configuration > General > Contacts.
Check Email Options > Send Emails To if the standard Magento Contact Us form recipient needs changing.
Check Email Sender if the customer wants the outgoing sender identity changed.
Save Config when complete.
Calculus Custom Modules
Some sites have custom enquiry forms that send emails to specific recipient fields. If the customer uses any of these frontend forms, check their configuration as well as the core Magento settings.
The common pattern is that each module has a To Email field and an Email Sender field. To Email controls where the form submission goes. Email Sender usually points to one of the Store Email Addresses identities.
Common Module Checks
Calculus > Multi Buy > Multi Buy Module Configuration: check To Email and Email Sender.
Calculus > Product Enquiry > Product Enquiry Module Configuration: check To Email and Email Sender.
Calculus > In Stock Alert > In Stock Alert Module Configuration: check To Email and Email Sender.
Calculus > Product Quote Request > Product Quote Module Configuration: check To Email and Email Sender.
Custom Module Notes
Only change a module if the site uses that form or the customer specifically mentions that enquiry type.
If a To Email field contains multiple email addresses, keep the existing comma-separated format and only replace the address requested.
If Email Sender is set to Sales Representative, Customer Support, or another identity, update that identity under Store Email Addresses if needed.
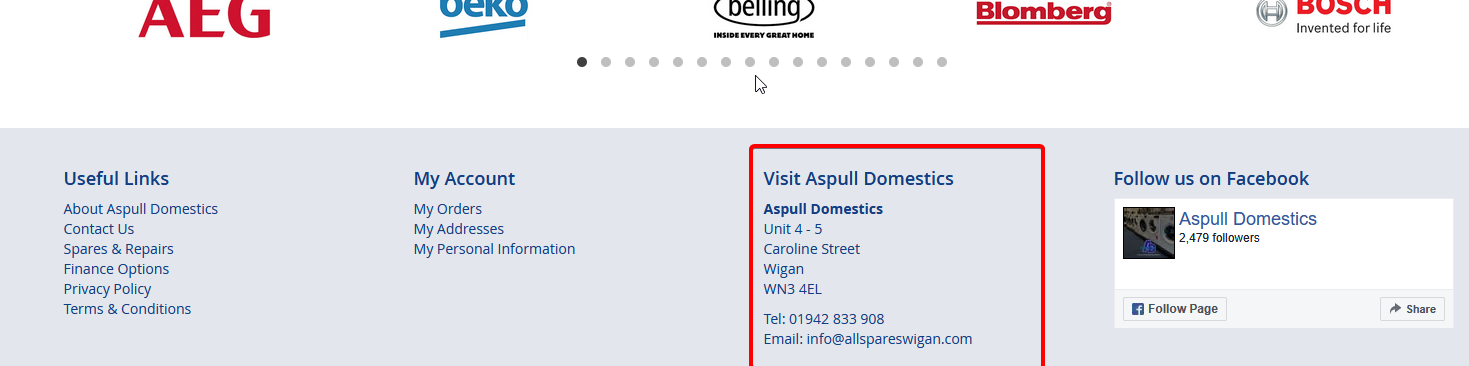
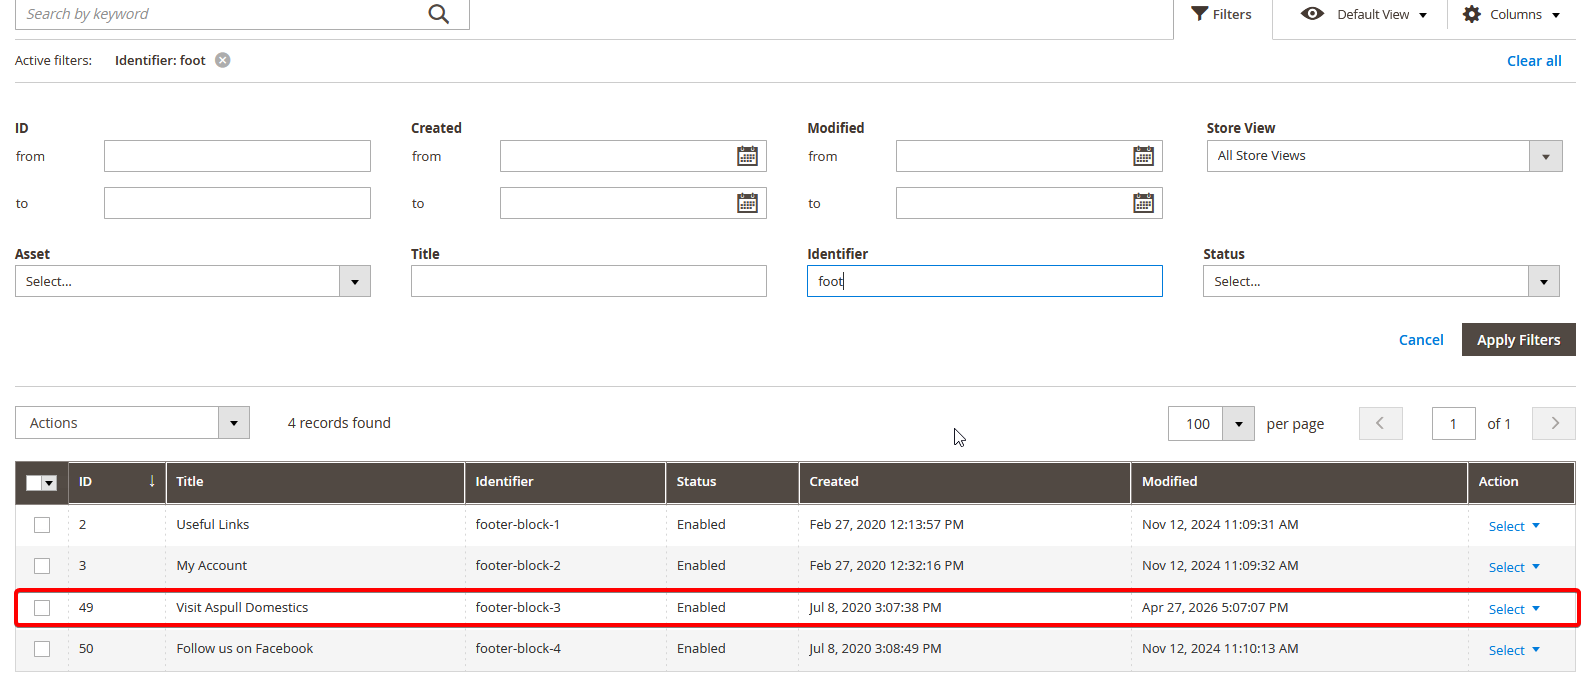
Footer Email Content
Magento Admin path: Content > Blocks.
Use this when the email address appears in the footer of the website, such as a store address block with telephone and email details.
1. Open Content > Blocks.
2. Use Filters and search Identifier for footer.
3. Compare the block Title with the footer section on the frontend. For example, a visible footer title such as Visit Aspull Domestics may correspond with a block like footer-block-3.
4. Open the matching block.
5. Search the block content for the old email address.
6. Update both the visible email text and any mailto: link if present.
7. Save the block.
CMS Blocks grid filtered by Identifier footer and matched by block Title.
Store Location Email Blocks
Magento Admin path: Content > Blocks.
Store pages and location sections are often built from CMS blocks. If the customer has multiple store locations, each location may have its own email block.
1. Open Content > Blocks.
2. Search by keyword email.
3. Open every relevant location block, such as Location Store 1 Email.
4. Check whether there are multiple location blocks for the customer.
5. Update the visible email address and any mailto: link in each block that should change.
6. Do not change other branch emails unless the customer requested those as well.
7. Save each changed block.
Screenshot placeholder: CMS Blocks keyword search for email showing location email blocks.
CMS Pages
If the email cannot be found in a CMS block, also check CMS pages.
Go to Content > Pages.
Search for the old email address or the store/location name.
Open matching pages and check PageBuilder, HTML, and inserted CMS block references.
Update visible text and mailto: links where required.
Saving And Cache
After configuration changes, select Save Config.
After CMS block or page changes, select Save.
Flush Magento cache if the frontend does not update straight away.
If the site uses LiteMage or another full-page cache, clear that cache as well.
Recommended QA Before Closing The Request
Check the frontend footer on desktop and mobile.
Check every store-location page that was changed.
Click visible email links and confirm the mailto: address is correct.
Submit a safe test on affected enquiry forms if the recipient email was changed and the customer expects form routing to change.
Check a Magento transactional email only where the customer requested sender changes for sales emails. (An old sales order can be located placed by a company address and you can trigger this by opening the order, and clicking "Send Email" at the top this might take up to 15 minutes to arrive in the receipients email inbox)
Confirm the old email address is no longer present in the changed CMS blocks or configuration areas.
Troubleshooting
If the frontend still shows the old email, flush Magento cache and any full-page cache, then check the correct store view was edited.
If an email sender still shows the old address, check Store Email Addresses for the identity selected in Sales Emails or the custom module.
If form submissions still go to the old address, check the module To Email field rather than only the sender identity.
If there are several store locations, search Content > Blocks for email and review every location-specific block for "email".
Useful Admin Paths
Stores > Configuration > Sales > Sales Emails.
Stores > Configuration > General > Store Email Addresses.
Stores > Configuration > General > Contacts.
Calculus > Multi Buy.
Calculus > Product Enquiry.
Calculus > In Stock Alert.
Calculus > Product Quote Request.
Content > Blocks.
Content > Pages. (if the email is presently on any cms pages THIS IS WORTH CHECKING)