WAS - Stock Number Mode
This is a guide to cover the warehouse application in Stock Number mode.
Pick to Tray and Stock Bins have been excluded from this guide, if you have been trained on these areas then please refer to the guide you were provided at time of training.
- Getting Started
- Goods In
- Supplier Collection
- Manual Store
- Bulk Move
- Stock Take
- Load Vans
- Picking Jobs
- Unload Vans
- Order Collection
- Stock Count
- Stock Management
- Print Queued Labels
- Listed Item Swapping
- Updates, Queue, and Settings
- Item Lists
- Customising Menus
- Transfers
- SLAM and Load Carrier
Getting Started
Introduction
The Warehouse and Stock Application (WAS) is a powerful tool designed to assist warehouse operatives with stock management.
Companies of all sizes can benefit from using the app, whether you operate a manned or unmanned warehouse, or store stock within a retail shop. WAS makes stock management easy and efficient.
The current version of the app supports the following stock management processes:
- Goods In – capturing images, item condition, and serial numbers.
- Supplier Collection – tracking supplier returns and marking them as collected.
- Manual Store – storing items in barcoded locations.
- Bulk Move – moving multiple items between locations.
- Stock Take - stock take on fully tracked items and their locations.
- Load Vans – picking stock for in-house vans and external carriers.
- Picking Jobs - picking stock for in house vans and external carriers by location.
- Unload Vans – tracking unloading of collections and failed deliveries.
- Order Collection – completing customer collections with image and signature capture.
- Stock Count - stock count linking to the Desktop process.
- Stock Management – assign images, store serial numbers, change retail prices (configuration controlled), and reprint labels.
- Custom Menus - Manage users menus from NCompass, simplify or remove menu itesms on a user by user basis
Stock Swapping
Stock swapping is a feature that can be enabled on a per-user basis and is turned off by default.
When picking stock for vans, this feature allows the operator to pick the most accessible stock number, provided the model number matches.
If stock swapping is disabled, the operator must pick the exact stock number allocated to the sale.
Pallet Management
The pallet feature allows multiple items to be stored under a single pallet number.
Each item within the pallet still retains its own unique stock number, but individual labels are only printed if the pallet is split.
This feature is turned off by default and should only be used when items are stored on pallets or within outer cartons.
Automatic Transfers Within Branch
New Feature
This feature must be enabled in NCompass configuration.
When enabled, stock will automatically transfer between stock rooms and branches. For example:
- If an item is stored in a location locked to Stock
- And is then scanned into a location locked to Display
- The item will automatically move to the Display stock room
Warehouse Mapping
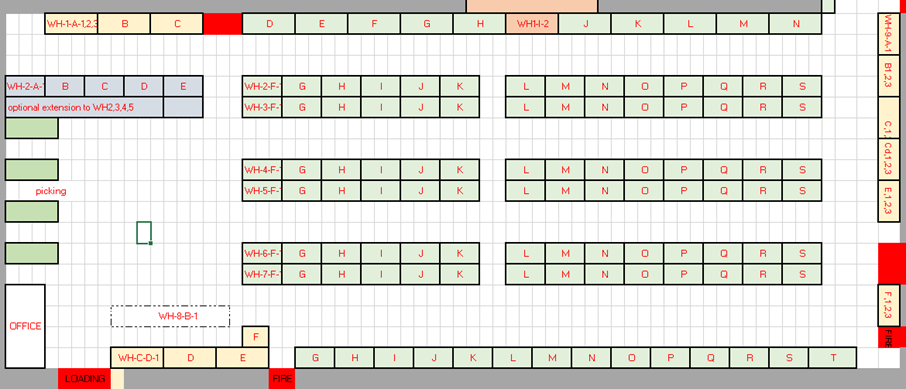
As part of the initial setup, an Implementation Engineer will typically visit your warehouse to advise on the best way to map your warehouse into stock locations.
They will:
-
Create stock locations within NCompass
-
Provide a document containing barcodes to print and place around the warehouse
-
Advise on barcode design depending on storage type (e.g. floor labels vs racking labels)

Stock Location Management
You can create your own stock locations; however, it is strongly recommended that you consult the Implementation or Support Team before making changes.
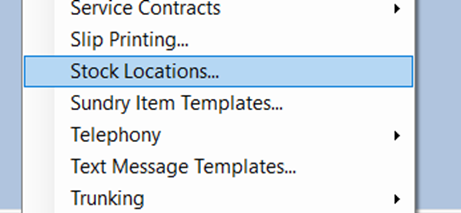
Administration > Stock Locations
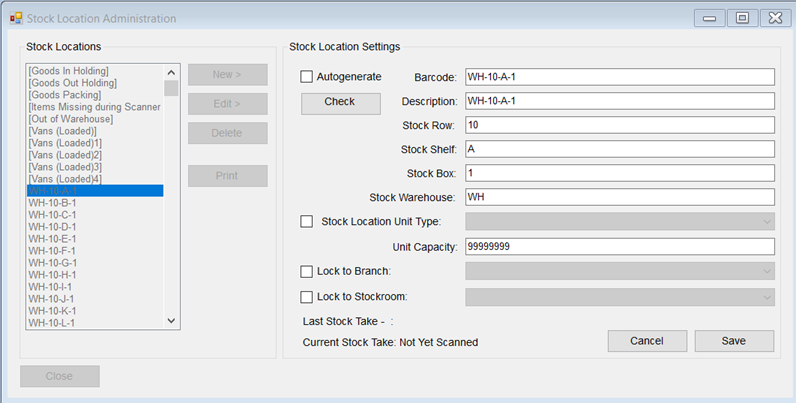
Creating a Stock Location
- Tick Autogenerate to automatically build a barcode.
- Enter a Description for the barcode.
- Enter a Stock Row.
- Enter a Stock Shelf.
- Enter a Stock Box.
- Enter a Warehouse Prefix.
- Enter a Unit Capacity (if required).
- Lock the location to a Stock Room if applicable.
- This is required for Automatic Transfers within branch.
- Click Check to confirm the barcode is unique.
- Click Save.
Starting the App
- Press the power button on the top of the handset to turn on the screen.
- Swipe up on the lock icon to unlock the device.
No PIN or pattern is required by default, although this can be configured in device settings.
Ensure the device has Wi-Fi or 4G connectivity, otherwise the app will not function.
The app icon is blue and displays a warehouse symbol.

Logging In
When you Log in for teh first time on WAS Version 2.10.0 or later, you will be prompted to setup a storage location for the Apps Log files
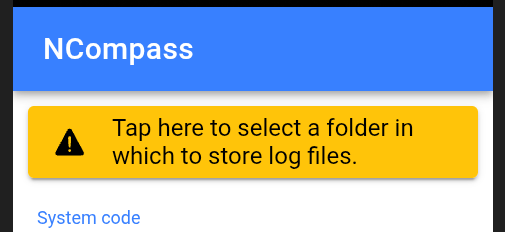
Click the 'Tap Here' Box and it will ask you to select a folder
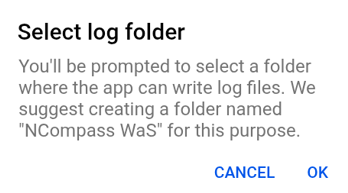
Click 'Ok'
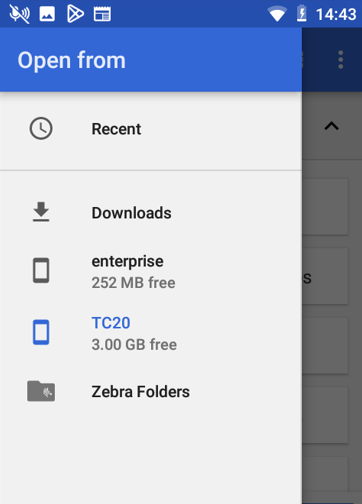
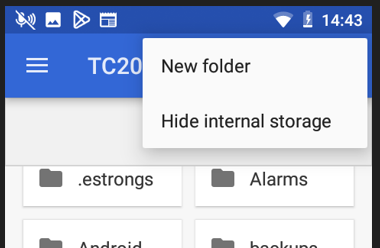
Then Select the new folder option form the menu ...
Eneter a suitable folder name and click 'OK'
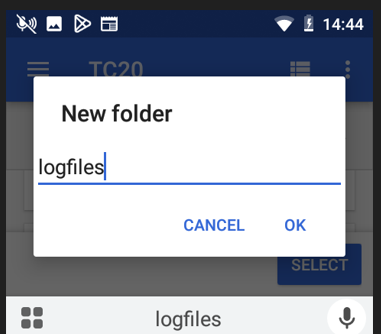
Then click 'Select'
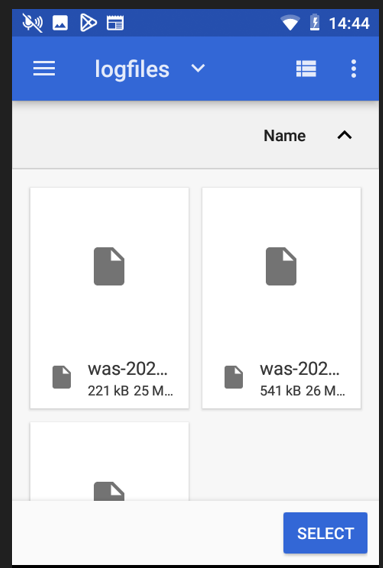
The APP will not ask again, unless teh device is reset
You must log in at least once per day for security reasons. It is recommended to log out at the end of each day.
In the latest release of NCompass, staff selection and PIN entry can be enforced. This ensures: All actions are logged against the signed-in user, Improved auditing and accountability.
Please contact the Support Team if you are interested in enabling this feature.
If you get a Salesperson prompt on the scanner when logging in, select yourself from the drop-down menu. If you have a password set up in NCompass input it or just click 'Confirm' to log in.
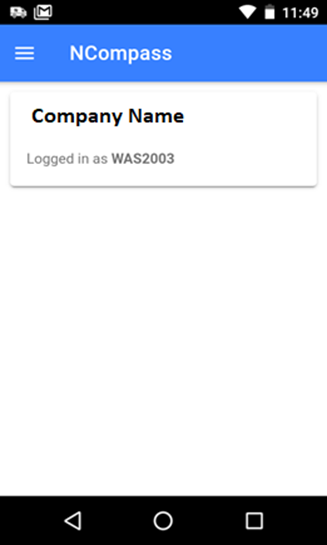
Tip: You can return to the home screen at any time. If another user needs to log in, simply scan their QR code to fast-switch users — no logout required.
Logging In With a Username and Password
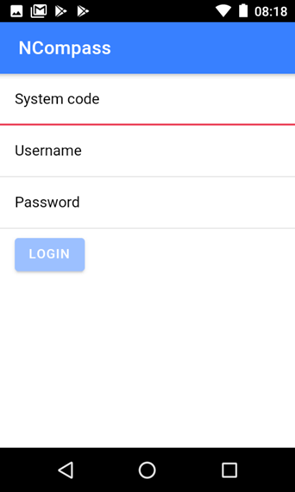
Where the login details are typed in rather than scanned from a QR code, the login screen has three fields - serial number, username and password. Password managers expect a login to be a username and a password, so the extra field stops them filling the login in.
The Username field now also accepts the System Code and the username entered together, separated by a backslash - the same format NCompass Anywhere uses:
SystemCode\UsernameExample:
34-0100-1234\JohnSmithEnter the password as normal. The serial number field can be left alone. The username and password are the same ones the user signs in to desktop NCompass with.
The System Code is the same value that goes in the serial number field. It is the same for everyone at your company, and is shown in desktop NCompass under Help > About NCompass, in the form 34-0100-1234.
Nothing has been taken away. The separate serial number field is still on the login screen and still works exactly as before, and QR code login is unchanged. Use whichever suits you - all three methods work side by side.
There is nothing to switch on for this. No configuration setting or licence change is needed, and it does not change who can log in or what they can do once they are in.
A screenshot of the updated login screen is still to be added - please capture one when reviewing.
Navigation
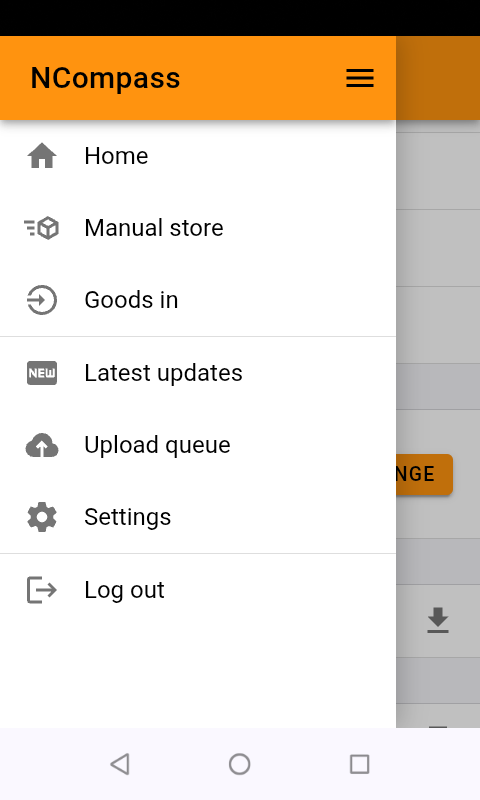
Access the full application menu by selecting the menu icon.

Tip: You can open the menu at any time while using the app to quickly switch processes.
Log Out
To Log Out when you are finished with the App:
- Click on the Menu Icon
- Scroll all the way to the bottom of the menu
- Click Log Out
Customising Menu items
The default setting for the APP will show all menu items, if you would like to limit the menu options, for Example, if you have a user that only needs to do goods in, you can set a custom menu, with just the items the user needs to complete is tasks, in this example, [goods in] and [manual store]
Administration > Menus
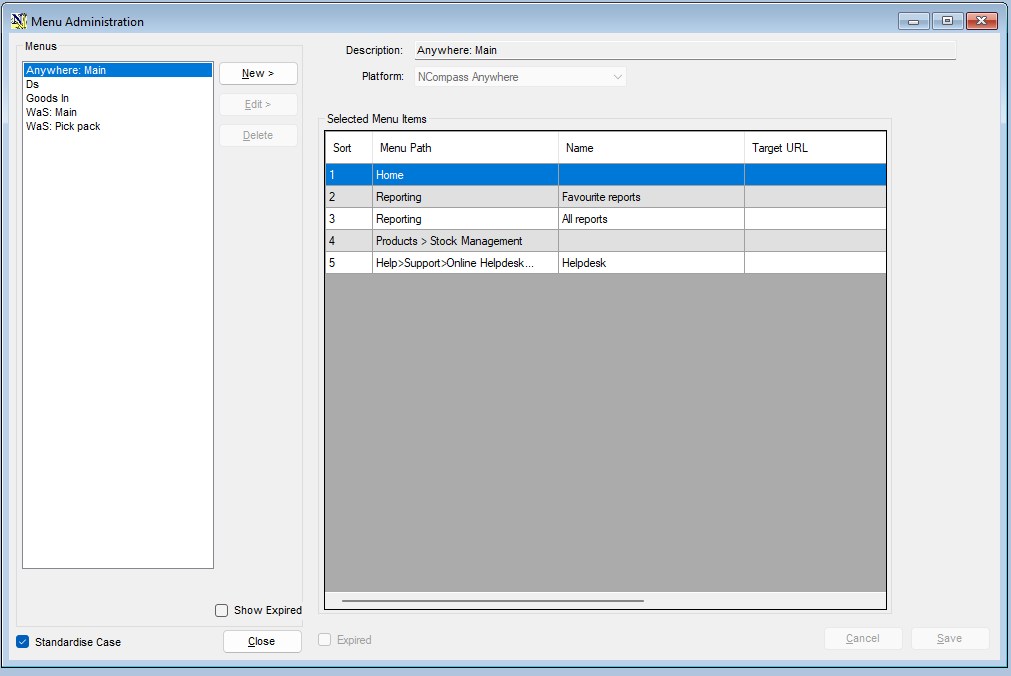
- Click New
Or
Note: Some Menus in the list are system default menus and cannot be edited or deleted
For New menus
- Enter a description for the Menu
- Select the platform the menu is for from the drop down list (WaS)

once the platform is selected you will be presented with a full list of the available menu items in the top list
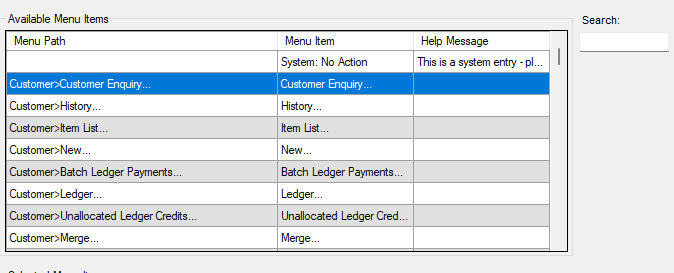
You can also each for the menu item with the search box
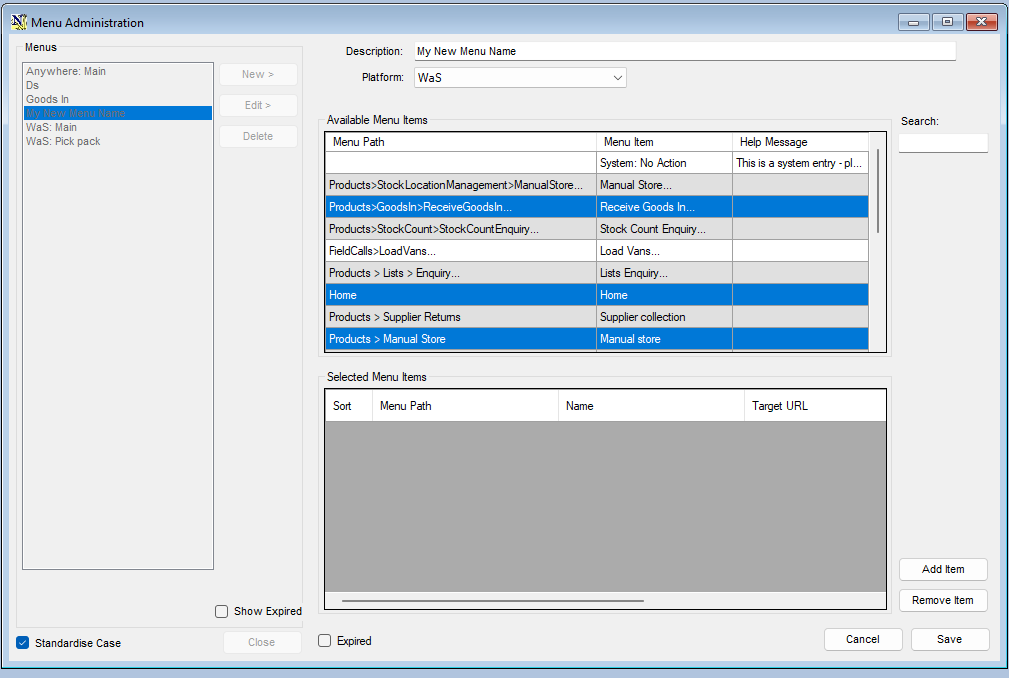
Click 'Add Item'
Click 'Save' When you your selection
Adding your menus to a workstation or User
This is done from
Tool > Configuration
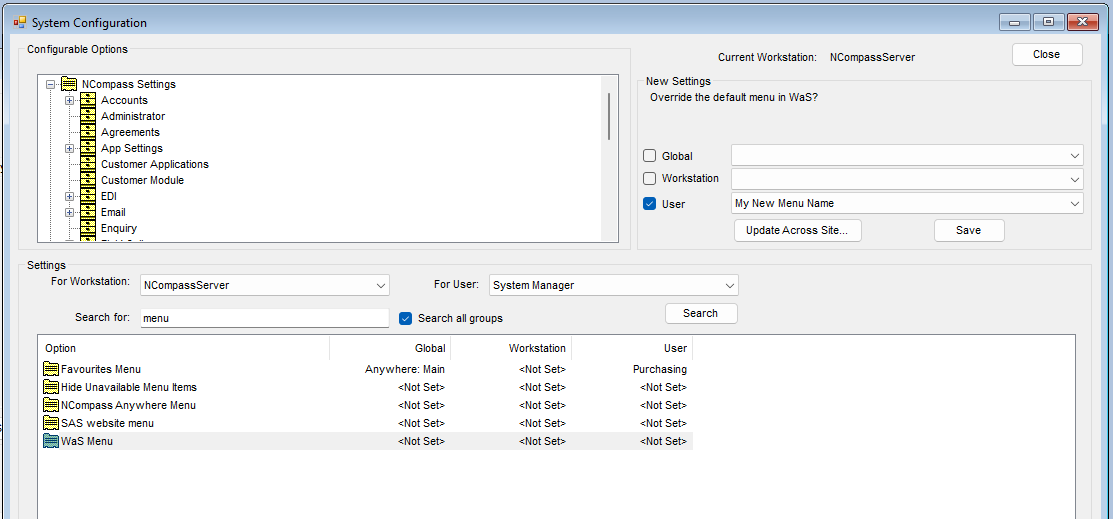
You can set the Menu at workstation or user level, As a WaS log in is normally tied to a workstation, it's usually best to set it at User Level
Your new setting will take place the next time the user logs out of WaS and logs back in, or you can force the update by going to the Scanners menu
Scroll down to the Data Section
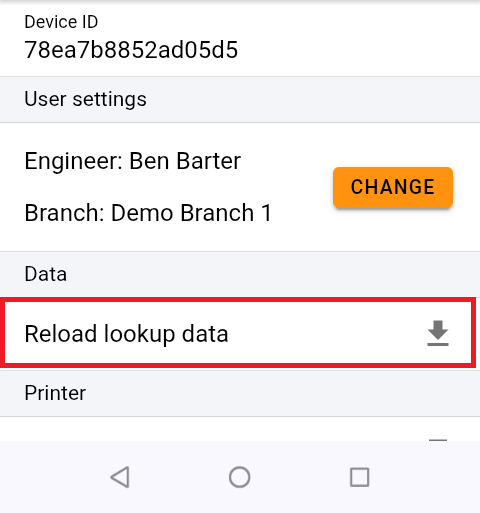
- Click on 'Reload Lookup Data'
Goods In
There have been some changes to streamline the goods in process. There is a new option for a Two Step Goods In which allows users to preemptively tell NCompass what items are going to be received into stock via the Purchase Orders.
This allows the Delivery Note, and the expected arrival date/date range to be pre-populated which means we can safely skip the Manifest step which can save a lot of time booking in stock. It pairs well with the wireless label printers too to massively reduce the risk of sticking the wrong label on a box. This would be our recommended solution but will require consultation with our Implementation department before using for the first time.
Settings
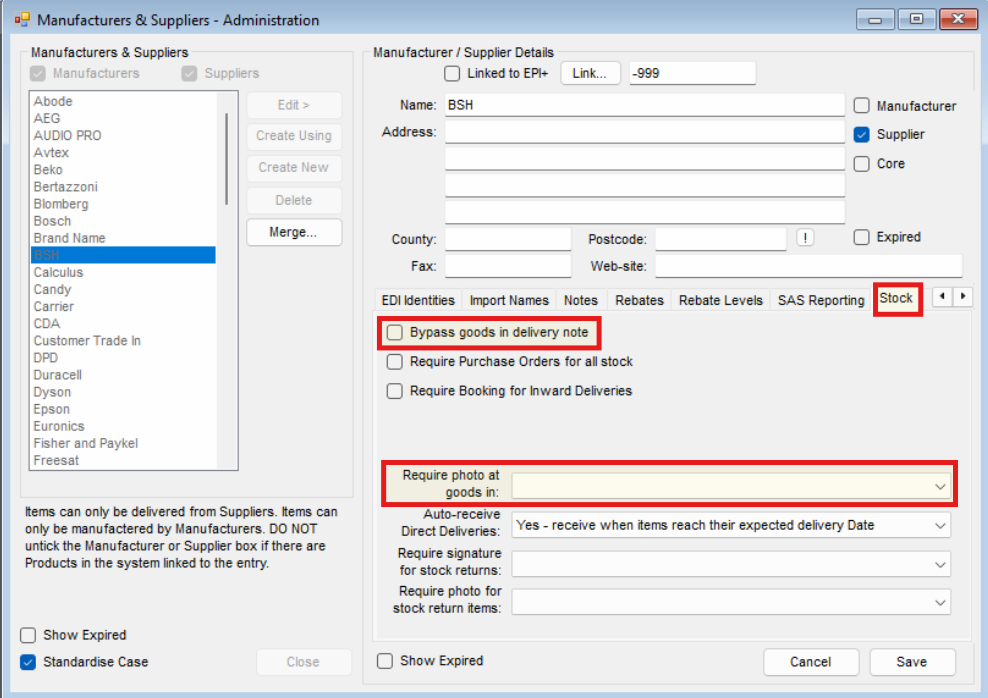
There are two settings to change the behavior in the app at Goods In which need to be done on a Supplier level:
- Bypass goods in delivery note - this refers to the Two Step Goods In, only select this IF you have had consultancy with Calculus as misuse will result in Goods In being blocked for the Suppliers with it set.
- Require photo at Goods In:
-
- Yes - Forces the user
- No - Skips the step
- Remind - Prompts the step
Goods In
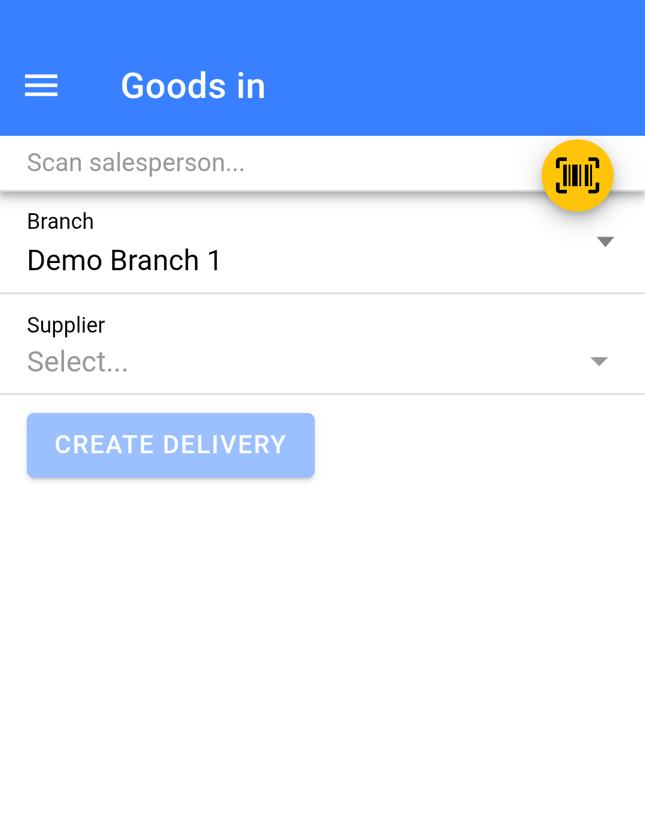
- Select a Supplier
- Leave the Date as today
- Enter or Scan the Delivery Note Number
- Click Create Delivery

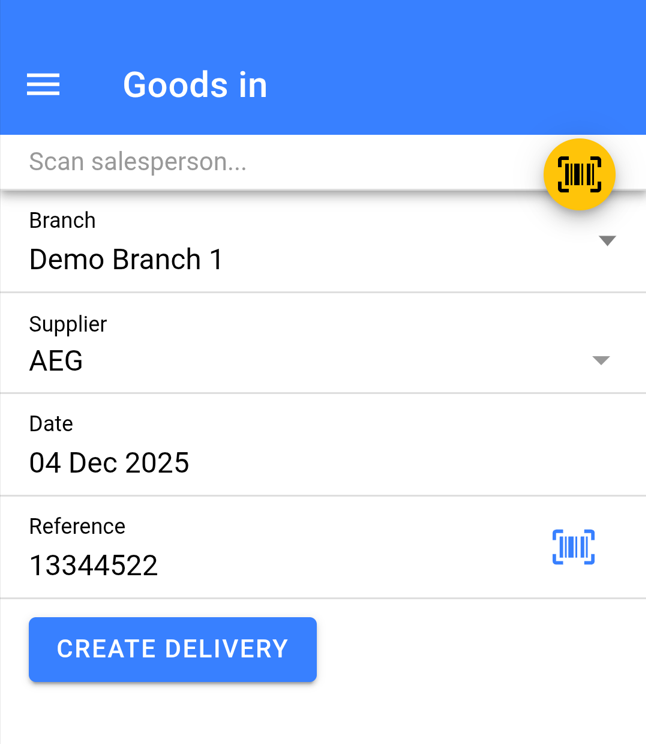
If the Supplier is enabled for Two Step Goods In (mentioned in the Settings Section) you will not be required to input a date or Delivery Note Number.
Add Products
If you are using Two Step Goods In as you scan the items EAN's the labels will print and stock booked in immediately at Step two bypassing the remainder of this guide.
If items are not in the list that you expected you will need to speak to the member(s) of staff who input the delivery note details before the stock arrives to resolve.
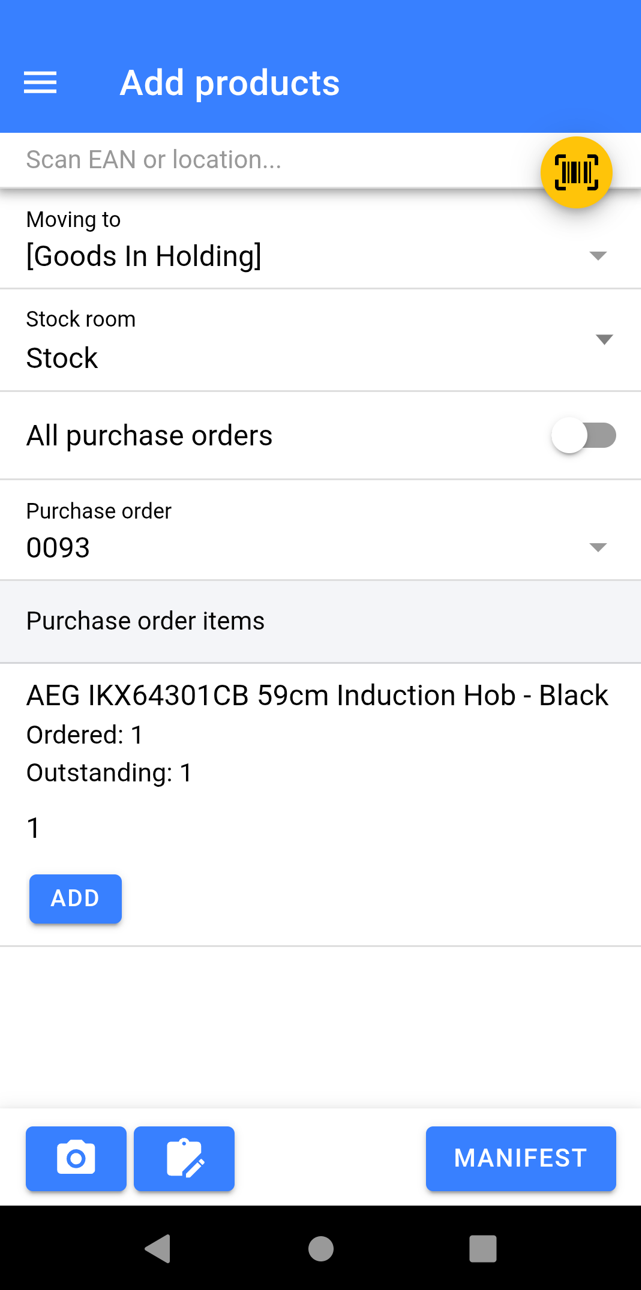
- If your process requires you to, scan a location barcode to store all the stock from the delivery into. All stock will default to be stored in [Goods In Holding] otherwise (recommended method). From 11.19: for count-only products you can scan a bin here and the count-only stock goes into it. If nothing is scanned, it goes into the Goods In default bin when one is set in NCompass (Configuration > Stock), and otherwise into no location, as before.
- Change Stock Room If required
- Select All Purchase Orders, if you wish to book in stock regardless of what PO the item links to.
- Select the Purchase Order numbers that you are receiving into stock on this Delivery Note. You can select multiple.
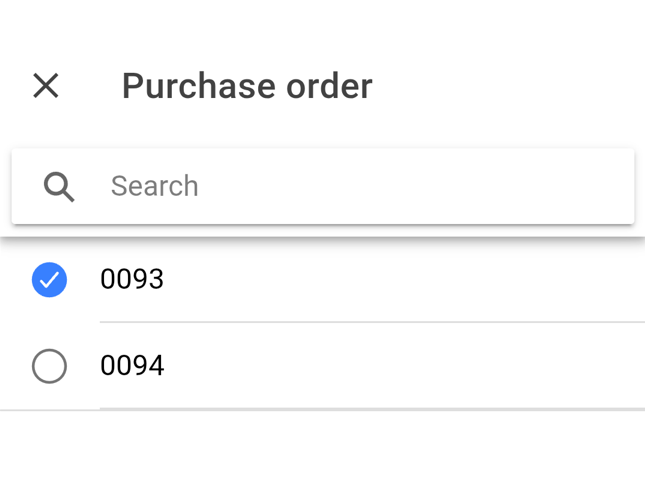
Booking in from all PO's does come with a risk as if the same item is outstanding on multiple PO's you are losing the ability to select which PO the item has been received in from.
You will now be presented with a list of the item(s) you are expected to receive into stock:
- Scan the EAN of the product which will book 1 into stock. It will also prompt for a Quantity to receive in.
Alternatively:
- Against each item in the list specify a quantity for those you have received and click Add
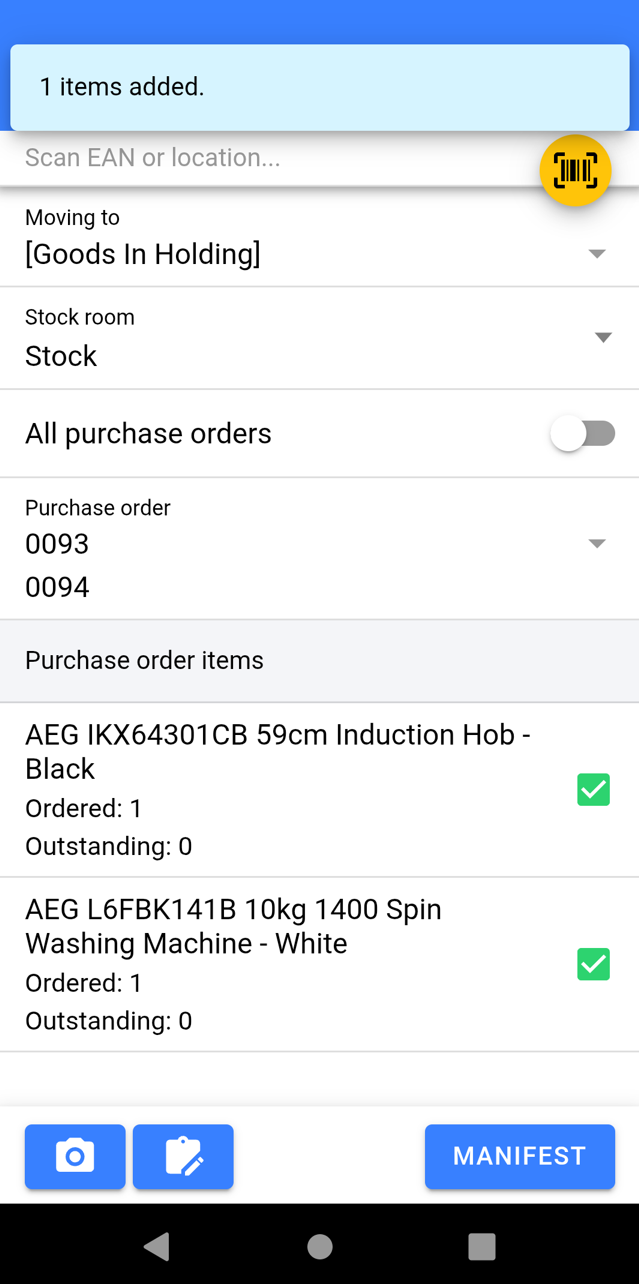
Once you have scanned/ Added all the items on the Delivery Note:
- Attach images if required, especially if there were any damages to goods.
- Click Manifest
Manifest
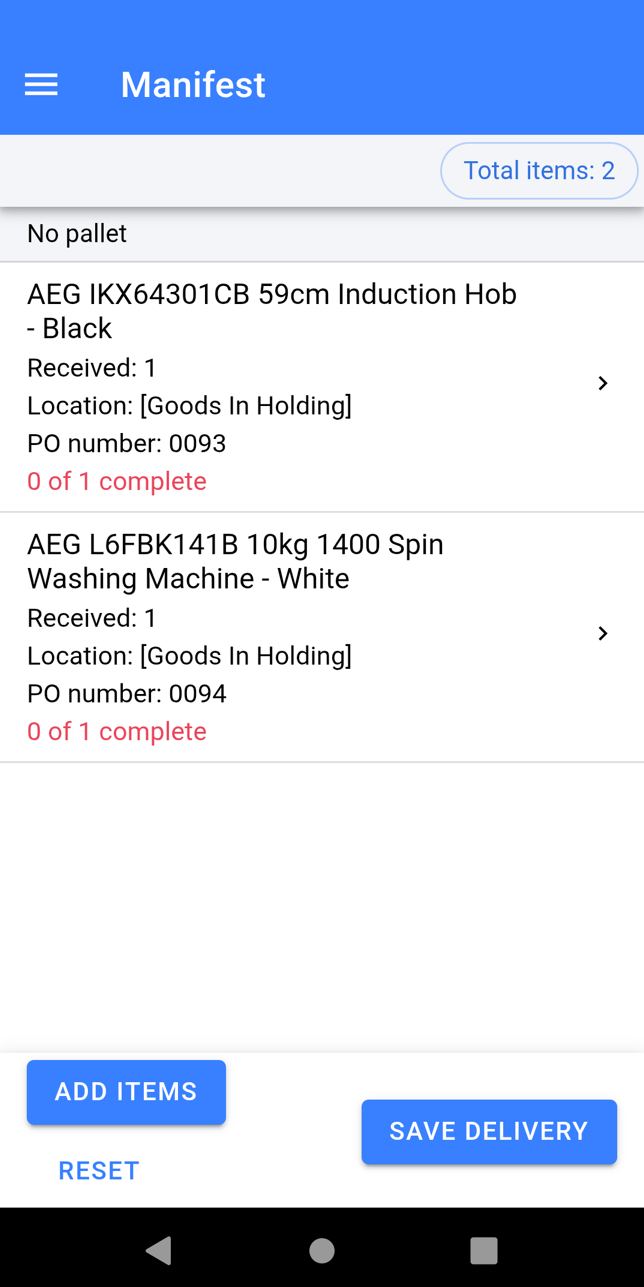
- Ensure the Total Quantity matches what you expected.
- Check the correct items have been booked in against paperwork/items you have physically received
If you have missed item(s):
- Click Add Items
If you have booked something in error:
- Click on the item and Swipe to Remove individual items or Click Remove All to get rid of all of the selected items quantity.
- Once you are happy the items in the Manifest are correct click Save Delivery. The items will now book into stock and the labels will print off to be stuck on the boxes.
Capturing Serial Numbers and Condition
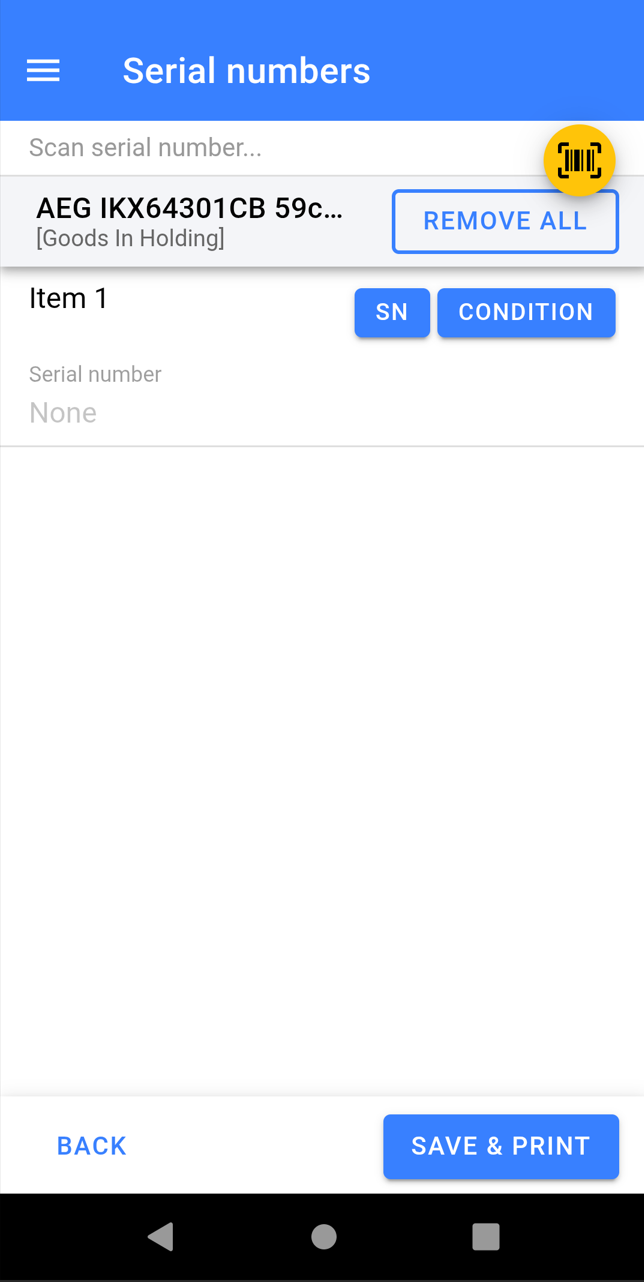
- Click on the item(s) you need to capture Serial Number/Condition for
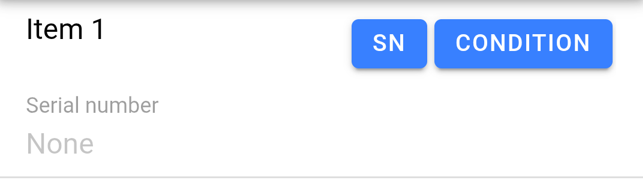
- Scan the Serial Numbers to Add them in, you do not need to click into each SN
- Click into the Condition Notes to Add Condition, Pricing, and Stock Number Specific Images.
- Once finished Click Save & Print
Supplier Collection
When raising a Supplier Return in NCompass you now have the option to mark the returned item as being collected by the Supplier at a later date. This is the advised option at point of raising the Return and can be defaulted in configuration. The Warehouse scanner supports marking the returned item as collected and can obtain evidence such as images, uplift numbers, and signatures during the process.
Settings
There are two settings to change the behavior in the app upon marking items as collected which need to be done on a Supplier level:
- Require signature for stock returns
- Require photo for stock returns
Each can be set to either:
- Yes - Forces the user
- No - Skips the step
- Remind - Prompts the step
Marking Returns as Collected
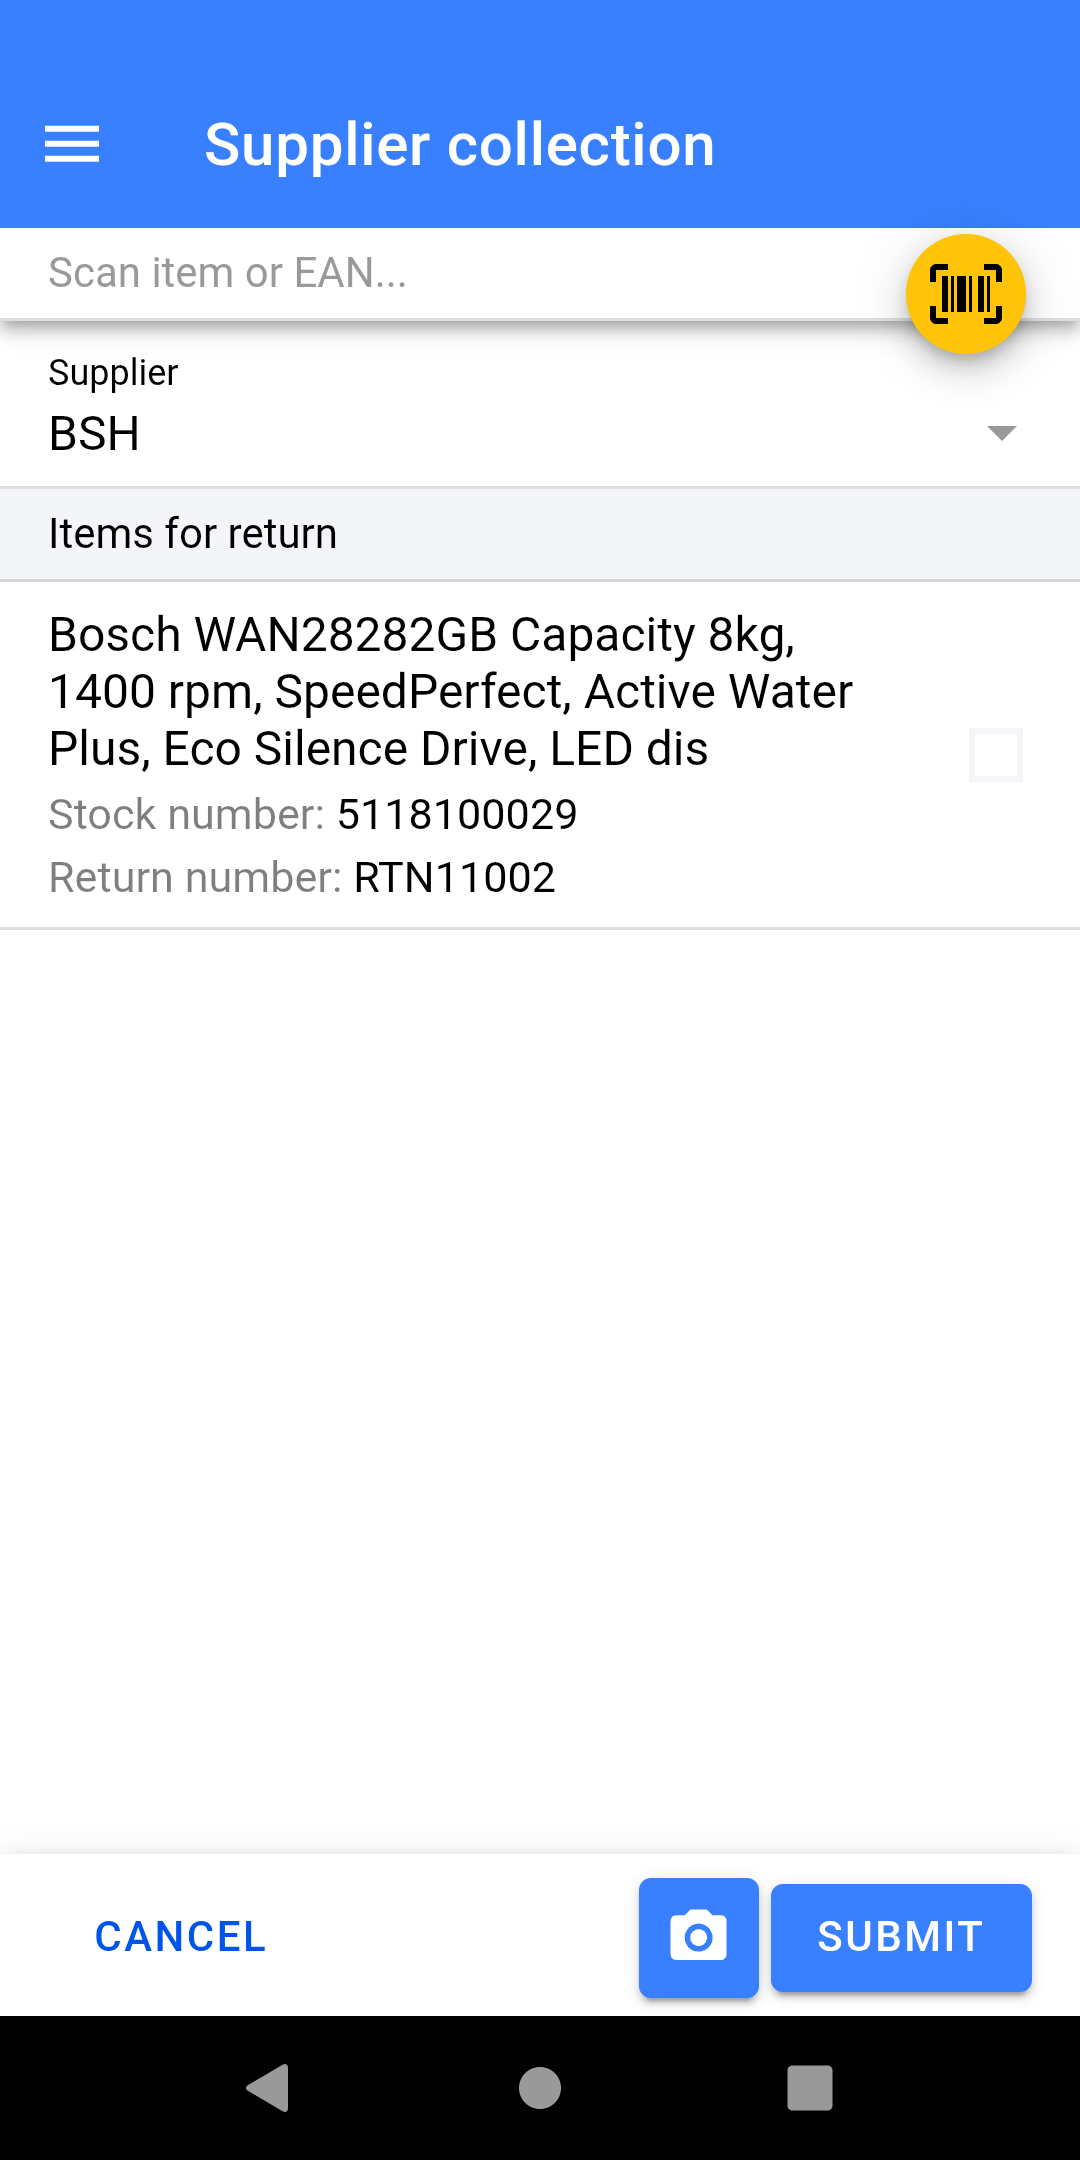
- Scan the stock number label for the item being collected.
- Enter the Uplift Number
- Take Photo (if required)
- Click Submit
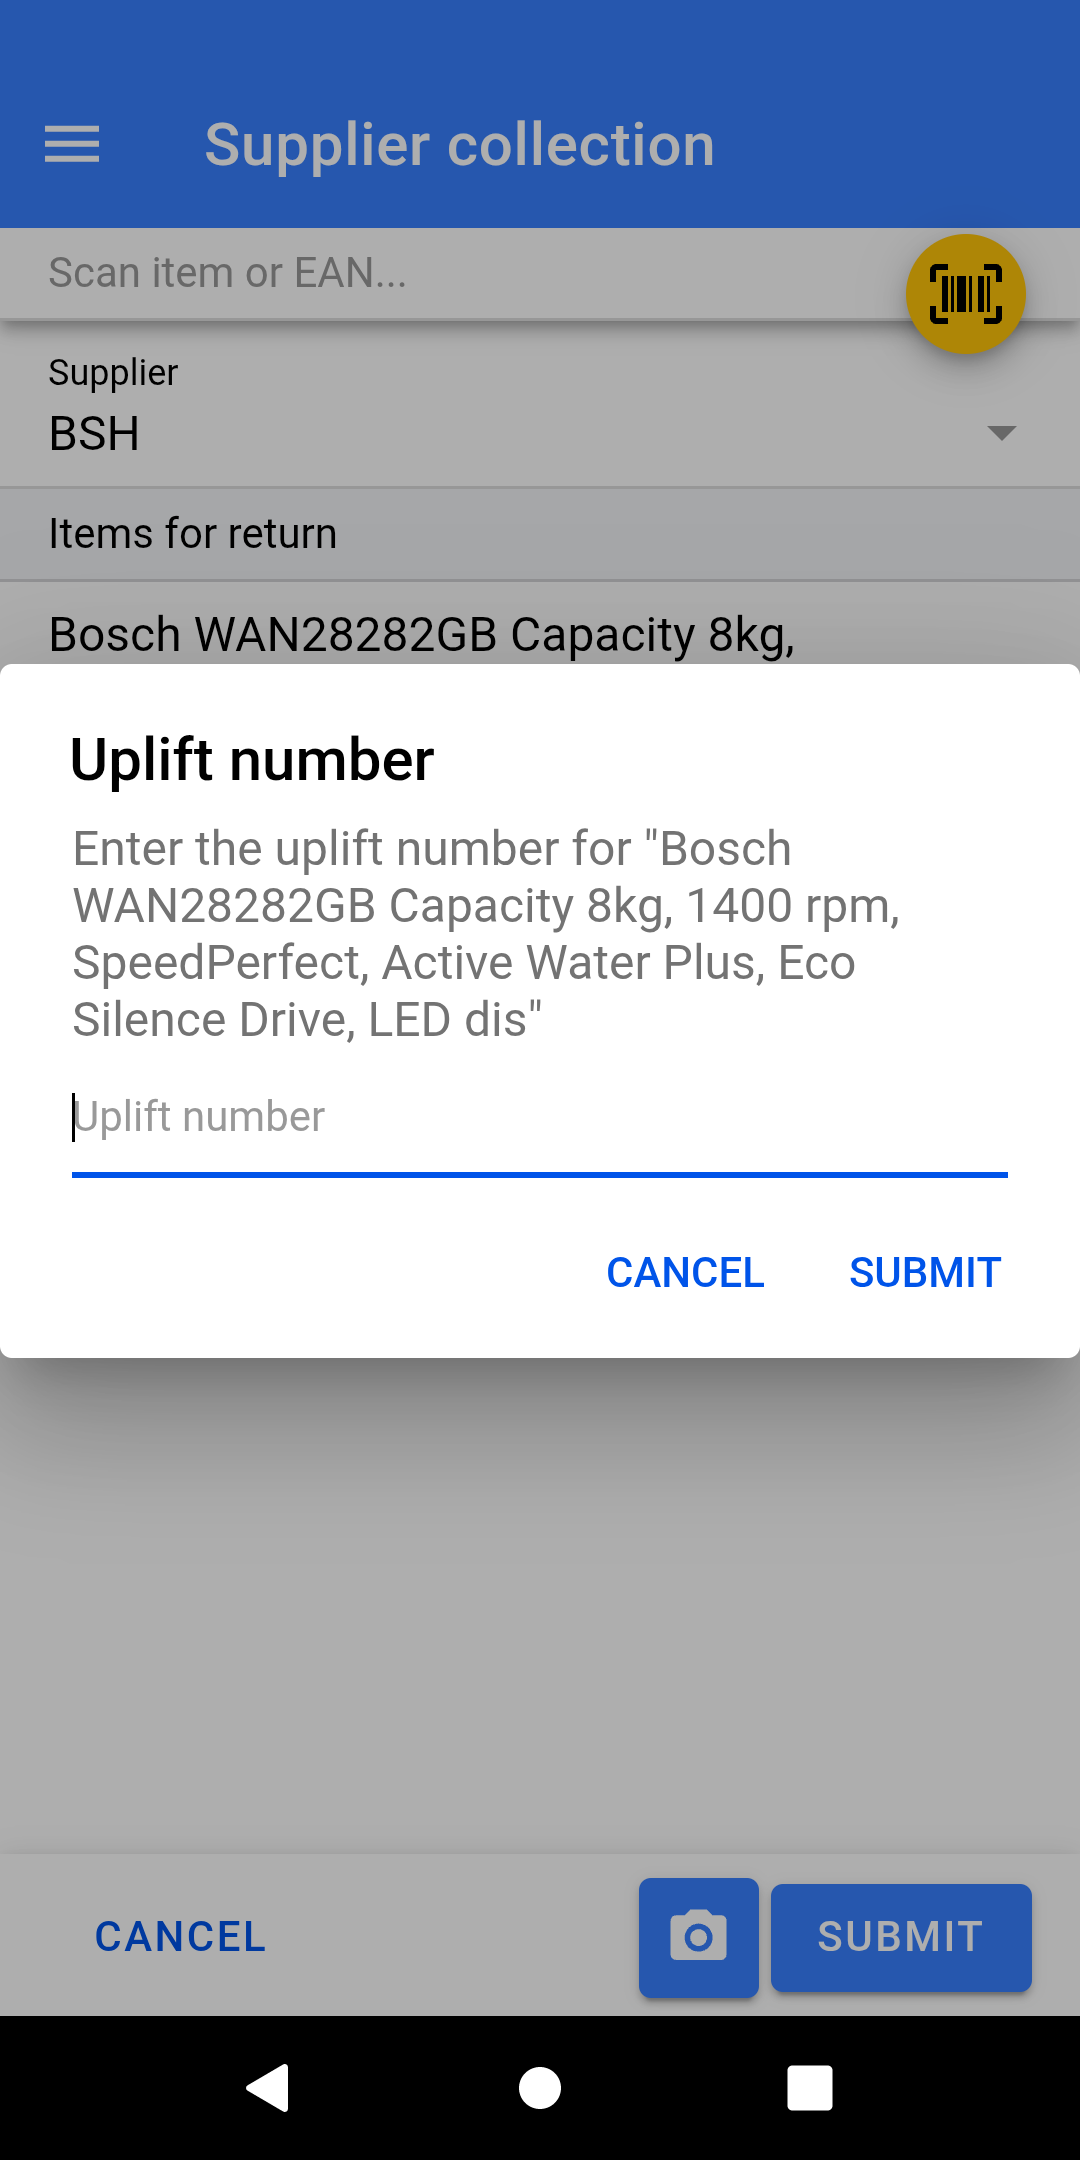
Depending on your settings you may now be prompted or forced to capture a signature from the driver collecting the goods.
If you have preset the Uplift number in NCompass before the goods are collected then this step will just ask you to confirm the uplift, rather than inputting it which will save time.
Manual Store
Accessing Manual Store
The Manual Store feature is used to store specific stock numbers into a stock location.
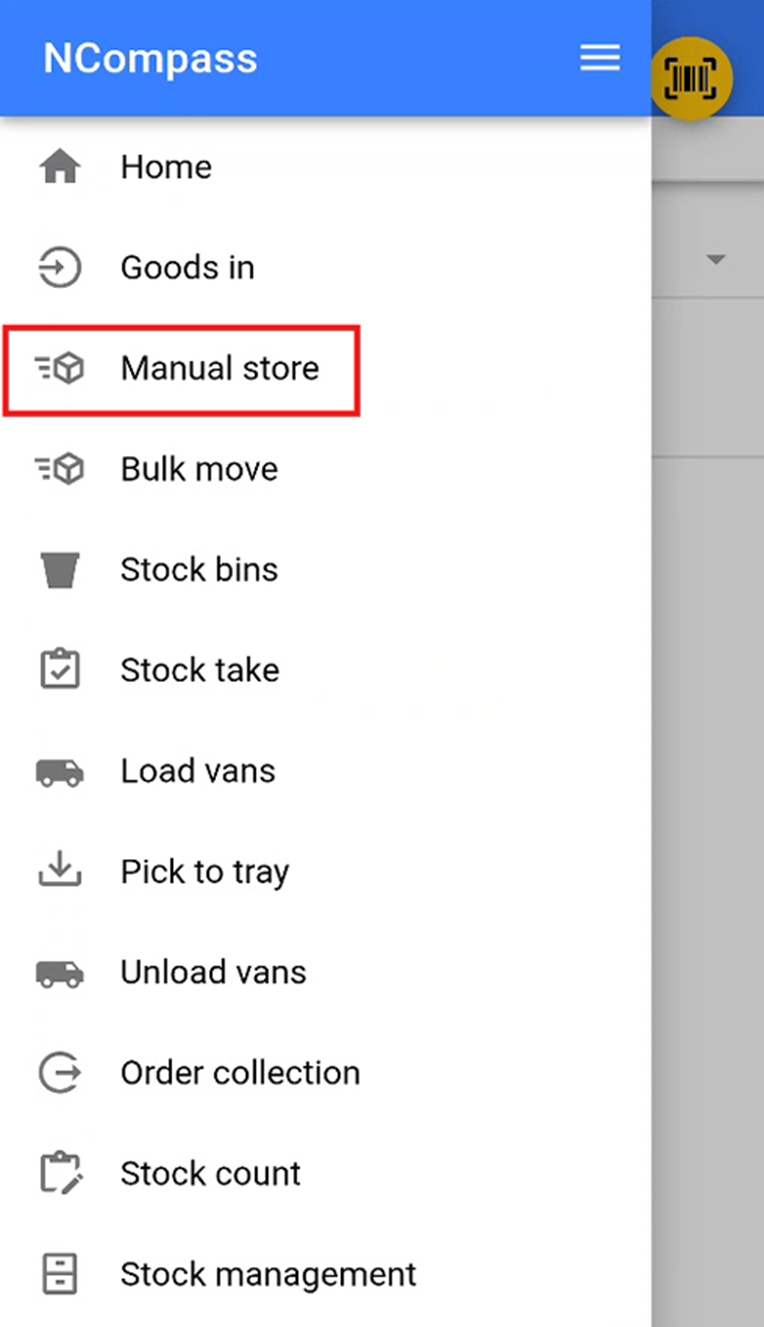
Selecting a Stock Location
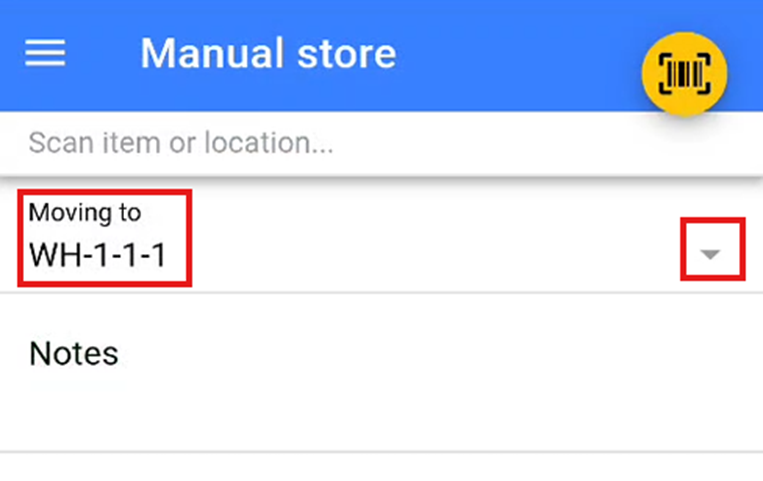
Select the stock location where you wish to store the stock. You can do this by either:
- Scanning the stock location QR code or barcode provided, or
- Selecting a stock location from the dropdown list by pressing the small ▽ icon.
Storing Items
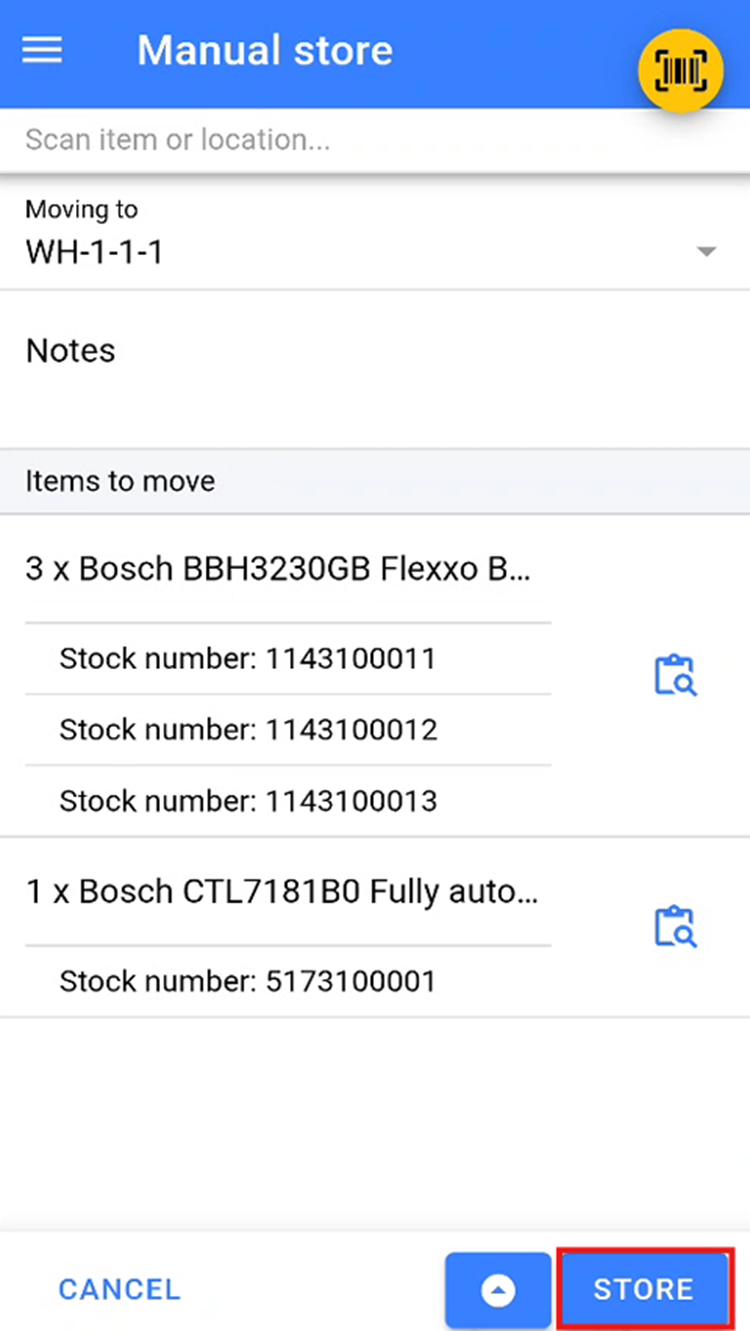
Scan or add all items that you wish to store in the selected stock location.
Once all items have been added, click the Store button to move the items into this location.
Bin Move (from 11.19)
Bin move moves stock from one bin into another. It works for count-only products and for individual stock numbers. Open it from the burger menu; it is shown only to users allowed the Bin move security function.
- Scan the bin to move out from, or pick it from the list. The screen lists everything in that bin. For each product it shows the quantity held there and up to two suggested bins that already hold the product, shown as bin - quantity here (used / capacity used).
- Choose what to move. Tick rows, or scan a product barcode or stock number to tick its row, and change the quantity if you are not moving it all. Select all ticks every row at its full quantity. Move becomes available once something is ticked.
- Scan the bin to move into, or pick it from the list. The header shows how full that bin is. Items that already have stock in it move to the top in bold. Items that cannot go into it (a different unit type) are greyed out.
- Press Move. If the move would put the bin over capacity, you are asked once whether to Move anyway. Any lines that cannot be moved are listed together in one message, and the rest are moved.
- Back returns to the first bin's list, so you can move the remaining items somewhere else.
Screenshots of the Bin move screens are still to be added - please capture them when reviewing.
Bulk Move
Bulk Move is used to move large quantities of items at one time.
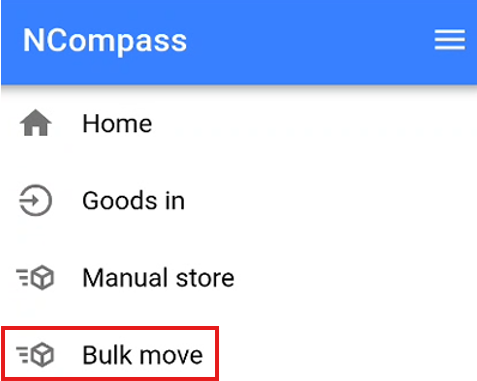
Bulk Moving By Stock Number
When the Bulk Move screen opens, you will see a message indicating that no items have been picked.
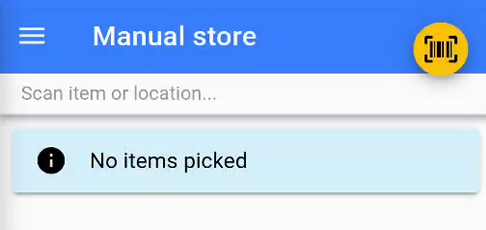
Begin scanning the individual stock numbers that you wish to move.
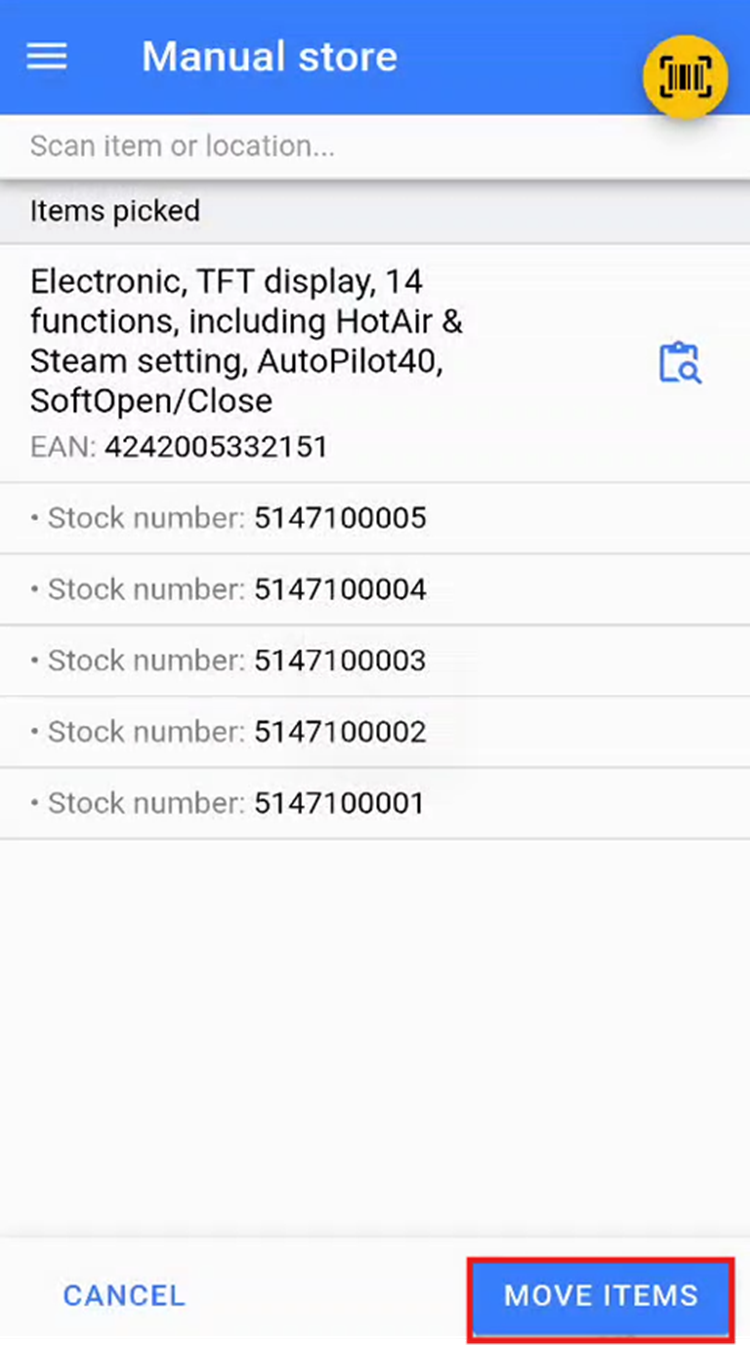
Once all required items have been scanned, click the Move Items button to confirm the selection.
This will open the Move Items screen, where you can either scan a stock location or select one from the dropdown menu. Select the location you wish to move these items to, then click Move Items to confirm the bulk move.
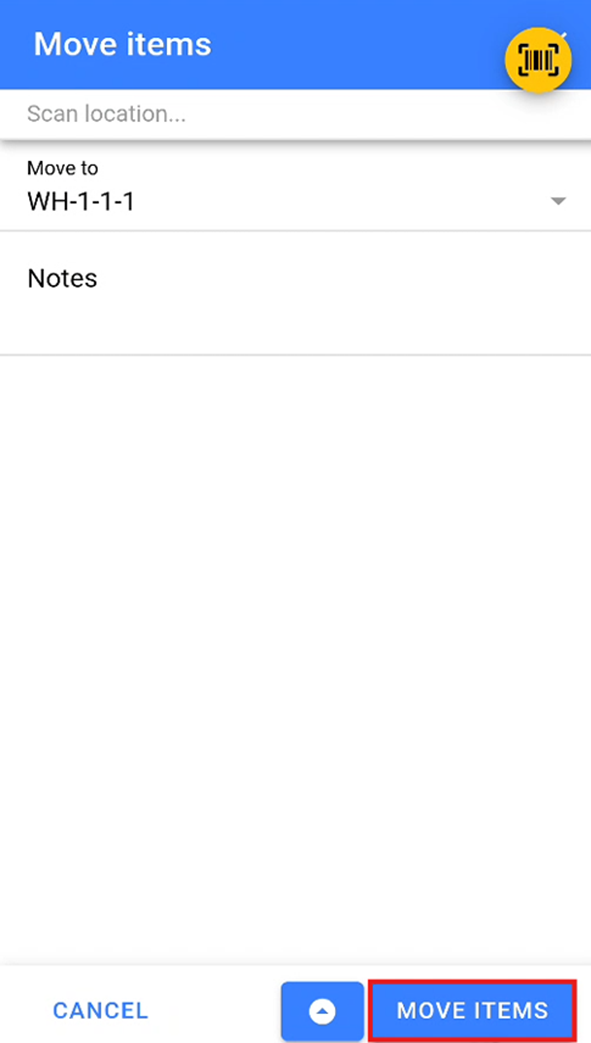
Bulk Move By Stock Location
On the Bulk Move screen, you can also scan a stock location. This will return a list of all items and their associated stock numbers currently stored in the scanned location.
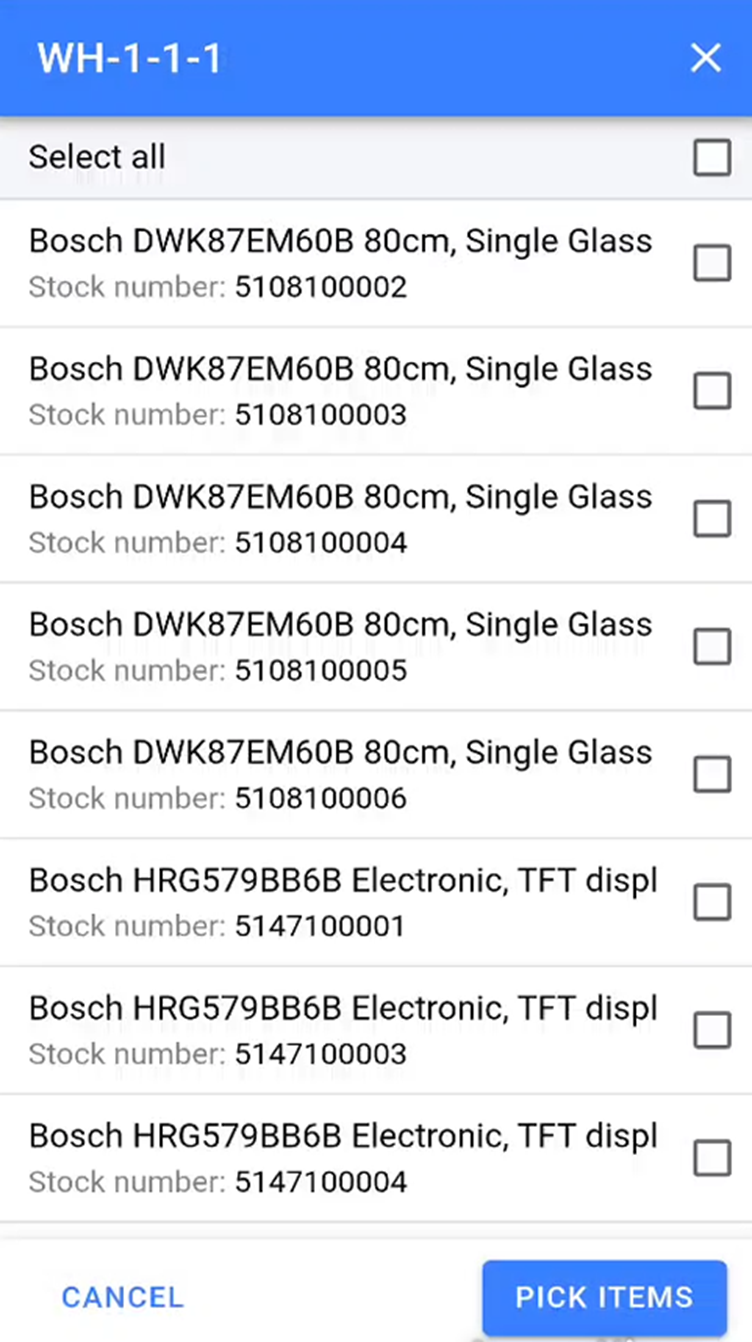
You can manually select the stock numbers you wish to move by tapping on them. Selected items will be indicated by a checked checkbox to the right of each item.
If you wish to bulk move all items from the current location, click the Select All option at the top of the list.
Once you have selected all items you wish to move, click the Pick Items button to confirm the products you are removing from this stock location.
Note: You can continue adding products onto this list again by scanning another stock location and repeating the above step or by scanning stock numbers.
Once you have selected all the items you wish to move click the move item button to confirm the items to move.
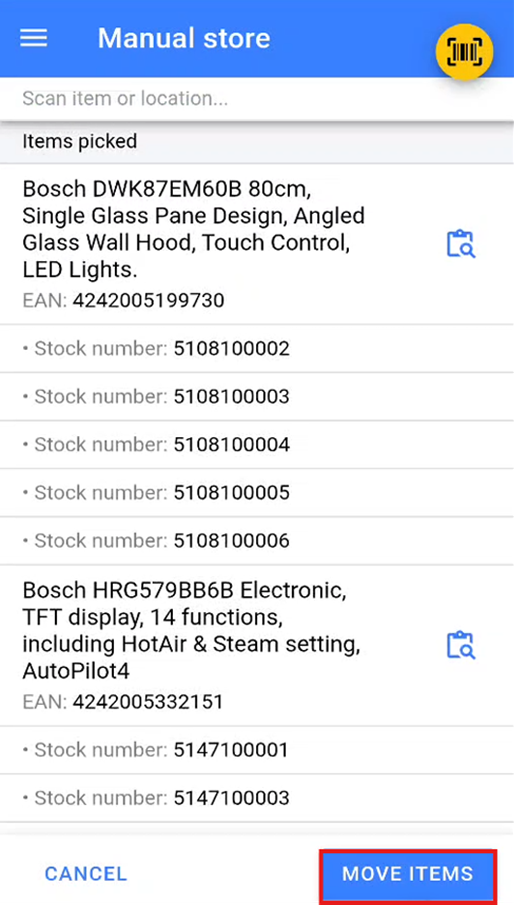
This will open the Move Items screen, where you can either scan a stock location or select one from the dropdown menu. Select the location you wish to move these items to, then click Move Items to confirm the bulk move.
Stock Take
Stock Take By Location
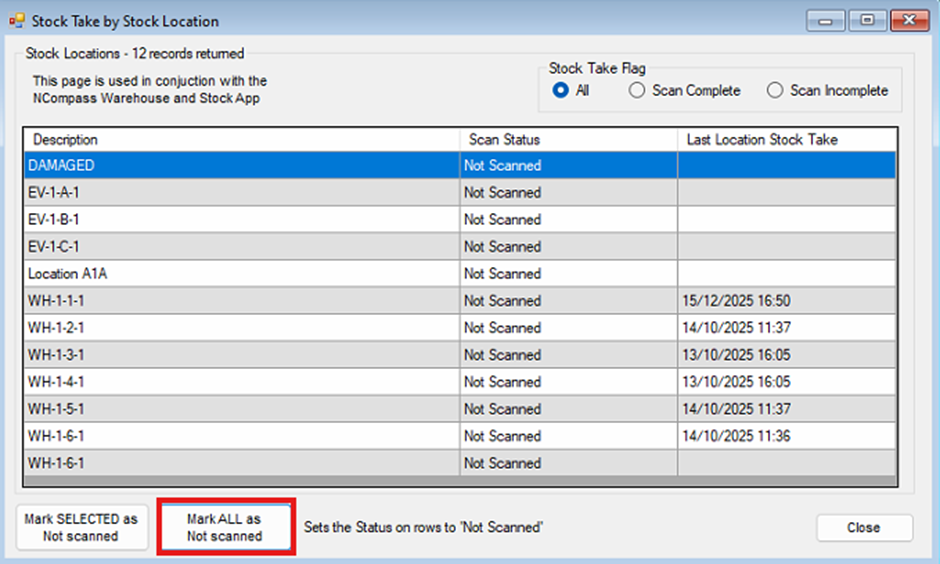
Inside the desktop version of NCompass, navigate to Products > Stock Count > Stock Take by Location.
This will bring up a list of all stock locations that you currently have set up in your system, along with the last time they were stock checked.
Click the Mark ALL as Not Scanned button to set the scan status of all locations to Not Scanned. This will help you track which stock locations still need to be scanned as you undertake your stock take.
Stock Take Detailed Mode
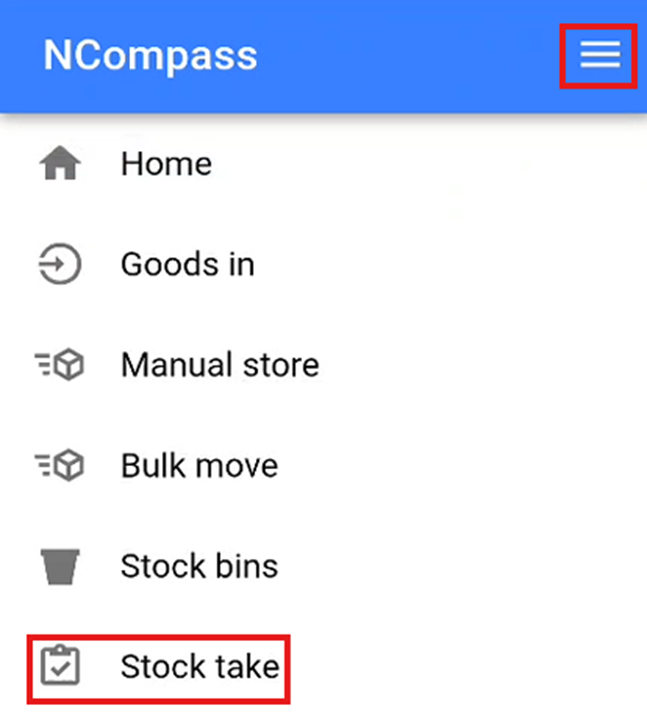
On the warehouse scanner, click the burger menu in the top right of the screen to open the menu. Then click the Stock Take option to start undertaking your stock take.
You will now need to scan the stock location that you wish to undertake a stock take on. This will populate all the stock numbers that are currently stored in this location and that you would expect to find.
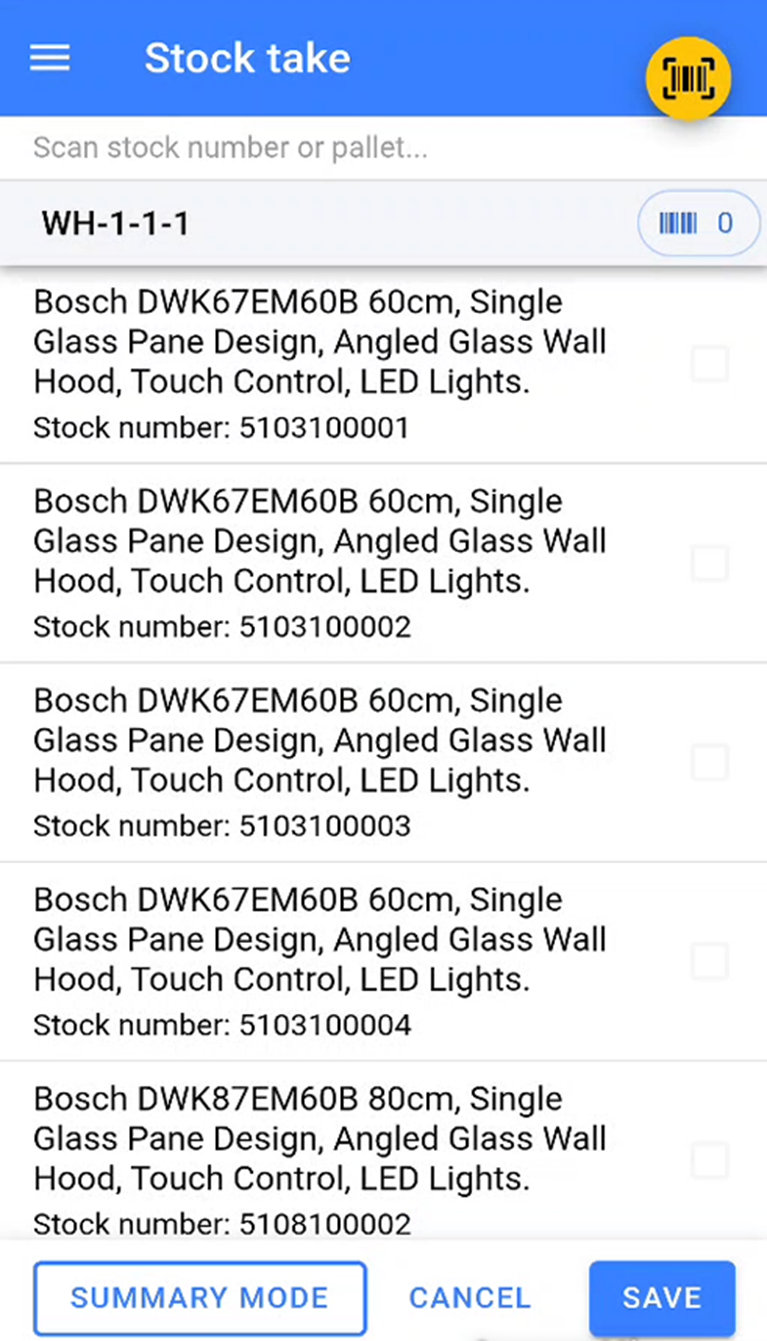
You will now need to start scanning the stock numbers that are physically sitting inside that location in the warehouse.
Once you have started a stock take, you must ensure that you scan all items in that location. If you complete a stock take halfway through scanning, you will need to restart the stock take and scan all items inside the physical location again.
As you scan the stock numbers, the warehouse app will tick off the stock numbers as they are scanned. You will be able to see how many stock numbers have been scanned in this location by the number next to the small barcode icon.
Any items that remain unticked are items that the system expects to be in this location but are not physically there.
Once all stock numbers that are physically in that location have been scanned, click Save to complete the stock take.
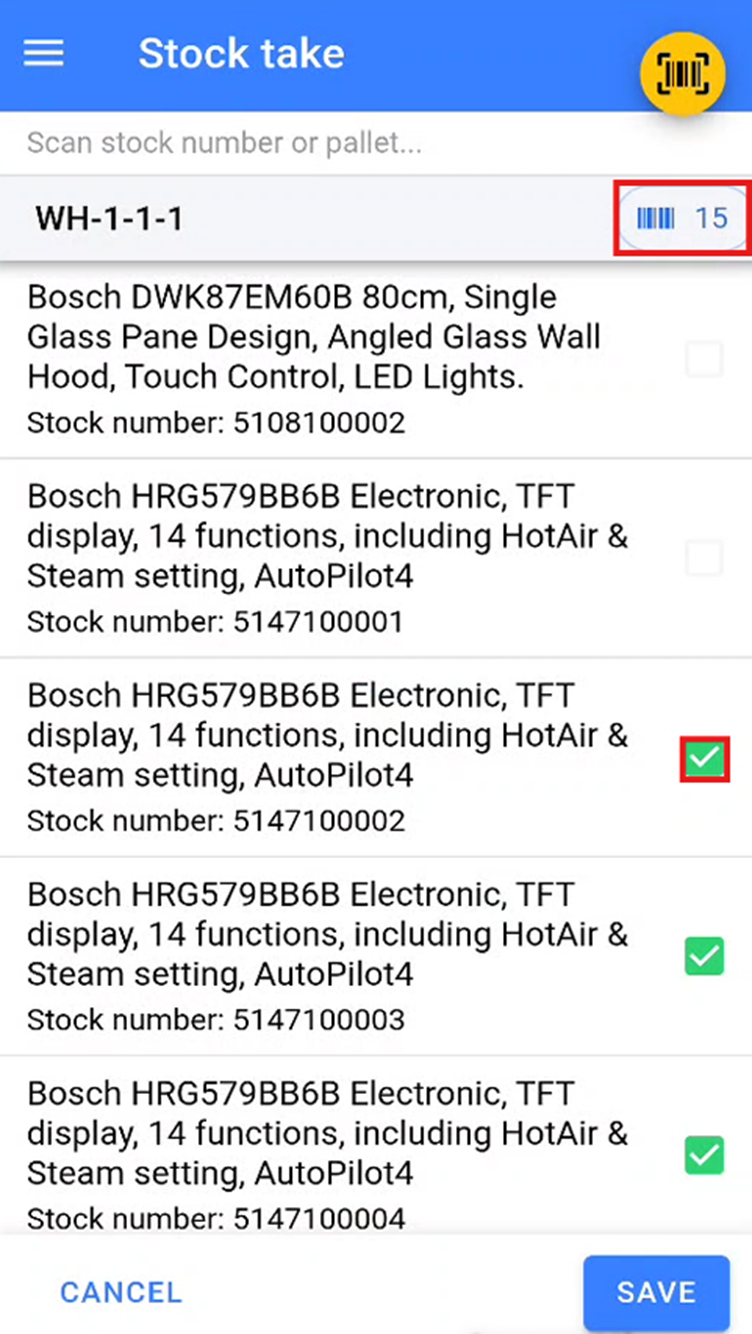
Any items that were expected in that stock location but were not scanned during the stock take will be moved to a temporary **Missed During Stock Take** location to be dealt with at a later point.
Any items that are stored in another location but are scanned during the stock take are automatically moved to the location where the stock take is being conducted.
Stock Errors
During your stock take, you may encounter a stock error. This occurs when a stock number that has been scanned is marked as not physically in stock in the warehouse. This is most likely due to the wrong stock number being marked as delivered to a customer.
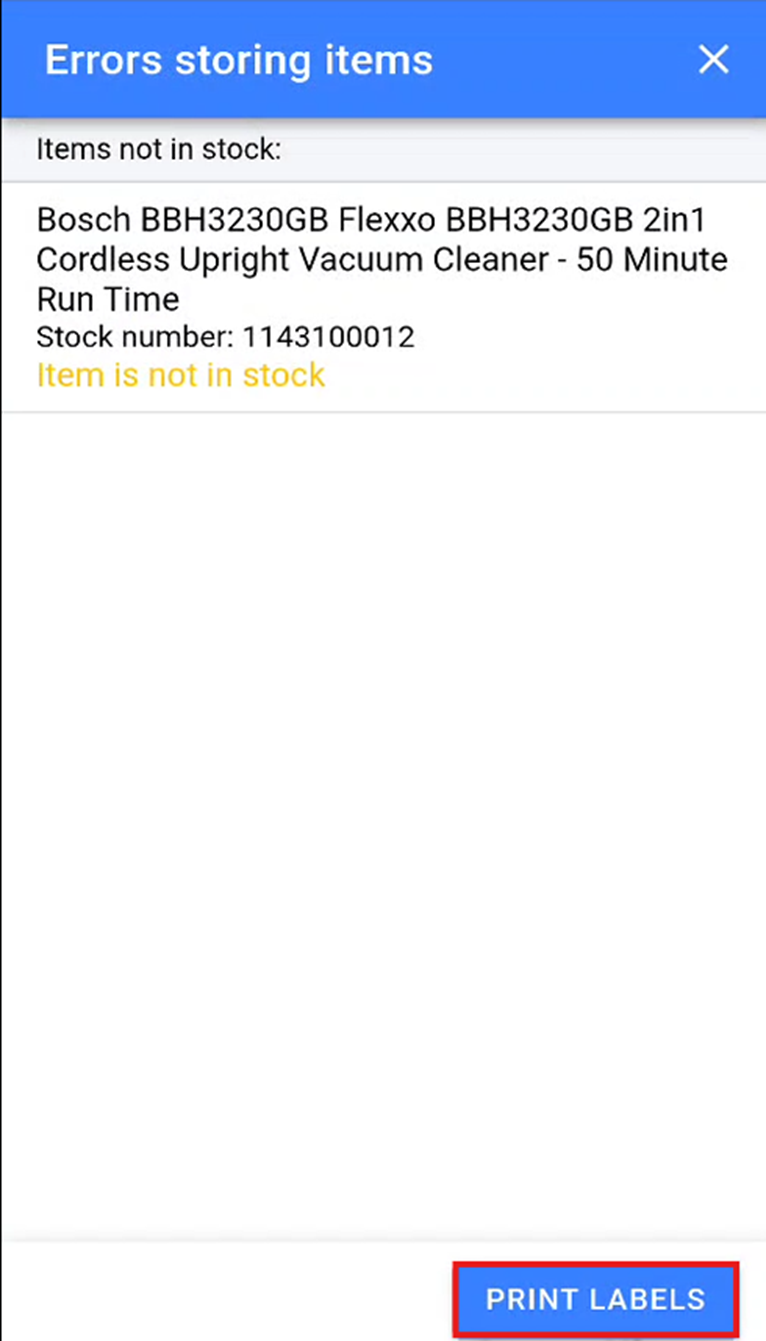
We suggest that you print two stock error labels for each stock error and physically remove the item with the stock error from the bay. You will then need to stick one of the stock error labels directly over the existing stock number to indicate that the stock number for this product needs to be amended.
From NCompass 11.16 you can also save the stock errors to a list instead of printing a second label for each one. In the stock error pop-up on the scanner, click Save as List.
This creates a new list named Stock Take errors - {location} {date and time} containing every item that errored during that stock take, so the errors can be reviewed on the desktop rather than from a pile of duplicate labels.
Saving a list does not stop you printing labels. Print Labels still asks how many copies you want, so you can save the list for review and still print a single label to stick over the stock number on the item.
To review the saved list on the desktop, go to Products > Lists > List Enquiry and open the list. Double-clicking the item description on a stock number row opens the item history for that item, so you can check where it has been and what has happened to it without leaving the list. See Item Lists for more on working with lists.
Summary Stock Take Mode
If you store multiple units of the same item within a stock location, you can undertake a stock take using summary mode. To enter summary mode, click the Summary Mode button at the bottom left of the screen after selecting a location to undertake your stock take on.
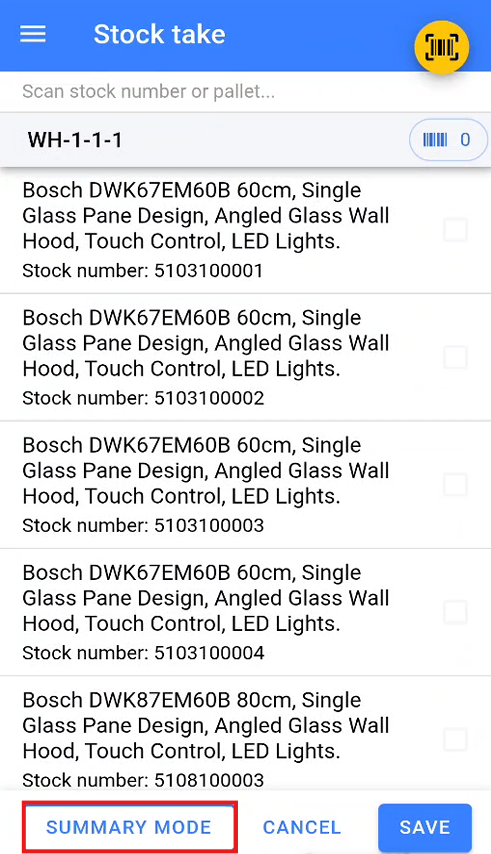
This will display a blank list ready for you to populate. During the summary stock take, you will need to scan the EAN of the product you wish to count. Once the EAN has been scanned, enter the quantity of the item that has been counted in the physical location.
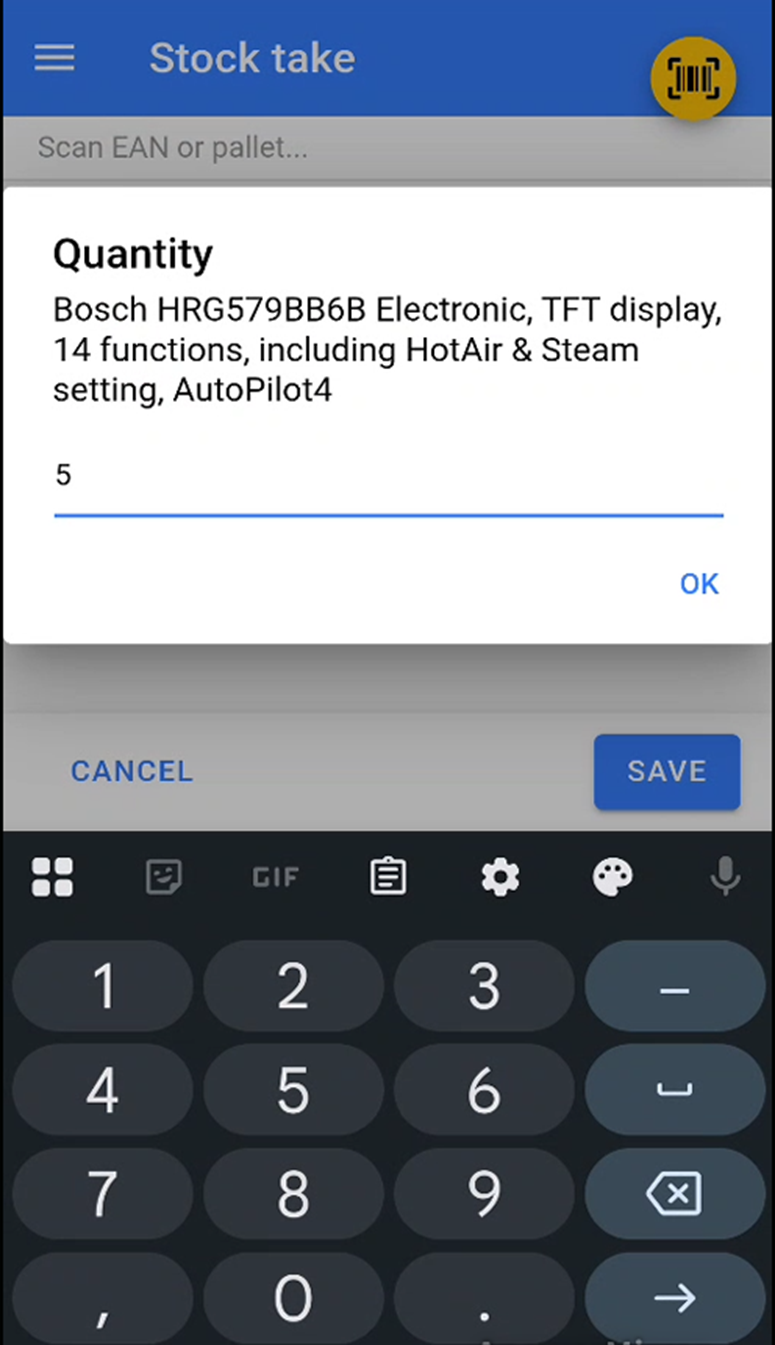
Once you have scanned and entered the quantity for all items within the location, click Save to complete the stock take.
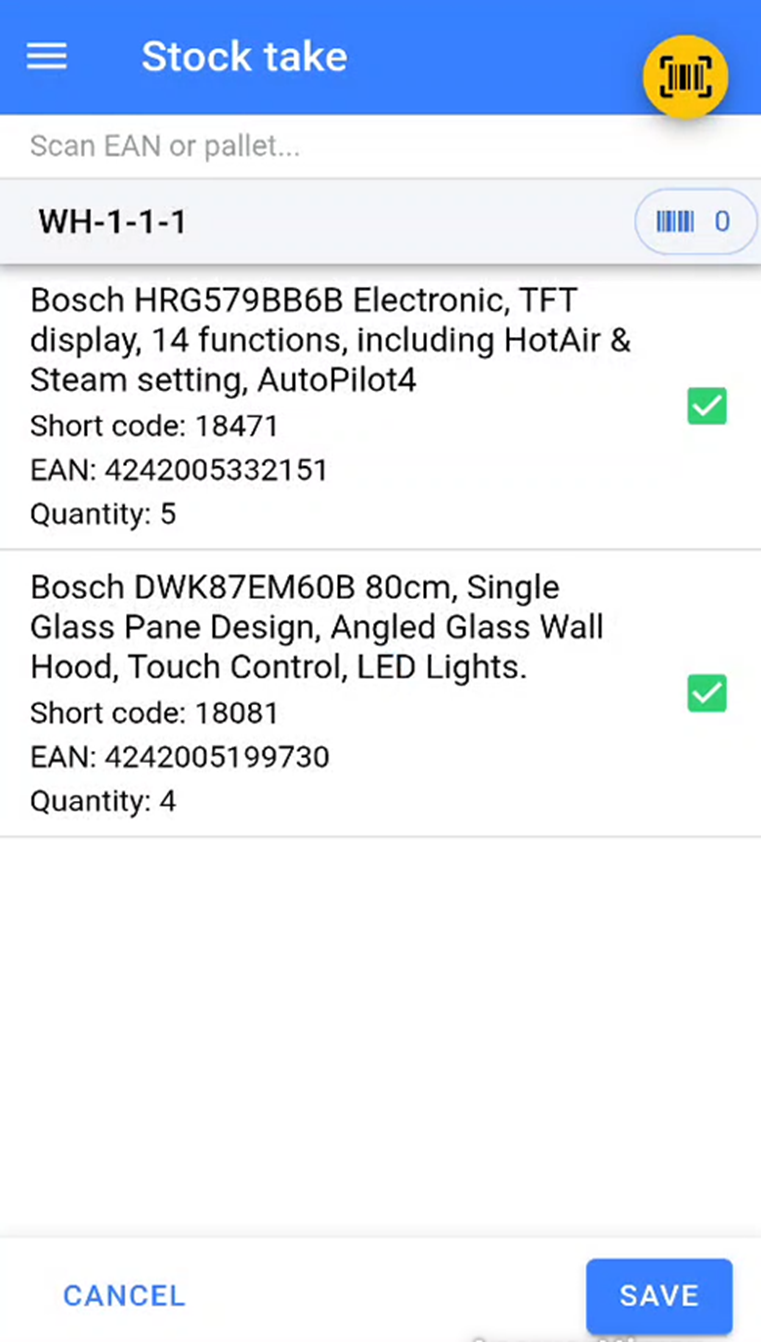
If the items and quantities entered match what is already stored in that location, the stock take will be completed.
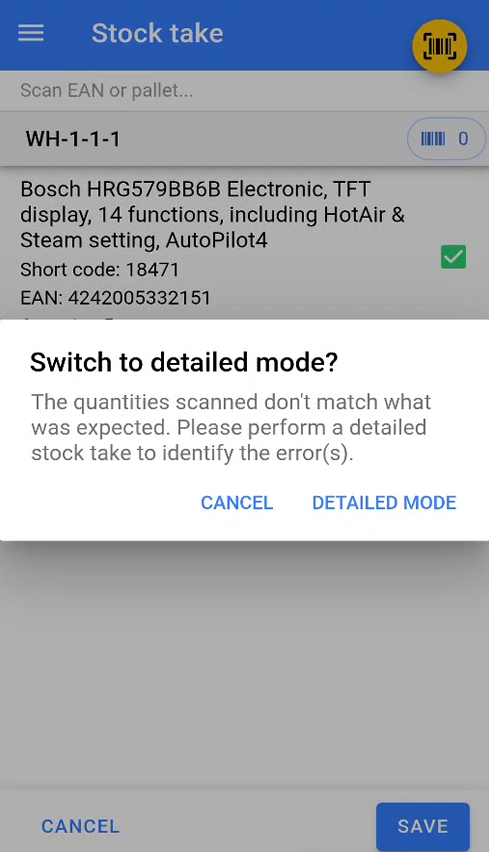
If the items and quantities differ from what is already stored in that location, the warehouse scanner will warn you and prompt you to undertake a detailed stock take to identify where the discrepancies lie.
Stock Reports by location
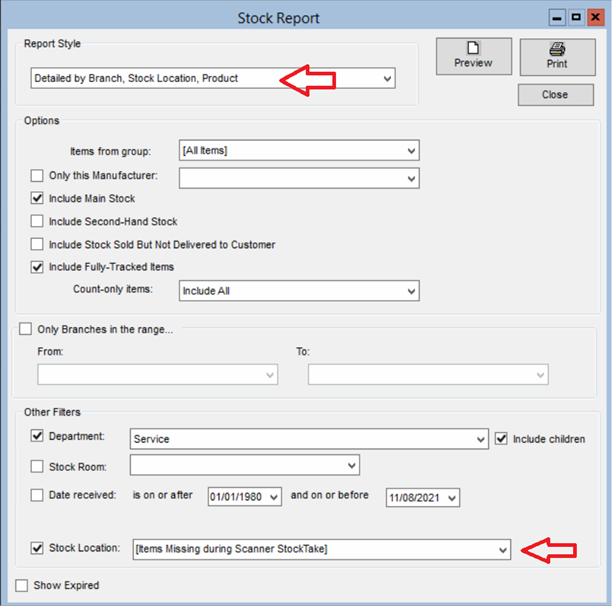
Then select one of the report styles that include location. You can also limit the report to just a single location.
There is a missing location **‘Items missing during scanner stock take’.** This location will show all items which were missing during a details stock take.
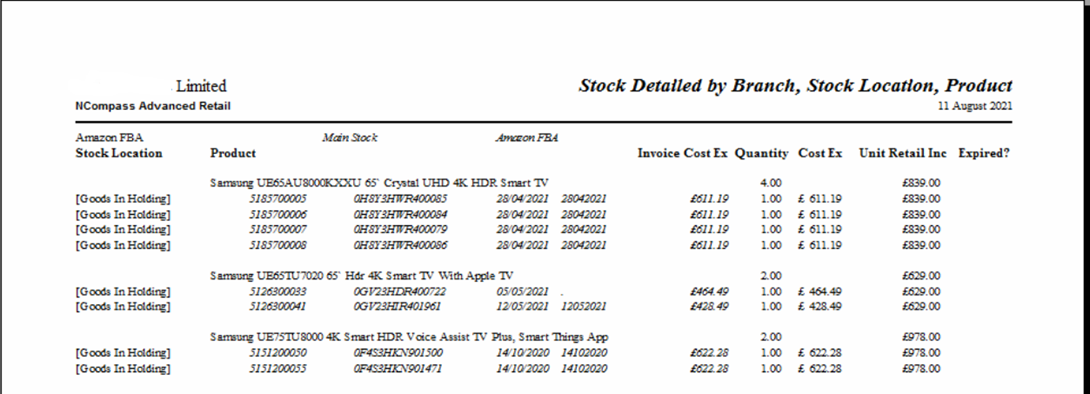
Scan History
If you need to check where an item has been stored, you can search for the item via product enquiry, then click on item history.
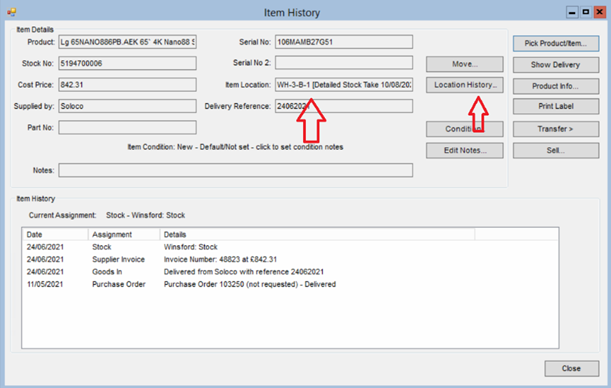
Its current location is shown along with the date it was scanned at that location
If you click the location history button, you will get a history of the locations the item has been stored in.
The initial location ‘Goods in holding’ may not have been scanned, it’s the default location, item are placed in this location if none has been specified at goods in or since.
Load Vans
Start by pressing the Load Vans option in the menu.
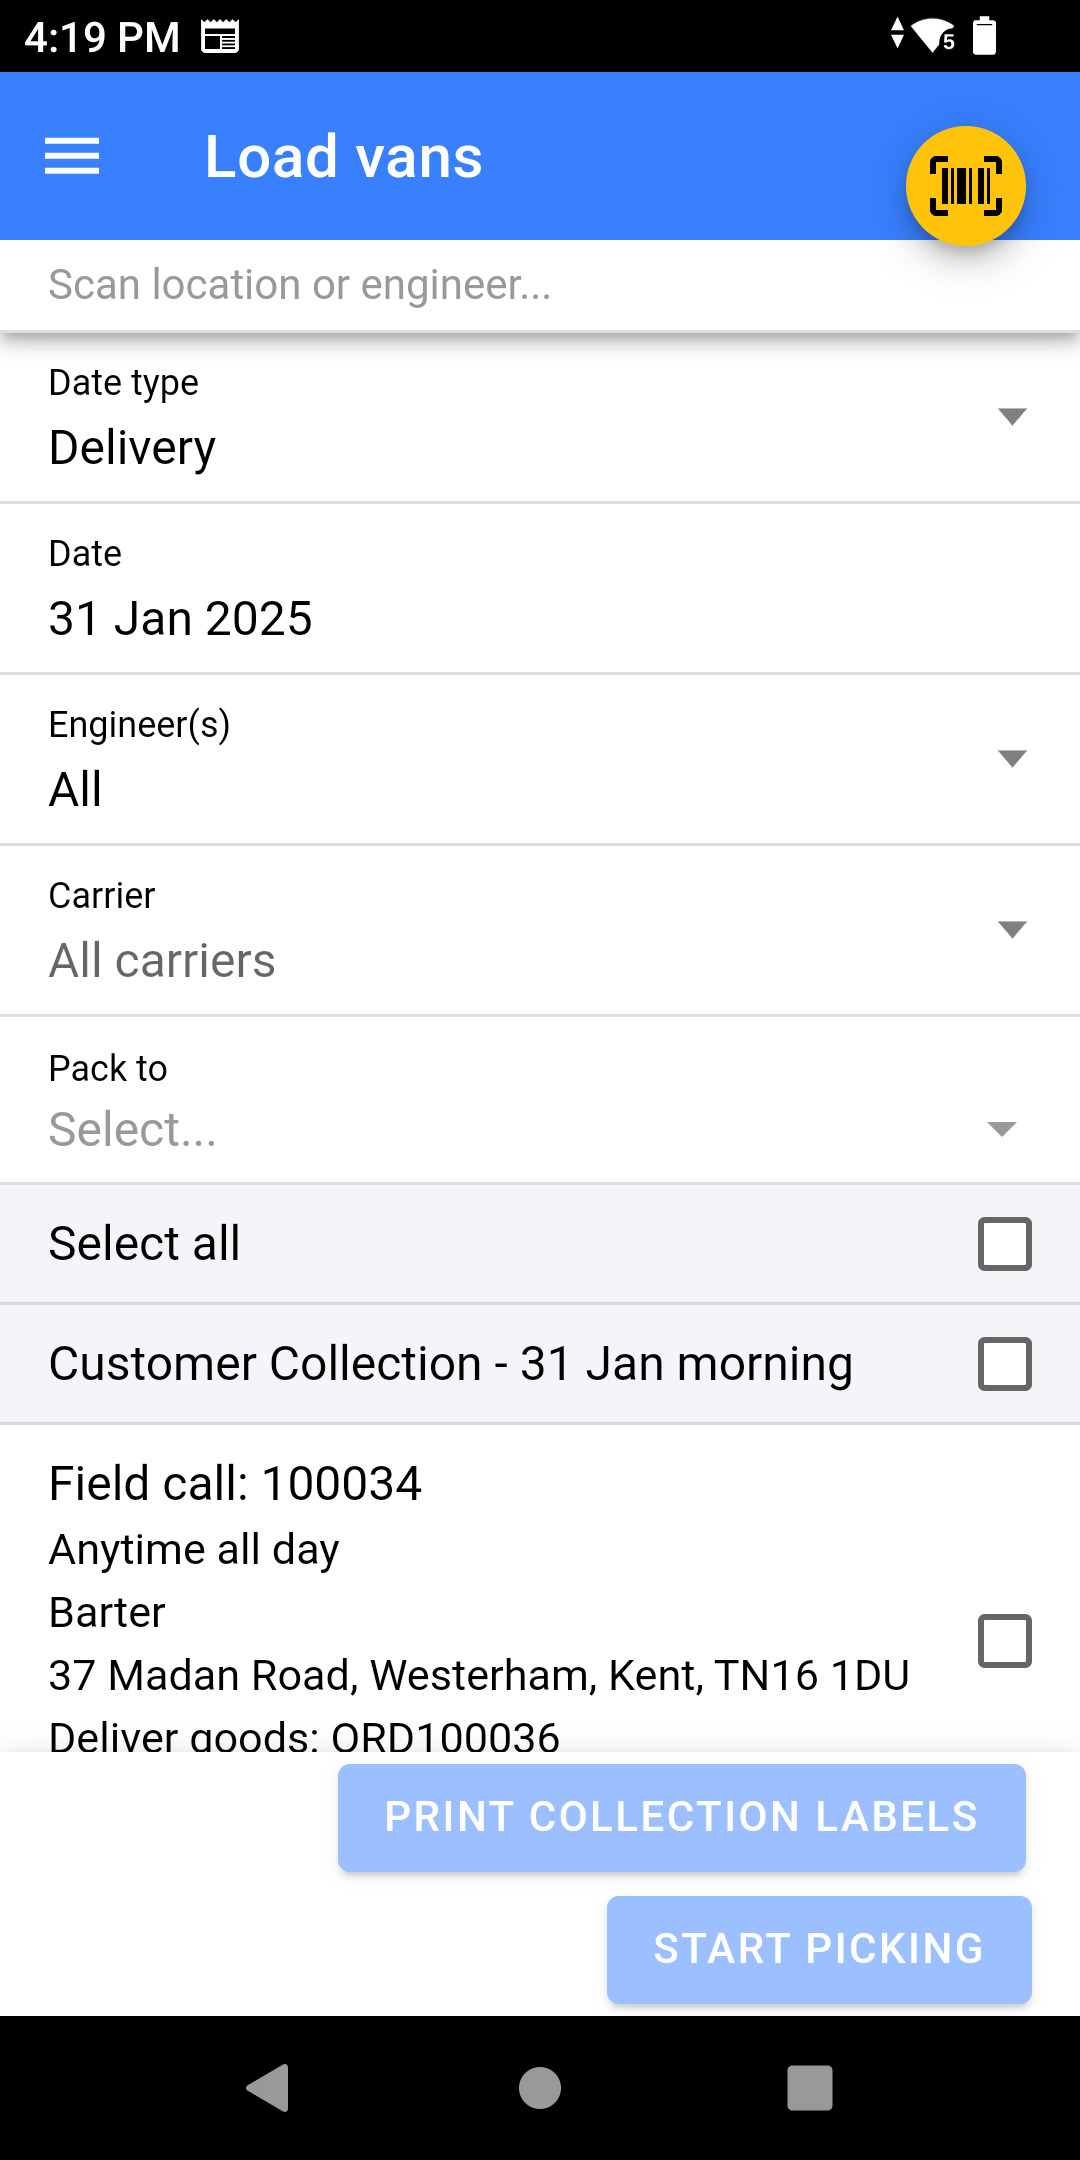
- Select a Date Type:
- Delivery - Date of Delivery
- Dispatch - Used for Carriers, this is the date of collection rather than the date of the field call.
-
Select the Date you are packing field calls for.
-
Select the Engineer you are packing for.
- Select Specific Carriers: This allows you to pick for a group of engineers, intention for this is for picking for carrier who you have multiple service levels with.
-
Scan the Location you are packing to.
You can do a multi-stage pick, whereby you pick to a holding location and then on to another location afterwards, much like a multi-stage goods-in where the goods are held before being stored in their final location.
- If you wish to pick for all calls; Click Select All, or choose Morning/Afternoon instead.
- Click Start Picking
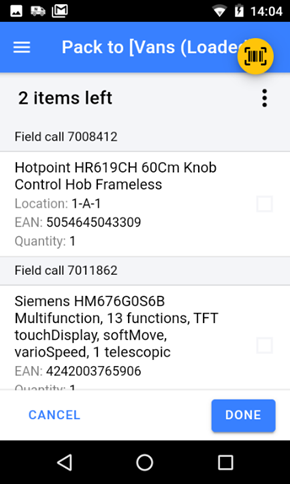
- Locate each item on the list and scan the stock number label
- Once the item is picked, it will have a tick against the item (or the item may disappear of the list)
If your configuration allows you to, you can scan a different stock number to the one displayed and NCompass will stock swap the stock number for the one you scanned.
- Once you have finished picking click DONE
Settings
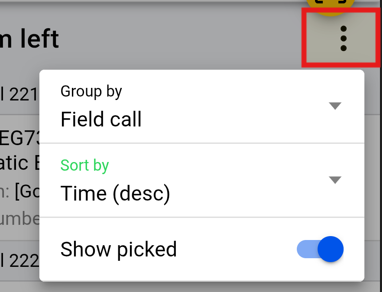
Clicking on the 3 dots gives you the option to:
- Group by:
- Stock Location - Sorts them into order by location instead of by time.
- Field Call (Default) - Sorts by time of call
- Branch - Shows all branches not just your physical location
- Sort by:
- Time DESC (Default) - logical order for loading van, first on is last off.
- Time ASC - flips the loading order
- Show Picked - Shows the item picked if enabled but with a Green Tick, otherwise they will be hidden.
Requiring Field Calls to be Locked
Field calls in NCompass can be locked to stop them being changed once the day's work has been finalised. Where a business wants the run fixed before anything goes on a van, NCompass can insist that this has happened before Load Vans will release any of the work.
This is controlled by the configuration setting Require field calls to be locked before van can be loaded, which is set to No by default. Find it in NCompass under Tools > Configuration by searching for its name.
- No – Load Vans behaves exactly as described above. Whether a field call is locked makes no difference.
- Yes – every field call for the engineer and date selected must be locked before any of them can be loaded. If a single call for that engineer and date is still unlocked, none of that engineer's work can be loaded for that date until the office locks the outstanding call.
The check is made across the whole engineer and date, not call by call, so one unlocked call holds up the entire van. That is the point of the setting: it stops a van being loaded while the run is still being changed.
Locking a field call
- A field call can be locked and unlocked from the field call itself in NCompass. Who is allowed to do this is controlled by the Allow Locking of Field Calls and Allow Editing/Unlocking of Locked Field Calls settings.
- Field calls can also be locked automatically when a route is saved, using the Lock Field Calls after routing setting. The same choice is offered as a Lock Field Calls after Routing tick box on the routing summary screen.
Sites that route their deliveries usually pair the two settings: routing locks the calls as the run is confirmed, and Load Vans then refuses to release work that has not been through that step.
Picking Jobs
Picking Jobs are used in conjunction with Load Vans to get stock ready for Deliveries/Couriers.
They can be used and set up in many different ways and it will require consultation before use so it can be configured correctly for your business.
Picking Jobs would be used to get stock ready in a Pre-load location as a step before Loading Vans.
Picking Jobs allow for picking by location instead of by engineer/courier. It works by checking the list of all items which are due to be going out on a selected date, ordering them by location, and then allocating X number of items for a user to pick, these items are then excluded from any future picking jobs raised. This allows for more efficiency when picking stock, especially where multiple operatives are picking stock at the same time.
If you feel this feature may benefit your business please contact Admin to arrange a consultancy call with the Implementation Team.
Creating a Picking Job in NCompass
Picking jobs are raised from the Field Call Enquiry in NCompass. Find the calls you want stock picked for, then use the option to create a picking job from the selected calls, or from every call in the list. The window that opens lists all the items that could be picked, and lets you filter that list, decide how many items go on a job, and choose who the job is assigned to.
Choosing where the stock is picked to
The Pick to list decides the target location the operative is sent to for each item on the job:
- A goods out location – the item is picked to the normal goods out area.
- A preload location – the item is picked to the preload area belonging to the engineer the call is booked for.
- Specific location – you choose one stock location and everything on the job is picked to it.
Preload locations
A preload area is a location where an engineer's stock is gathered ahead of time, ready to be loaded onto their van. Each engineer's preload area is held against their record in NCompass under Administration > Salespersons, in the Preload Location box on the engineer details. Any stock location can be used, and an engineer may be left without one.
When A preload location is chosen:
- The list of items is narrowed to items on calls for engineers who have a preload location set, and which are not already sitting in that location. Items for engineers with no preload location are not offered – either set a preload location against the engineer, or pick those items with one of the other options.
- A single picking job can only send an operative to one target location, so on creation NCompass splits your selection by preload area and creates one job for each area. Picking for three engineers who share a preload area produces one job; picking for engineers in two different areas produces two.
- In NCompass WAS, each item on the job shows its target location as that preload area, so the operative picks and puts away in a single pass.
Removing an Item from a Picking Job
If an operative cannot pick an item – it is not where the system thinks it is, it is damaged, or it needs equipment they do not have – they can remove it from the job in NCompass WAS. The item returns to the pool of stock so it can be picked on a later job, and the reason it was removed is recorded against it.
Rather than typing a free text note, the operative chooses a reason from a drop-down list. The list offers every removal reason that has not been expired or deleted.
Managing removal reasons
Removal reasons are maintained in NCompass under Administration > Picking Removal Reasons, with the usual add, edit and delete options. Each reason has:
- A Description – the wording the operative sees in the drop-down.
- A list of email addresses to notify when the reason is used. Several addresses can be listed, separated by a comma, a semi-colon or a new line. Leave it empty where nobody needs to be told.
- An Expired tick box, which takes the reason out of the drop-down without disturbing the history of items already removed for it.
When an item is removed and the chosen reason carries notification addresses, an email goes to those addresses automatically.
Picking only the items that were removed
Items that have been removed from a picking job are held back from ordinary jobs. An operative raising a new job in NCompass WAS is not shown them, so the same unpickable item is not put in front of the warehouse again and again.
To go back and deal with them, use Pick on removed reason only under Additional options when creating a job in NCompass WAS, and choose the reason. The job is then built only from items that were removed for that reason; items which have never been removed are left out, and the other filters chosen on the screen are ignored apart from the date.
The configuration setting Picking jobs - allow creation of job for removed items (default No) controls whether that option appears at all, so it can be given only to the sites and users who need it. Find it in NCompass under Tools > Configuration.
A typical use: reasons such as Needs a forklift or Blocked in let the warehouse gather all the awkward items into one job for the person with the right equipment, while a reason such as Cannot find emails a manager the moment it is used.
Finding removed items
Removed items can be looked up in NCompass under Products > Stock Location Management > Picking Job Removed Item Enquiry, where they can be searched and filtered by date and by removal reason. This is the place to answer questions such as "why has this item been sitting in the warehouse for a week" or "how often are we failing to find stock in that aisle".
Unload Vans
The Unload Vans feature is used for scanning items that were failed deliveries or collections that the delivery team has picked up during the day. These items are scanned back into the business to mark them as received.
The Manual Store feature is used to store specific stock numbers into a stock location.
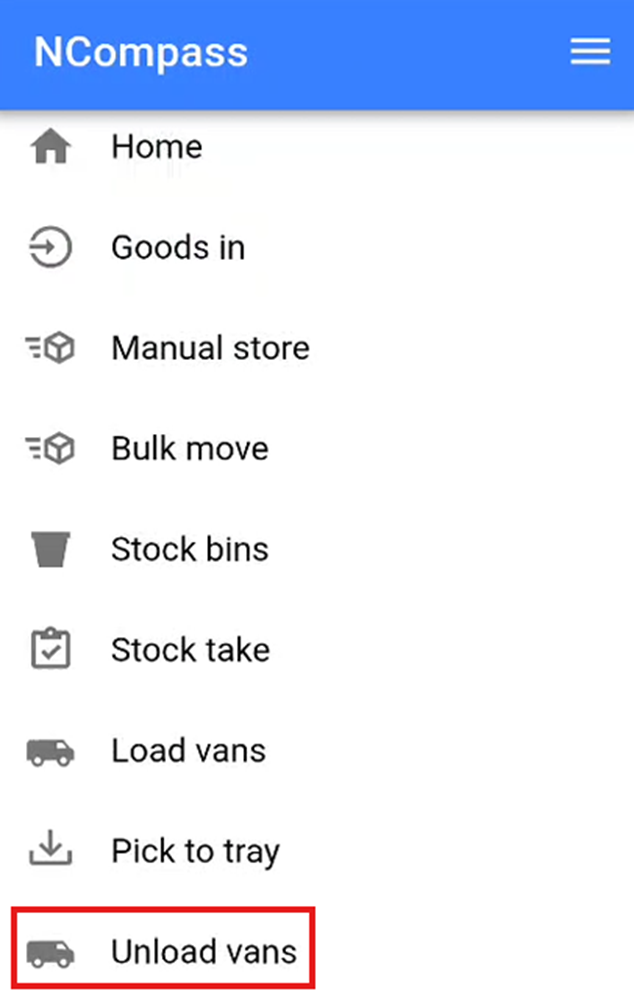
This will open the Unload Vans screen.
Selecting Engineer and Location
Select the Engineer for whom you are unloading the van.
Set a location for the items by either:
- Scanning a location barcode, or
- Manually selecting a location.
Once the engineer and unload location have been selected, click Submit to start unloading the van.
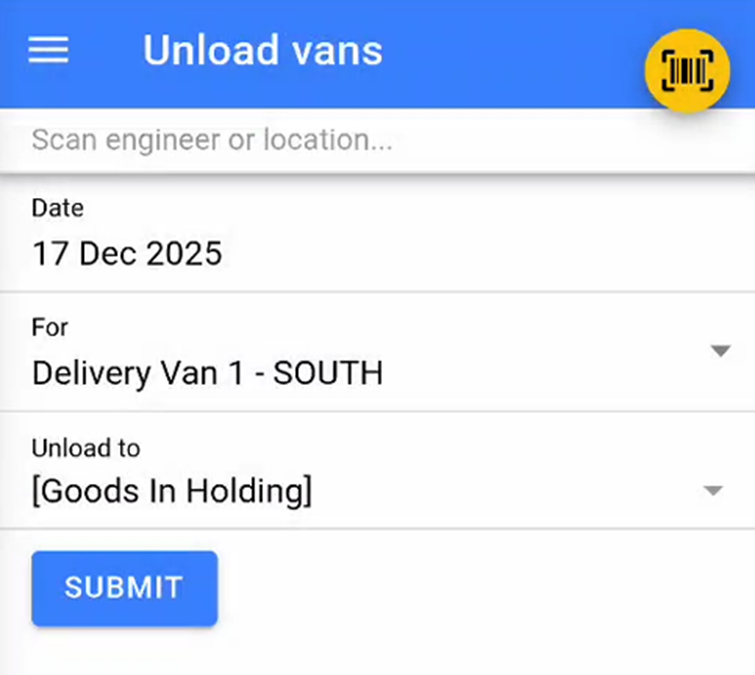
Once you have selected the engineer and the unload location click 'Submit' to start unloading the Vans.
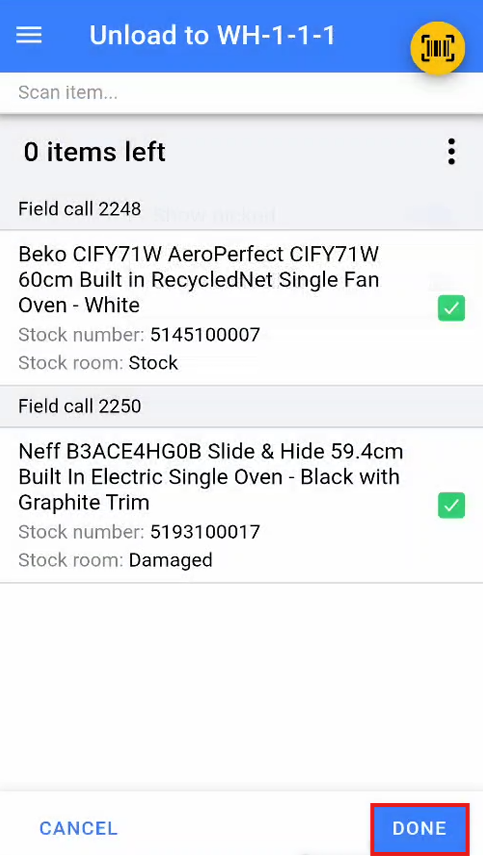
Scanning Items
A list of items on the van that need to be scanned off will appear.
Scan each stock number to check it off the list.
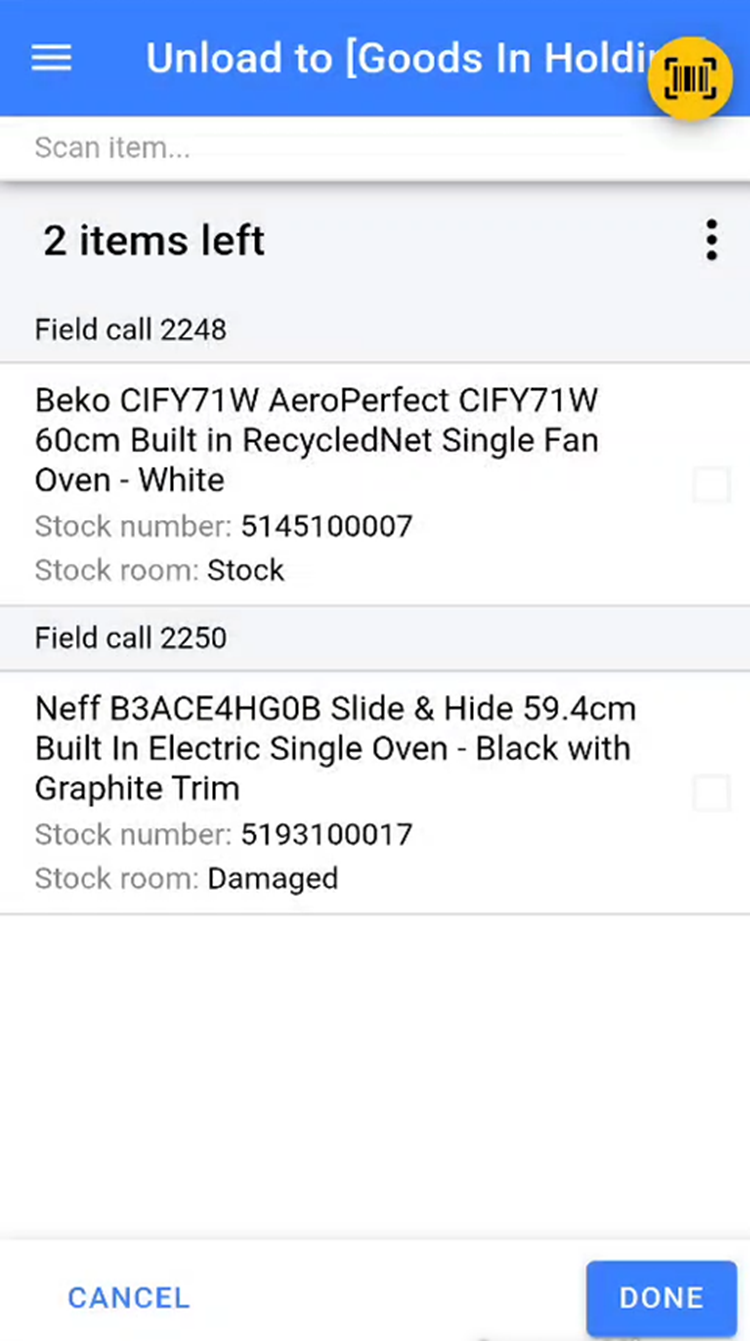
**Note:** The list includes items that were failed deliveries by the selected engineer or any collections marked as completed.
If an item has had its stock number removed and cannot be scanned, swipe left on the item to access two additional options: for that item so you can put the stock sticker back onto the item.
- Printer Icon – Prints another stock label for the item.
- Check Icon – Manually marks the item as scanned.
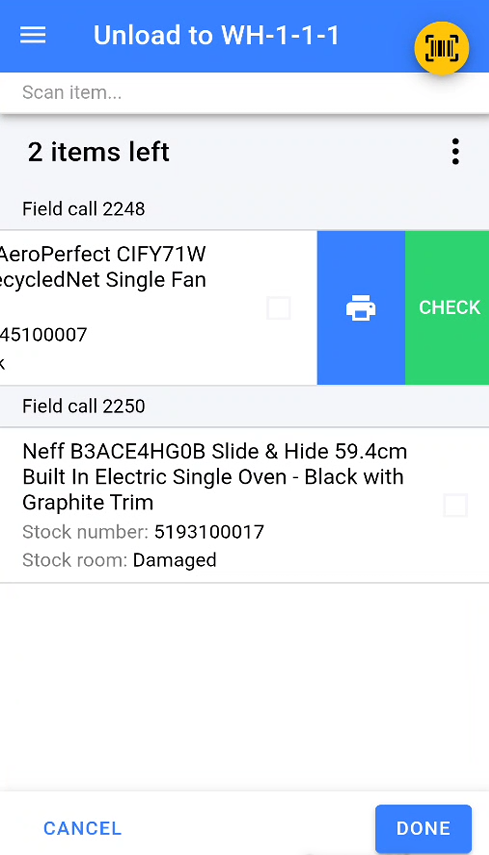
Once all items have been scanned or marked as scanned, click Done to complete the unload van process.
Order Collection
Picking a Customer Collection
A customer collection is used when a customer collects items directly from the warehouse. Customers will be provided with a collection slip, which they must bring with them and hand over at collection.
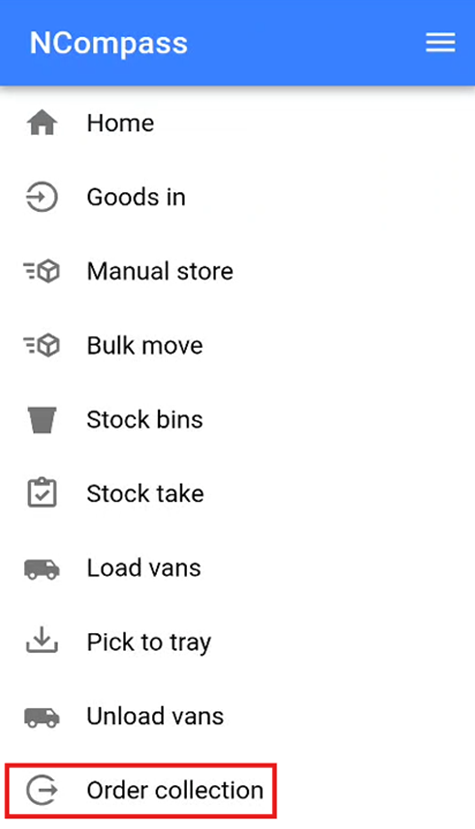
Click the burger menu in the top right of the screen, then select Order Collection from the menu.
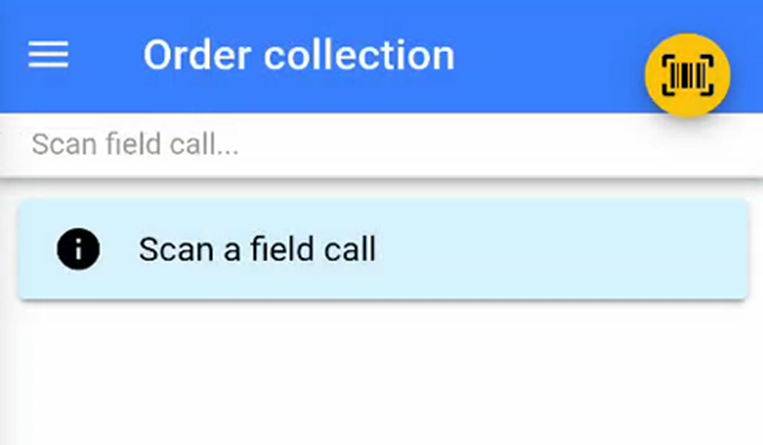
This will open the customer collection screen, ready for you to start the collection, and will prompt you to scan a field call.
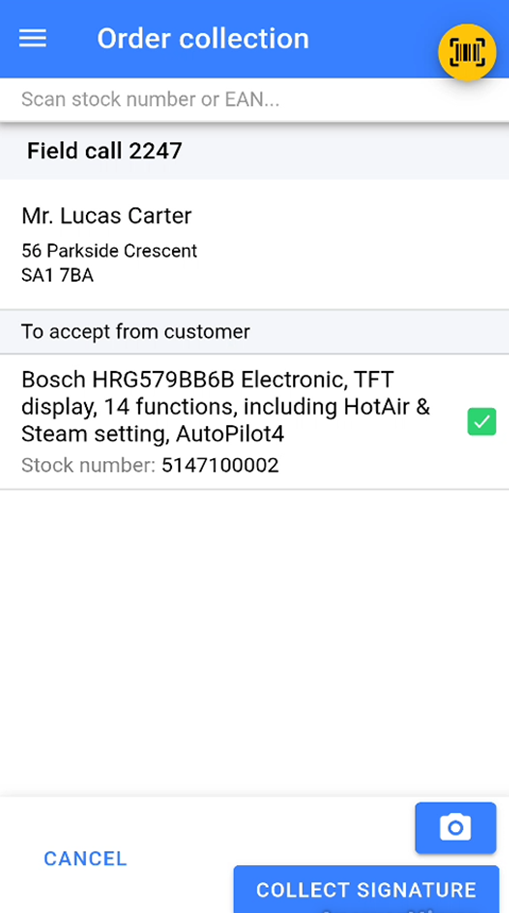
Scan the barcode at the bottom of the customer collection slip to select the collection you will be undertaking. Once the slip has been scanned, the warehouse app will display a list of items due on that collection.
Locate the item due for the customer collection and scan the stock number being issued to the customer. The normal stock swapping rules apply if your system is configured for stock swapping.
Adding photos to a customer collection
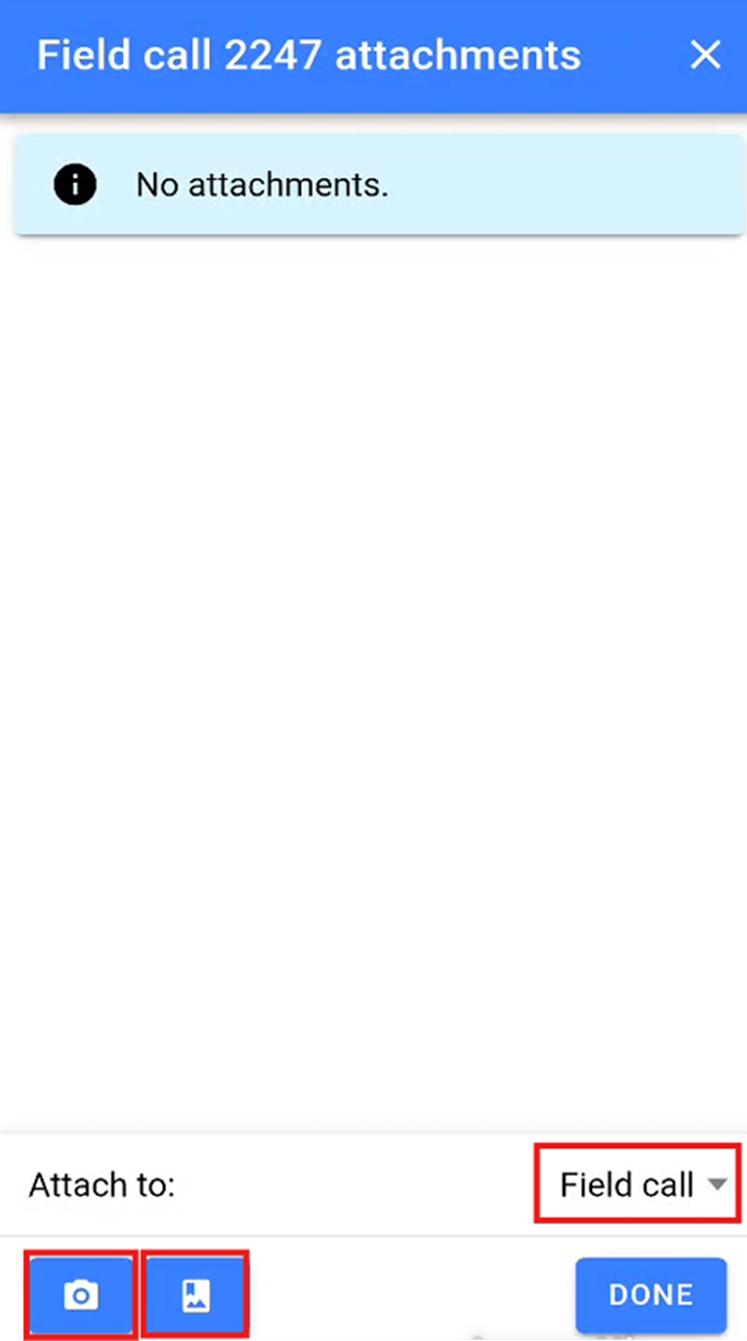
You can add photos to a customer collection by pressing the camera icon in the bottom right of the screen.
This will take you to the attachments section, where you can either take a photo directly by pressing the camera icon in the bottom left of the attachment screen.
You can also attach photos that have already been saved to your device’s camera roll by clicking the image icon in the bottom left of the screen.
You can choose whether to attach the photos to either the field call or the sale by selecting the relevant option from the dropdown in the bottom right of the screen.
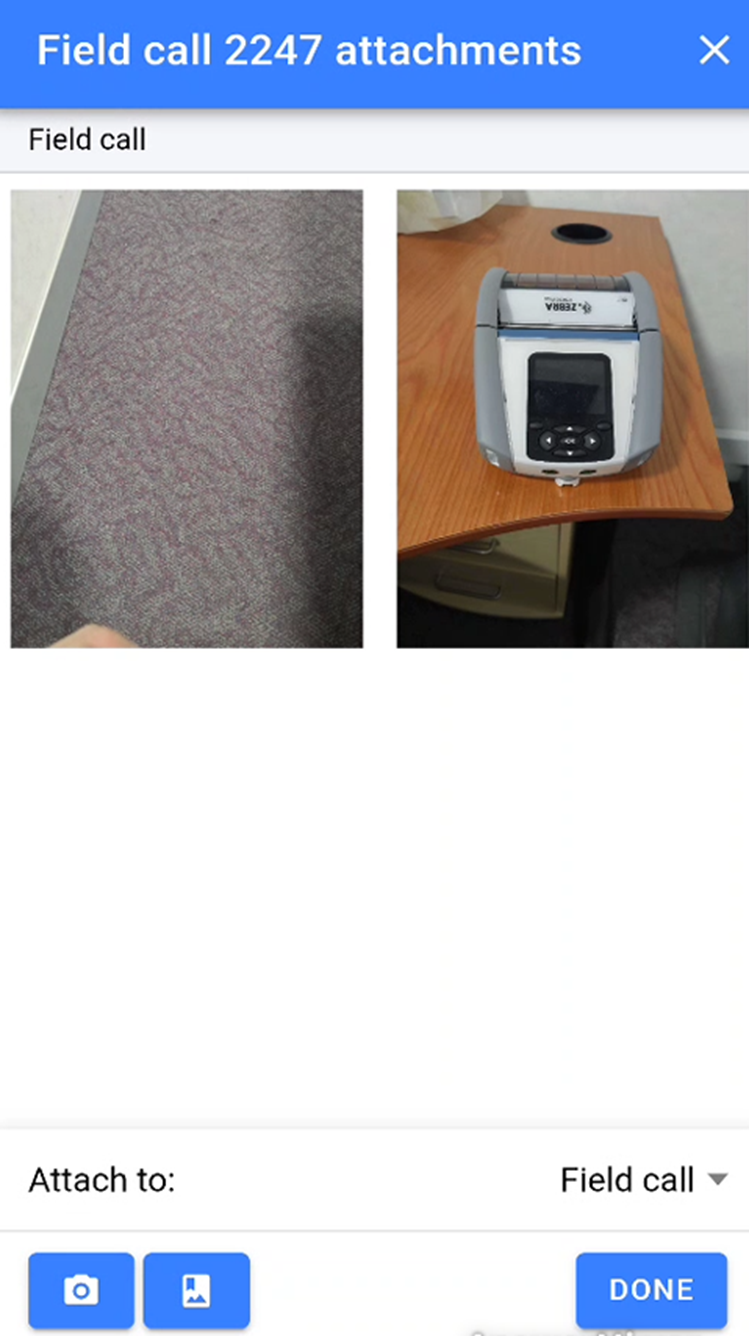
Once you have added the relevant photos in the attachments section, you will be able to see all photos that have been added. Click Done to finish adding photos.
Completing a Customer Collection
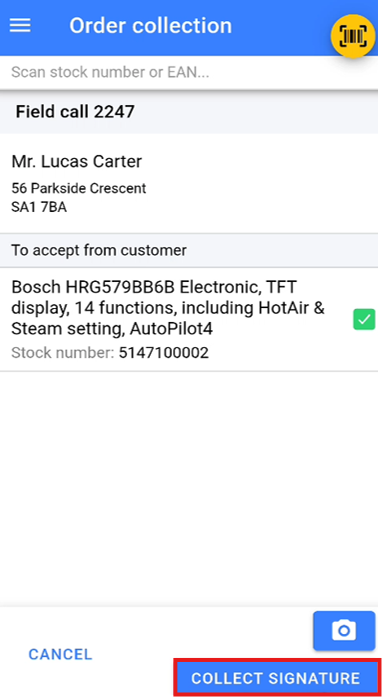
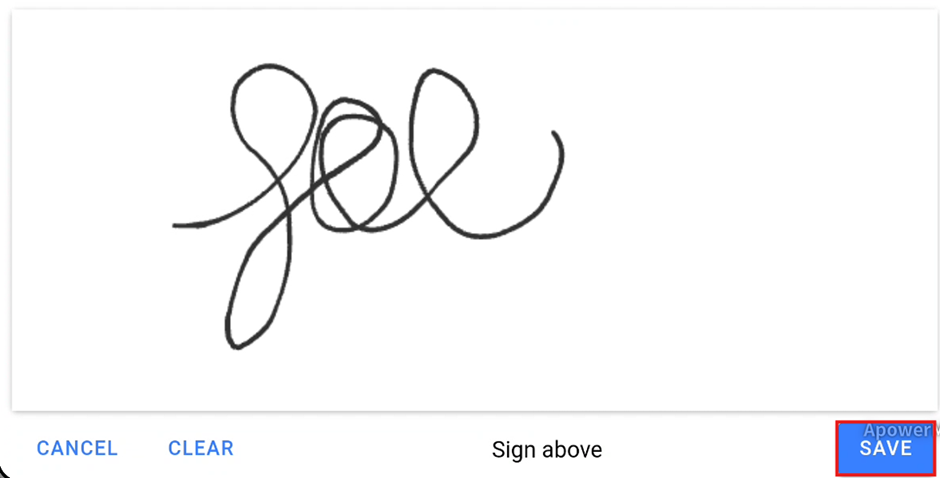
Once all items have been picked and any required photos have been attached, you will need to collect a signature from the customer to confirm they are happy with the collection.
Click the Collect Signature button in the bottom right of the collection screen.
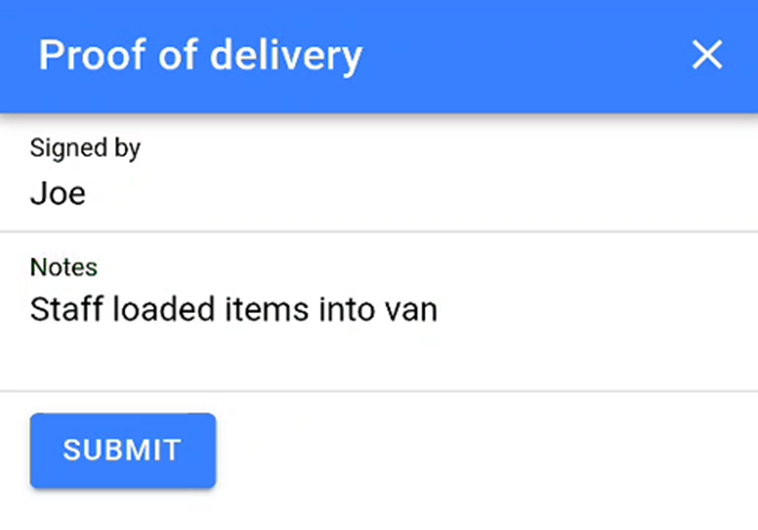
This will open the proof of delivery screen, where you can enter the name of the person collecting the items and add any notes if required.
The warehouse application will then switch to a landscape layout and display a signature pad. Ask the customer to sign on the device. Once the customer has signed, click Save to complete the collection.

Sorting Order of Items
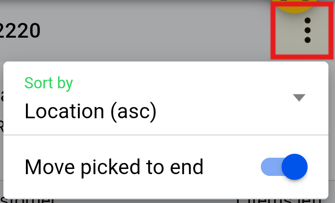
For those Larger collection orders you can now sort the items by location order:
Stock Count
You can use WAS to populate a Stock Count created in NCompass, this is especially useful for Count Only items.
There is a separate guide which covers using and setting up Stock Counts in NCompass.
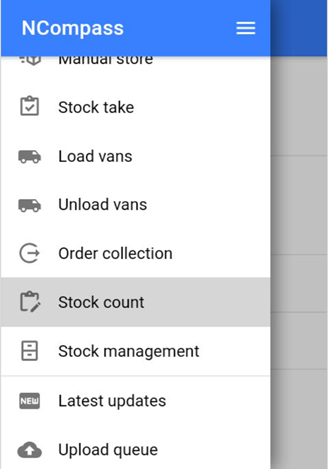
- Click on the stock count with the correct Date/Branch/Stock room you are counting.
If there is no branch/stock room you can select where you are scanning on the next window.
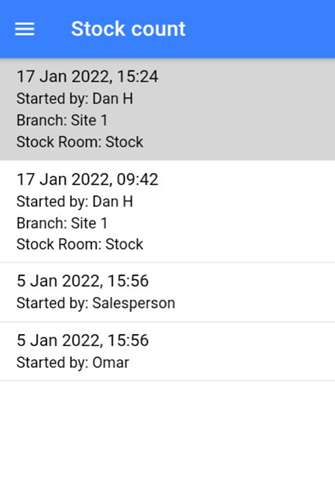
- Once you are on the stock management screen, if not already preselected:
- Set Branch you are in
- Set Stock you are scanning
- Now start scanning the EANs
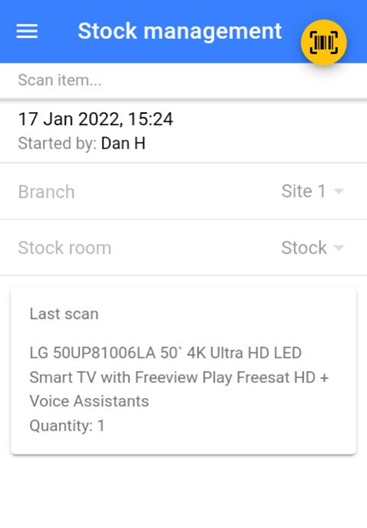
- Start scanning the EANs and entering the QTY of items
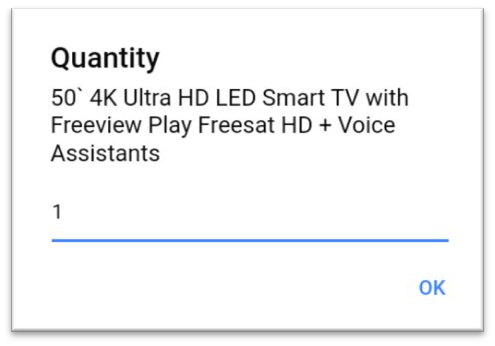
Once you have finished scanning, just click the back button. If you miss anything or are scanning over multiple days just come back into the stock count and continue to scan.
You can amend your last scan if you made a mistake! You can also check the Retail Price at the same time to ensure it's correctly set.
Stock Management
Stock Management is used to check details against an item without using Desktop NCompass. It can be used to:
- View Current Branch
- View Current Stock Room
- View Current Stock Location
- Check and amend Serial Numbers
- Add Condition
- Check and Change Selling Prices for all Categories
- Add Web Images
It can be used on both Fully Tracked Items and Count Only.
Fully Tracked Items
- Scan the NCompass Generated Stock Number Label
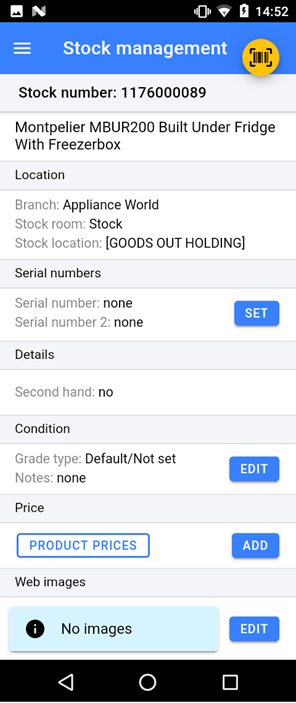
- You can update the serial numbers if they are incorrect or where not added at goods in, you can also add a second serial number.
- You can edit the item condition, adding notes and images.
- You can look up product pricing for the specific item.
- Reprint the Stock Number Label
Count Only Items
- Scan the EAN
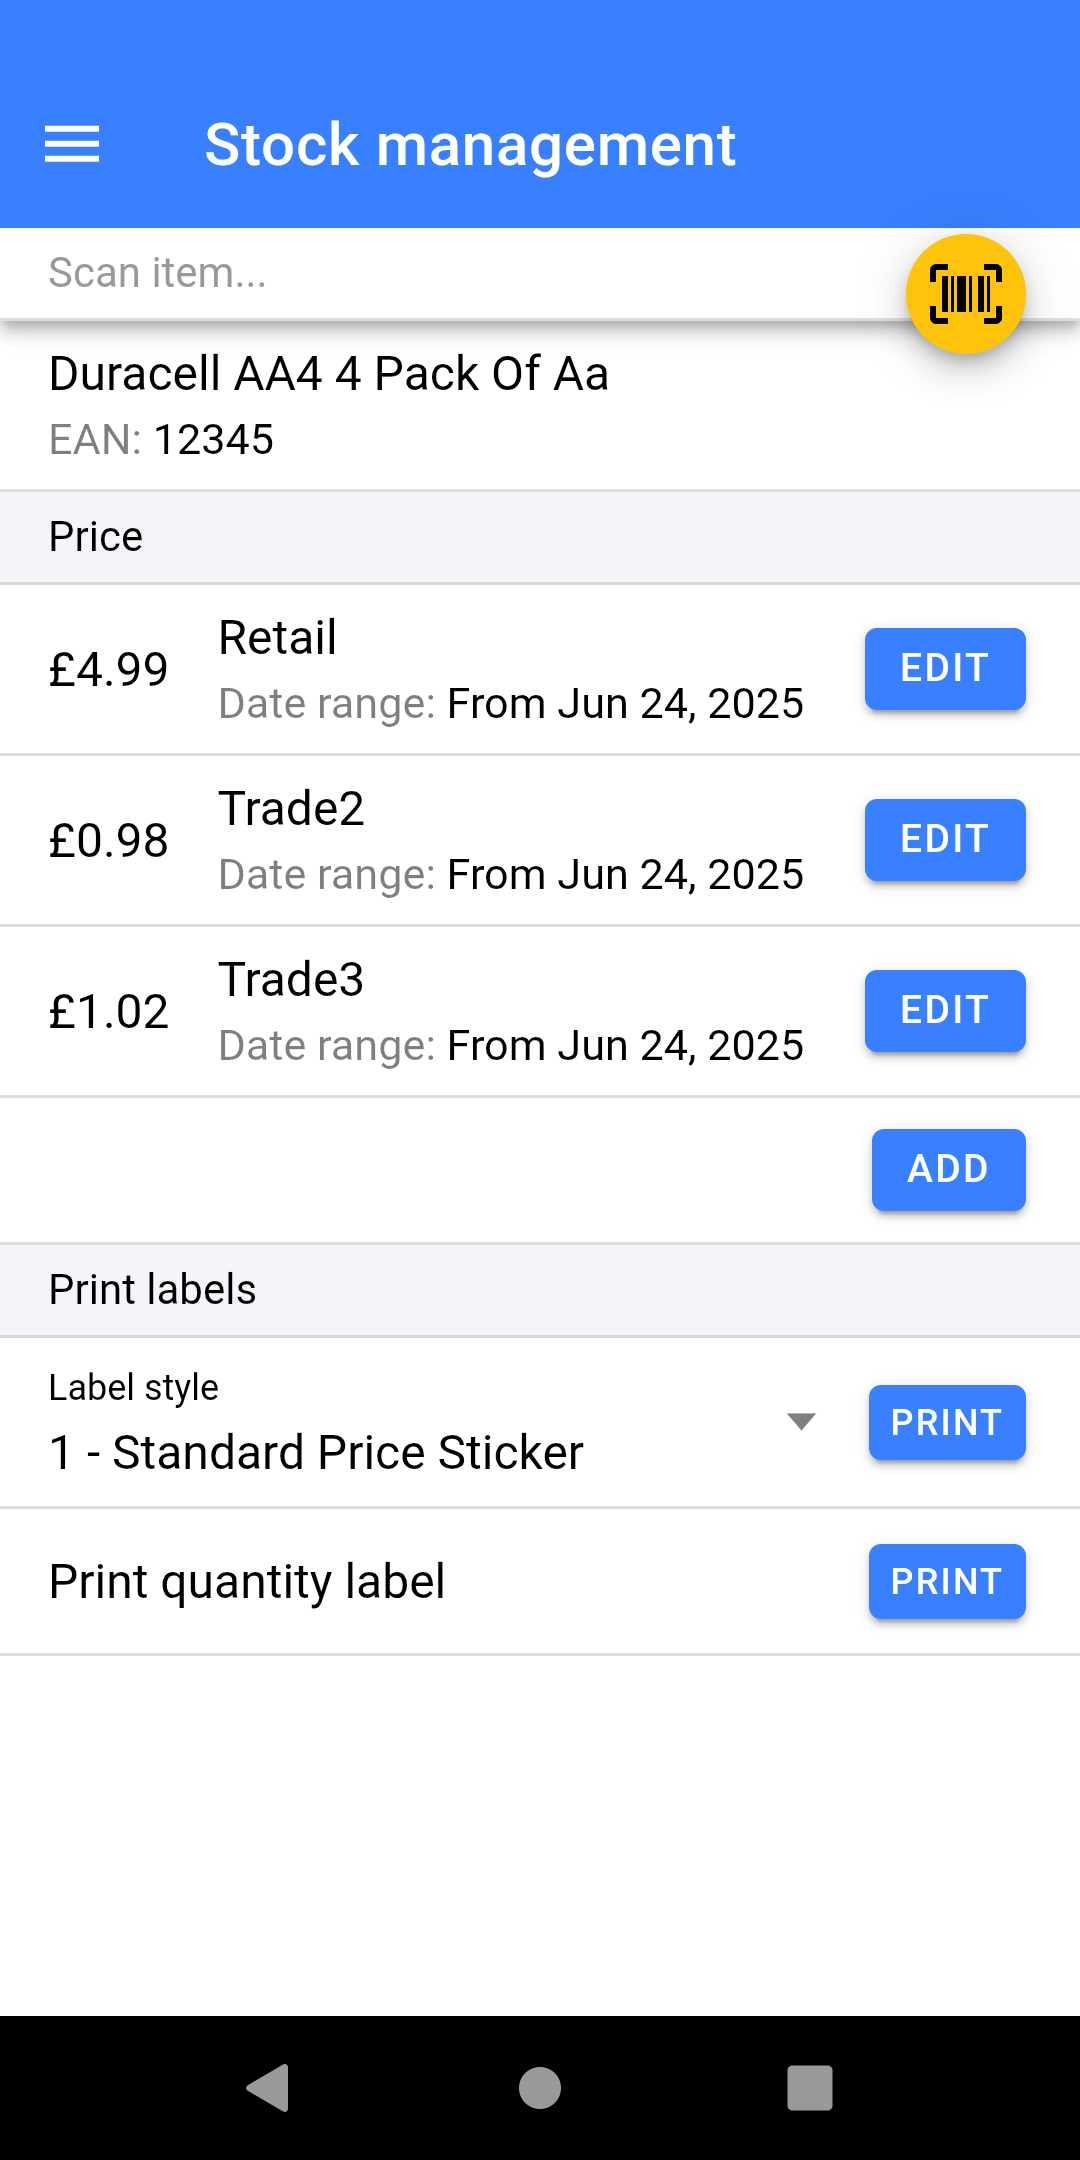
- You can lookup and change pricing, including quantity pricing.
- Reprint the label from a variety of styles.
Print Queued Labels
This process is only used for retailers who want to:
- Goods stock into NCompass on Desktop instead of the Warehouse Operatives doing it.
- Want to get the stock Goods In quickly first and later Label.
- Opening Stock process.
If you believe this feature may be useful to you please speak to Admin to book a consultancy call with the Implementation Team.
Listed Item Swapping
Stock swapping now supports both stock numbers and different models.
If you’re already set up to swap stock numbers on the WAS scanner, no scanner changes are required you just need to configure the swappable products in the Desktop version of NCompass.
Create an Item Group (to Allow Swapping)
-
Go to Administration > Item Groups.
-
Click New to create a group.
-
Enter a name for the group (e.g. the skill or swap category name).
-
Tick the checkbox “Allow item swap within group.”
-
Save the group.
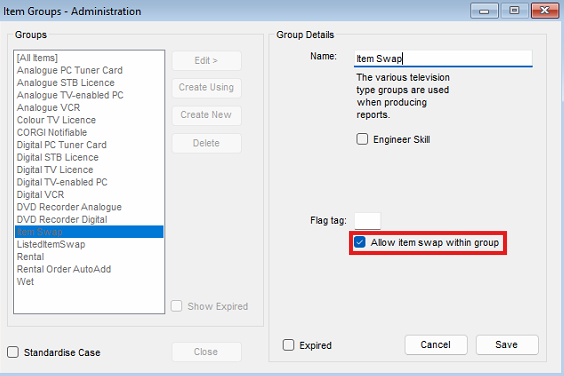
Once enabled, any products added to this group can be swapped interchangeably.
Add a Product to an Item Group
-
Open the Product Info record for the product you want to add.
-
Go to the Stock Control tab.
-
Click the Groups button.
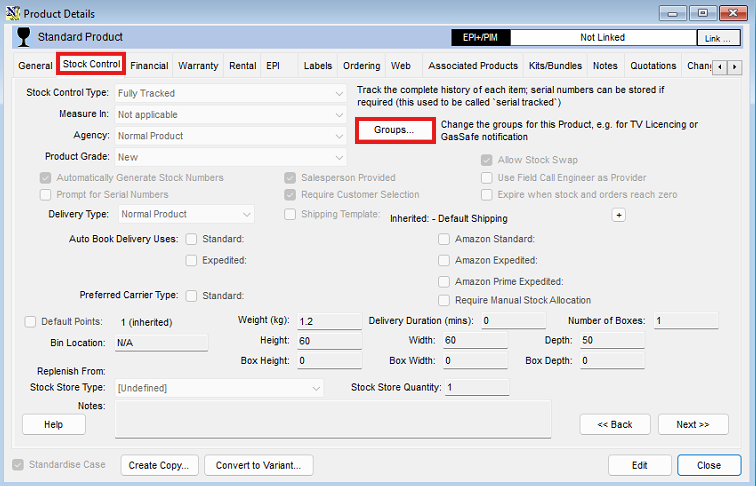
-
Select the relevant item group you created.
-
Add the group to the product.
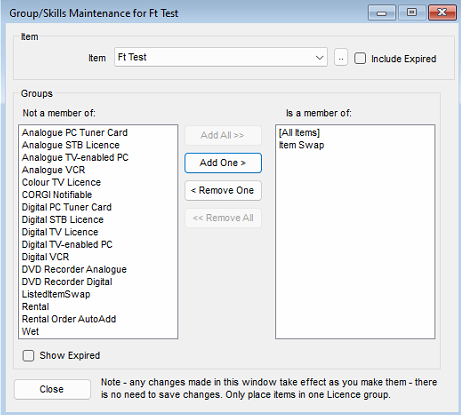
The product can now be swapped with other items in the same group.
Updates, Queue, and Settings
Software version and What’s New
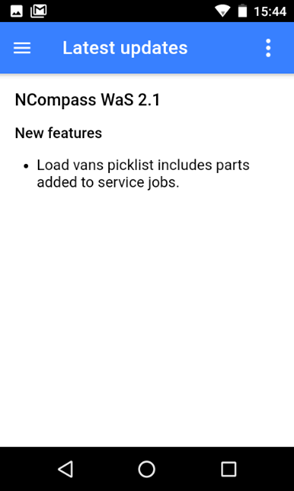
Select Latest Updates from the menu.
This will show you’re the current software version (major release Version, swipe from right to left to see incremental versions) and what’s been added in the last major release.
Check Upload Status
Select Upload queue from the menu.
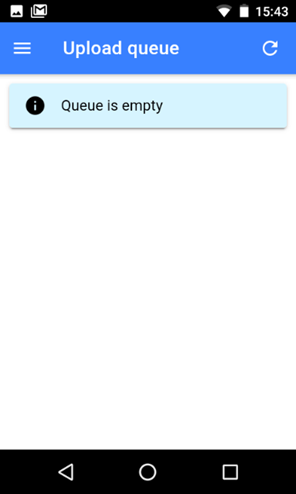
This option will let you see if there are any pending changes that have not been synced with your server.
Typically the queue will empty quite fast so normally it will show empty.
If your device loses network connectivity data may not sent to the server, the scanner stores the changes until the data network is reconnected.
You can manually remove items from the queue or force an update.
Settings
NCompass Configuration
Outlines details on what database and API the device is connecting to, this is something which the Support team may ask for when diagnosing any faults reported.
User Settings
This displays the user logged in, and can be changed with the Change button.
Data
Reload Lookup Data syncs the devices settings this is mainly used for when configuration changes are made whilst users are logged in.
Printer
- Test Printer - This is used to print a Test label out of the connected label printer. We recommend doing this before any instance of Goods In.
- Stock Error Labels to Print - This will default to 2, when doing a stock take if an item is scanned which NCompass thinks is not in stock it will produce a stock error label. We suggest to print 2; the first to stick on the product, the second to keep in a pile to action.
- Previous years in label queue date picker - This setting is used specifically for those companies who want to book the goods in on the desktop by a back office user instead of a warehouse operative, once the goods are booked in the warehouse operative can then load a list of labels to print and scan the EAN to trigger the label print. This setting is defaulting the number of years to look back for labels which have not been printed.
App Settings
Leave these settings as defaulted unless told otherwise by Support.
Photo Settings
- Photo Quality - To increase the upload speed of images taken on the scanner, and to save filling up server storage too quickly we suggest to set this to Medium on all devices. Without this being set images taken on the scanner will be in high res.
- Apply Watermark - Toggle this on if you want the images to be Date/Time stamped.
Load Van Defaults
- Date - Default the date on the loads van screen to be Today or Tomorrow
- Engineer - Default the selected engineer on load vans screen
- Stock Location - Default the Load to Location selected (not reconmended)
Picking Job Defaults
Picking Jobs will require consultancy before use.
Scanner
You won't need to use this unless instructed to by Support.
Device
These settings are used to add padding around the application, to resolve the issue where NCompass Mobile and WAS were opening too large for the screen, this is a temporary measure while the third party plug ins resolve the issue.
Item Lists
NCompass WAS can build lists of EAN Numbers, by scanning the EAN or the Stock Number label
Start by pressing the Lists option in the Menu
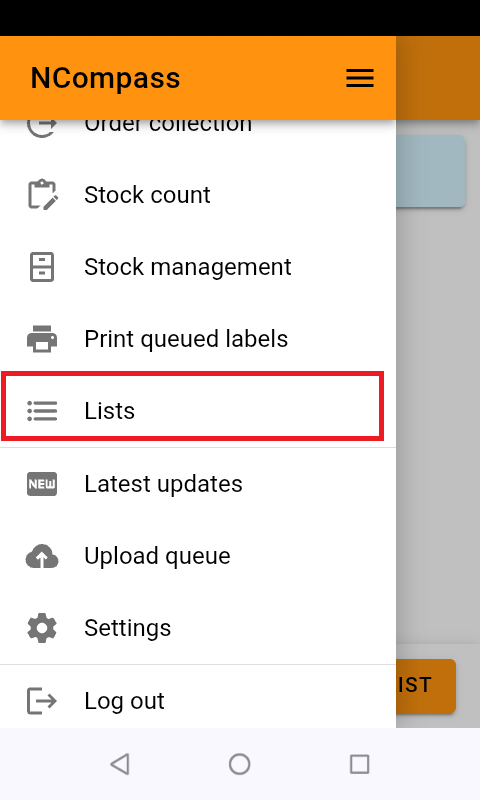
This will show you all lists that you have access to
If you have no lists, this will be empty, you can create a new list by clicking the 'Create List' button
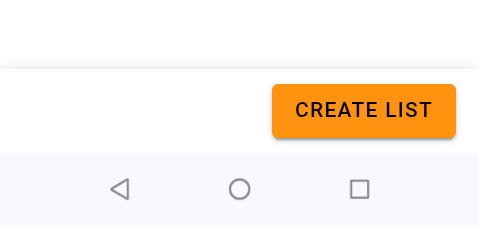
- Click the 'Show Options +' label
You can now give your list a description and an expiry date
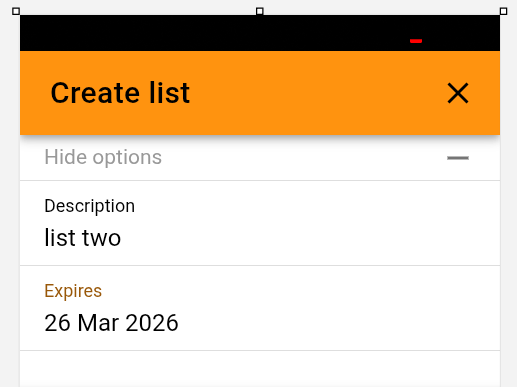
- Then Click 'Submit'
Your list will be added, and you will go back to the list selection screen
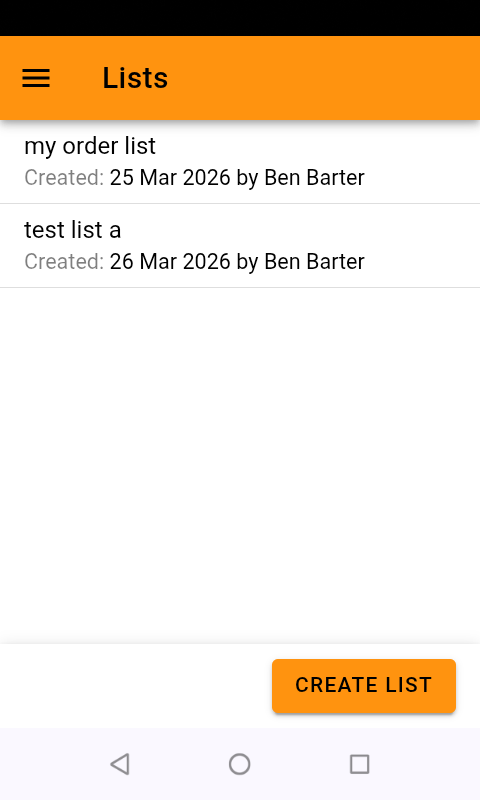
- Click into your list,
Your list will open, if you're revisiting a previous list its contents will loaded
- Scan your items onto your list
Each item will be confirmed
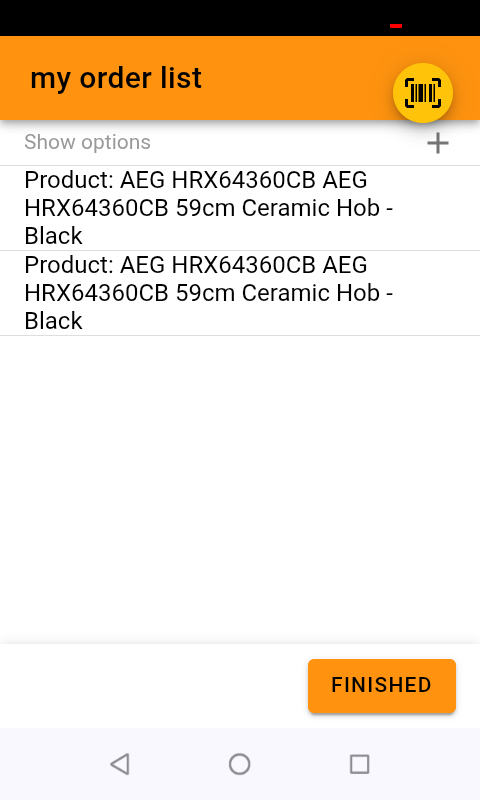
Click 'Finished' and your list will be saved
Scanning barcode that are not in your NCompass System
When you're in an active list, you can click the 'Show options' label
you can turn on 'Allow unknown Barcodes'
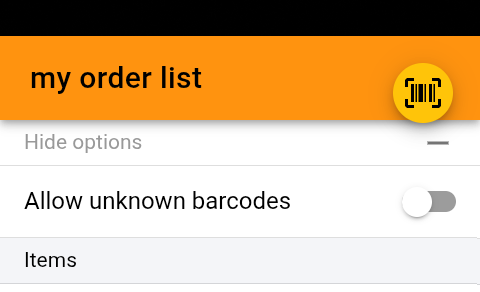
Use of Lists in NCompass
You can manage your lists in the products menu
Products > Lists >Create List
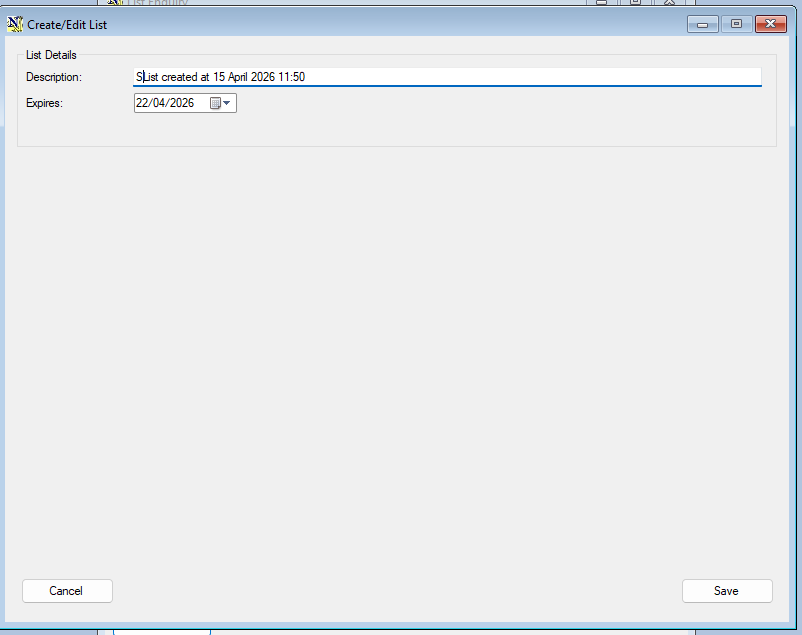
Products > Lists > List enquiry
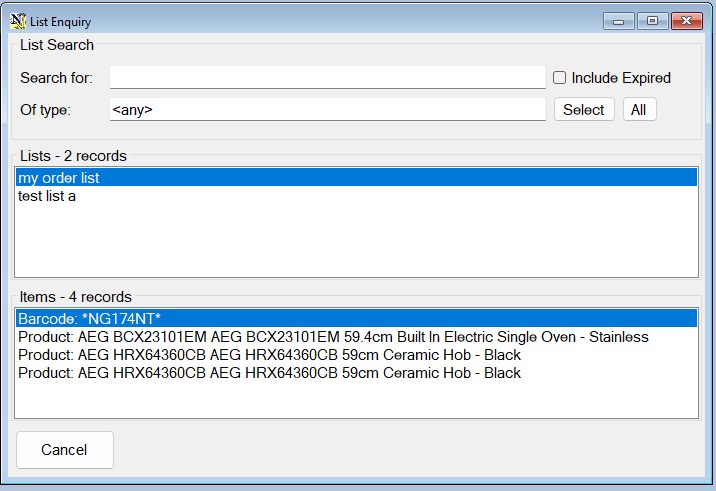
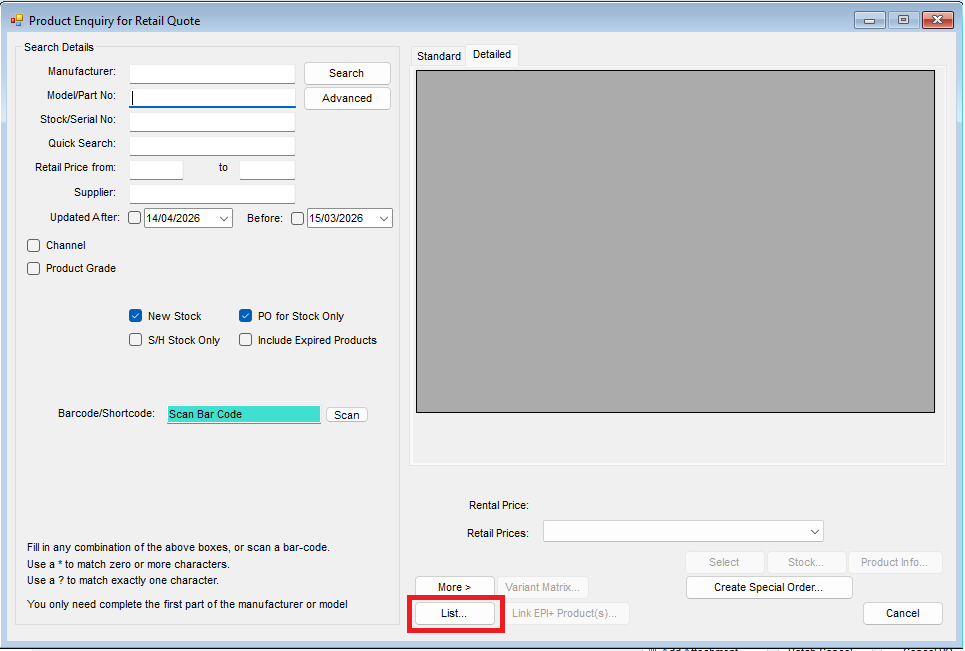
The use of list is being added to various screens in NCompass, at the time of writing, you can use lists to add products to quotes, orders and purchase orders, the lists are accessed by product enquiry
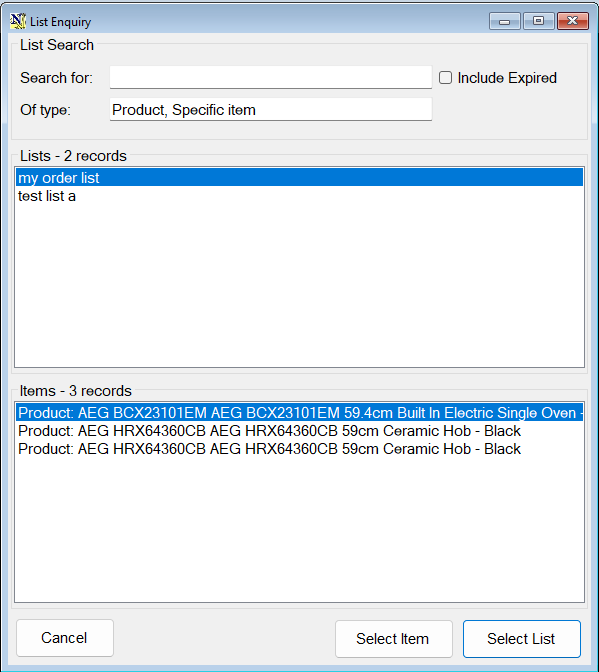
You can select the entire list, or items from the list
Opening a record from a list
From NCompass 11.16, entries on a list can be opened straight from the list. In Products > Lists > List Enquiry, double-click the Item Description of a stock number entry and the item history for that item opens.
The same works while editing a list: double-clicking the description of an entry opens the matching record - item history for a specific item, or the relevant screen for a listed item, field call or sale.
Entries that can be opened this way are shown as blue links, and entries that can be edited carry an edit icon, so it is clear which cells do something when you click them.
Lists can also be created from the warehouse scanner during a stock take, using the Save as List button on the stock error pop-up. See Stock Take.
Customising Menus
Transfers
Screenshots have not yet been captured for this page. Please add them when reviewing it.
Introduction
A transfer moves stock from one branch or stockroom to another. The sending branch raises the transfer and sends the goods; the receiving branch has to confirm what actually turned up before that stock counts as theirs.
NCompass WAS lets the receiving warehouse make that confirmation on the scanner, at the point the boxes come off the vehicle, instead of noting what arrived and completing the transfer at a desk in NCompass afterwards.
Where to find it
The option appears in the WAS menu as Transfer Enquiry / Transfer Goods In. Access is governed by the same permission that controls transfer goods in on the NCompass desktop, and like every WAS option it can be hidden from a user with a custom menu (see Getting Started).
Completing a transfer
- Scan the transfer.
- The app lists every item on that transfer.
- Scan each item you have physically received. As each one is scanned it is ticked off as received, brought into your branch's stock, and placed in the system stock location [Transfer Received].
- Press Confirm once everything that arrived has been scanned.
- If any items on the transfer were not scanned, you are asked what should happen to them – see Items that did not arrive below.
- You are also asked whether labels should be reprinted for the items you received.
Received stock stays in [Transfer Received] until it is put away. Use Manual store to scan each item into its proper location, exactly as you would after a goods in.
[Transfer Received] is a system location created by NCompass, not a physical place. It exists so that stock which has arrived but has not yet been put away can be told apart from stock that is already on the shelf.
Items that did not arrive
An item on the transfer that is not scanned has not arrived. NCompass can hand those items straight back to the sending branch, so the sending branch's stock figures are corrected and the goods are not left belonging to nobody.
What happens is set by the configuration setting Return unreceived transfer items to sending branch, in NCompass under Tools > Configuration. It takes three values:
- Yes – unreceived items are always returned to the sending branch, with no prompt.
- Remind – the default. The operative is asked at the end of the transfer whether to return them.
- No – unreceived items are never returned. They stay outstanding on the transfer.
This deliberately mirrors the equivalent prompt on the NCompass desktop, so a site behaves the same way whichever route its staff use.
Notes for support
- The scanner reads this setting when it loads its lookup data from NCompass. If a change does not appear to have taken effect, have the operative log out and back in, or use Menu > Settings > Reload Lookup Data.
- A transfer completed on the scanner appears in NCompass exactly as though it had been completed on the desktop. There is no separate WAS record to reconcile afterwards.
- Stock that seems to be "missing" after a transfer is most often still sitting in [Transfer Received] because nobody has manually stored it. Check there before treating it as a stock discrepancy.
SLAM and Load Carrier
SLAM (Scan, Label, Apply Label, Manifest)
From NCompass version 11.16 onwards, it is possible to create consignments and print carrier labels directly from the Warehouse Scanner (WAS).
Before enabling this functionality, the relevant carrier integration must already be configured and working correctly within the NCompass desktop application.z
Note: Not all carrier labels are supported for printing from the Warehouse Scanner. Please refer to the list of supported couriers below.
Prerequisites
1. Carrier Integration
The carrier integration must be fully configured and operational within the NCompass desktop application before label printing can be enabled on the Warehouse Scanner.
2. Printer Installation
The label printer must be installed directly on the NCompass server.
The printer must be installed under the same Windows user account that the NCM application service runs under. This is typically the NCM user account.
Some printer settings and properties are user-specific.
If printer formatting or configuration changes are required, these changes must be made while logged in as the same user account that runs the NCM application.
Configuration
Windows Printer for PDF Label Printer
For each Warehouse Scanner workstation, the following configuration setting must be populated:
Configuration Name: Windows Printer for PDF Label Printer
Value: The exact name of the label printer installed on the server under the NCM user account.
Example:
| Setting | Value |
|---|---|
| Windows Printer for PDF Label Printer | Zebra ZD421 |
Once this setting has been configured and the carrier integration is operational, supported carrier labels can be generated and printed directly from the Warehouse Scanner.
Supported Carriers
Please see the list of supported carriers below.
| Courier | Generating Consignments Supported | Label Printing Supported | Scanning Consignment Label Supported |
| BJS | Y | Y | N |
Note: If the consignment is slow to generate on the WAS scanner, check to see if the WAS scanner is connected correctly to a stock number label printer.
Carrier setup
The following settings need to be set accordingly.
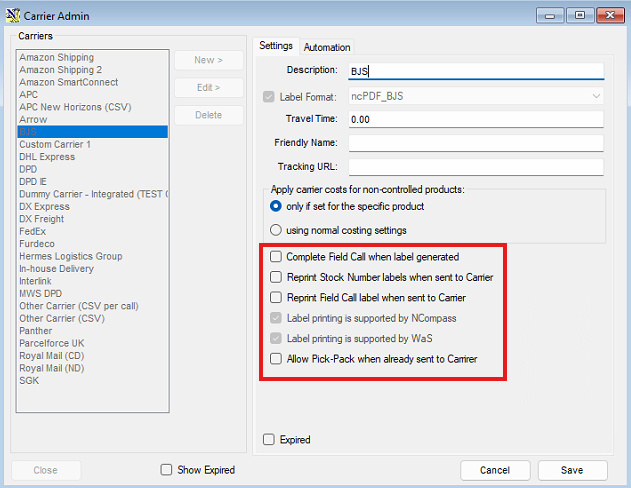
| Setting | Description |
| Complete Field Call when Label Generated | This setting controls if the field call is automatically complete when the consignment is generated. If the customer is using the load carrier function, this needs to be disabled. |
| Reprint Stock Number Labels when sent to Carrier | This will reprint the stock number label for the items on their field call when the consignment is generated. |
| Reprint Field Call label when Sent to Carrier | This will reporting the Field call labels when the consignment is generated. |
| Label printing is supported by NCompass | This is a hardcoded option and cannot be changed. This shows if the label printing for this carrier is supported by the NCompass Desktop. |
| Label printing is supported by WAS | This is a hardcoded option and cannot be changed. This shows if the label printing for this carrier is supported by the Warehouse Scanner. |
| Allow Pick-Pack when already sent to carrier | This allows the pick and pack process on the desktop to be used after the consignment has been generated for the field call. |
Not every carrier can be labelled from the scanner. Where a carrier cannot, use NCompass WAS to pack the items and then print the labels from the field call in NCompass.
Configuration
In NCompass under Tools > Configuration:
- Autosubmit SLAM when scanning complete (default No) – when the last item on a field call is scanned, send it to the carrier straight away instead of waiting for the operative to press the button. (Bypasees pressing the send to carrier button)
SLAM
- Open Pick Pack > SLAM.
- Choose the dispatch date and the carrier. These narrow the list to the consignments you are working through.
- The screen lists the field calls due to go out on that date with that carrier.
- Pick a field call by tapping it in the list, by scanning the field call barcode, or by scanning any item that belongs to it. Scanning an item both selects its field call and ticks that item off.
- Scan the remaining items on the field call. Stock swapping is allowed, so where an item is interchangeable the operative can scan whichever one is easiest to reach.
- Once every item is scanned, Send to Carrier becomes available – or fires by itself if autosubmit is switched on. This books the consignment with the carrier, prints the carrier label, and, depending on the carrier options above, completes the field call and reprints stock number or field call labels.
- The screen returns to the list, ready for the next field call.
Scanning an item during SLAM records a stock movement against the item at its current location, noted as SLAM. The item does not change location at this point – that happens when the carrier is loaded – but there is a record of when it was packed.
Working the field call list
Both a dispatch date and a carrier have to be chosen before the list can be refreshed. Refreshing without a carrier selected returns a plain message asking for one to be chosen, rather than an error.
The entry count. Each field call in the list shows a count of entries, and that count is the number of items the operative actually has to scan. Collection entries and service-only lines are left out of it, because those are never sent down to the scanner. This matters where a call has, say, one tracked item to deliver and one item to collect: the list shows one entry, and opening the call shows one item to pick, so the two agree.
A field call that meets the date and carrier filter but has nothing scannable on it at all – a collection-only call, for instance – is not shown in the list.
Calls that have already gone. A toggle controls whether field calls that have already been sent to the carrier appear. It is on by default, so the list holds only the calls that still need a consignment generating. Switch it off to bring the sent calls back into view; those are marked with a green tick so they can be told apart at a glance. A counter shows how many calls are still to be sent, so the operative can see how much of the run is left.
Grouping when picking. Opening a field call shows the items to pick grouped by branch and stock room, in the same way as the Load Vans screen. Count only items are grouped this way too, rather than being gathered under a single heading of their own, so on a site with more than one physical branch the operative can see where each item has to be picked from.
Load Carrier
Load Carrier is used when the carrier's vehicle arrives, to confirm what is really going on it. The goods must already carry a consignment number, put there by SLAM or by Send to Carrier in NCompass.
- Open Pick Pack > Load Carrier and choose the carrier you are loading.
- Scan a field call barcode, a consignment number, or an individual stock number.
- Scanning a field call or a consignment number moves every item on that field call into the system location [Courier Loaded]. Scanning a stock number moves that one item.
- Carry on until the vehicle is loaded.
Alerts
- If the field call has never been sent to the carrier – it has no consignment number – the operative is told SLAM not complete - this Field Call has not been sent to the Carrier. The SLAM step has been skipped and must be done first.
- If the field call belongs to a different carrier from the one selected, an alert is shown. The goods are about to go on the wrong vehicle.
When every item on a field call has reached [Courier Loaded], the field call is completed automatically. Service-only lines are ignored in that check, since there is nothing physical to load for them.
Seeing what is still to go
Choosing a carrier on the Load Carrier screen lists the items that are still expected to go out with that carrier – the ones where a consignment has already been generated, the field call has not been completed, and the item has not yet been scanned into [Courier Loaded]. Each row shows the stock number, the product, where the item is currently held and the date its call is scheduled for, and a count shows how many are left to load.
The point of the list is to make sure nothing that was due out has been missed. The scheduled date is shown so that anything which did not fit on the previous day's vehicle can be spotted and loaded first.
Notes for support
- [Courier Loaded] is a system stock location created by NCompass. Items sitting in it have left the building on a carrier vehicle; they are not on a shelf and should not be picked.
- Send to Carrier behaves identically wherever it is triggered – the field call in NCompass, the goods dispatch pick/pack screen, or NCompass WAS. A fault reported on one route is worth checking on the others.
- Carrier label printing needs a label printer configured for the service that talks to the carrier. A printer that opens a dialog of its own, such as Microsoft Print to PDF, will appear to hang, because the printing runs in an unattended session where nobody can answer it.
- Reassigning a field call to a different engineer. Changing the engineer by right clicking the call in NCompass and reassigning it also updates the carrier and service level held on the call to match the new engineer, provided the call has not already been sent to the carrier. Previously those were only refreshed when the call was opened and saved, which is why a reassigned call could go missing from the SLAM list until someone edited and saved it.
- Carriers that produce a CSV file per call. Sending a field call to this style of carrier used to work from NCompass but fail from the scanner with an object reference error, because the desktop and the scanner service work out where to put the file in different ways. Both now use the same method, so this carrier type can be used from SLAM.