HR Module
Holiday and Overtime Management
HR Module
What the HR module does
The HR module adds holiday and overtime management to NCompass. Staff request annual leave and overtime from inside NCompass, see their entitlement and booking history, and get warned about clashes before they submit. Managers and HR staff work through approval queues, record absences on behalf of staff, and watch the picture on dashboards and a team calendar.
The module has two areas, both under the top-level HR menu:
- Holidays - annual leave and absence: requests, approvals, entitlements, absence types, blackout dates, conflict rules, time off in lieu.
- Overtime - overtime requests, recording the time actually worked, approvals and the overtime report.
Day-to-day screens live under HR > Holidays and HR > Overtime; the rule and entitlement administration screens live under Administration > HR. Bank holidays are separate - they are maintained under Administration > Bank Holidays, are not part of the HR licence, and feed the working-day calculations.
Licensing and access
The module is enabled by the HR Module Installed licence setting. Without it the HR menu does not appear at all.
Each screen is controlled by the usual NCompass security functions, under HR Absence System in Security Roles. Two defaults are worth knowing when access "mysteriously" differs between the two areas:
- The holiday approval queues are available to tier-2 users by default, but the overtime approval queues are denied by default - they must be explicitly granted in Security Roles, even for administrators.
- The holiday Manager and HR approval queues additionally require the person's own salesperson record to carry the Manager or HR role. Someone with the security function but not the role is refused with a message about the missing role - that is not a Security Roles problem.
Roles
Every person in the HR module is a salesperson record, and the HR roles are set on the salesperson's HR tab (see Configuration & Staff Setup):
- Staff - included in the HR module. Anyone without this flag does not appear anywhere in HR - not in pickers, queues or calendars.
- Manager - approves requests from the staff who report to them.
- HR - gives final approval, sees all staff, and manages entitlements, absence types and time off in lieu. HR can also approve a request directly if a manager is unavailable.
Which employee a screen shows is driven by the workstation's default salesperson. The Allow User To Change Employee Selection setting (default No) keeps the employee selection locked to that person, so each member of staff should have their own login tied to their own salesperson record.
The approval workflow
Requests follow the same two-stage pattern in both areas:
Staff member submits > Manager approves > HR approves
- A request goes to the staff member's manager - either of the two Reports To managers on their record can action it.
- For holidays, which stages are actually required depends on the absence type: annual leave needs both, sickness needs none (it is effectively approved as soon as it is recorded), and some types need only the manager.
- A decline at either stage ends the request; declining always requires a note, which the staff member sees.
- Overtime has an extra stage: after approval the staff member records the time actually worked, and if it exceeds what was requested the manager must re-approve before HR signs off.
Email notifications
The module sends plain emails (using each salesperson's email address) at these points:
- Request submitted (holiday or overtime) - to the staff member's manager(s).
- Manager decision (holiday or overtime) - to the staff member.
- HR decision (holiday) - to the staff member.
- Actual overtime recorded - to HR; and if re-approval is needed, to the manager(s).
Nothing is emailed when a request is cancelled.
Not yet available
The original release notes for this module describe some capabilities that are not yet in the product. Support will be asked about these by customers reading older material:
- Calendar integration - leave requests do not create Outlook/calendar entries (no "REQUESTED - PENDING APPROVAL" / "CONFIRMED" entries).
- Automatic HR notification when sickness is recorded, and sick-note receipt tracking.
- Holiday reporting - there are no leave balance, absence trend, upcoming leave or declined-request reports. The only HR report today is the Overtime report (see the Overtime page).
- Enforced minimum/maximum booking limits - the settings exist but requests are not validated against them.
- "At least X people must be present" conflict rules and per-person blackout dates.
- A configurable holiday year - the holiday year currently always runs 1 January to 31 December.
Configuration & Staff Setup
Licensing
The module is enabled by the HR Module Installed setting (System Configuration, Licensing Data group). Until it is set, the HR menu is hidden entirely.
System settings
The HR Features group in System Configuration contains:
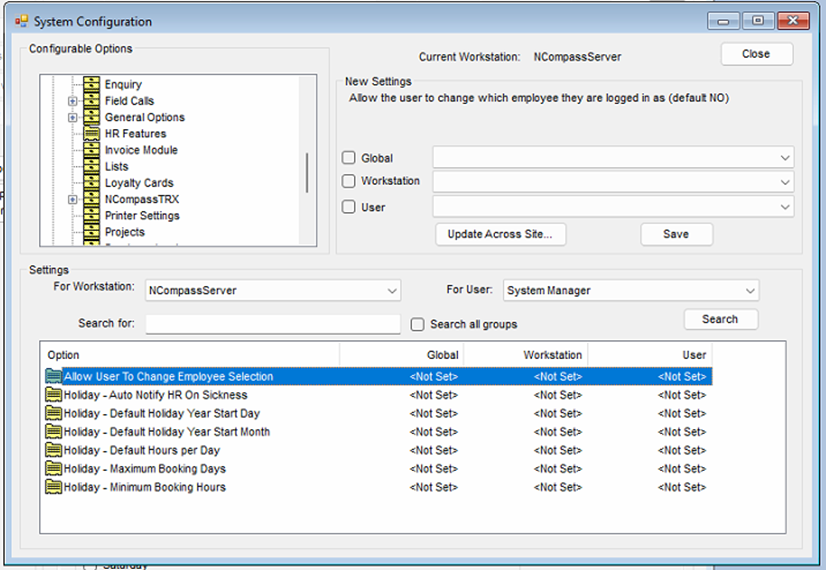
Allow User To Change Employee Selection- default No. With the default, the employee/manager/HR-user selection on nearly every HR screen is locked to the workstation's default salesperson, so users cannot look at other employees' requests. Leave it at No and give each member of staff their own login tied to their salesperson record.Holiday - Minimum Booking Hours- default 1. Currently has no effect - requests are not validated against it.Holiday - Maximum Booking Days- default 28. Currently has no effect - requests are not validated against it.Holiday - Default Hours per Day- default 8.5. Used when a day is booked in hours. Currently has no effect - the hours-per-day actually used comes from the person's entitlement entry.Holiday - Default Holiday Year Start DayandHoliday - Default Holiday Year Start Month- defaults 1 and January. Currently have no effect - the holiday year always runs 1 January to 31 December.Holiday - Auto Notify HR On Sickness- default Yes. Currently has no effect - no sickness notification is sent.
Security
The HR security functions are under HR Absence System in Security Roles. Defaults: the day-to-day holiday screens are available to ordinary users, holiday approval queues to tier-2 users, and the administration screens (entitlements, absence types, blackout dates, conflict rules, time in lieu) to administrators.
The overtime Manager and HR approval queues are denied by default - grant them explicitly in Security Roles for the people who approve overtime, including administrators.
Staff setup
Each member of staff is set up on their salesperson record under Administration > Salespersons Engineers > Edit, on the HR tab:
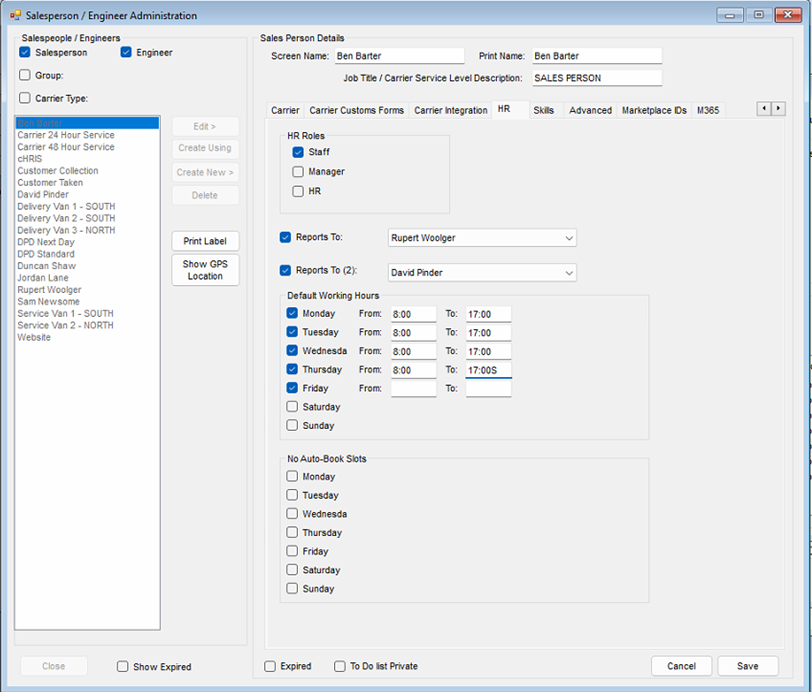
- HR Roles - tick Staff for everyone in the HR system (anyone without it is invisible to the module), Manager for people who approve their staff's requests, and HR for the HR team. At least one person must have the HR role. A person can hold all three.
- Reports To and Reports To (2) - the person's manager and an optional second manager. Either can approve the person's requests. Any salesperson can be picked (they do not need the Manager role first), and someone can even report to themselves - in which case they can approve their own requests, so check these selections carefully.
- Default Working Hours - the person's normal hours on each weekday. Also used by the Projects module's task planner.
- No Auto-Book Slots - windows the Projects task planner must keep clear; not used by holiday or overtime processing.
- Include on clock in dashboard - whether the person appears on the Clock In/Out dashboard (separate Clock In/Out module).
Cost centres
Blackout dates, conflict rules and the team views are scoped by cost centre, so every employee must be in the right one:
- On the salesperson record, open the Contacts / Settings tab.
- Click Edit if not already editing.
- Select the correct cost centre from the dropdown and click Save.
Cost centres themselves are maintained under Administration > Accounting > Cost Centres.
Where holidays show up elsewhere
- Scheduled Calls diary - approved and pending leave appears as staff-holiday banners (toggle "Show Staff Holidays" on the diary).
- Projects task planner - approved leave, the working-hours pattern and No Auto-Book slots all shape when tasks can be planned for a person (see the Projects book).
HR Rules & Entitlements
The rule and entitlement screens live under Administration > HR. Set them up in this order: absence types, blackout dates, conflict rules, then entitlements.
Absence types
Administration > HR > Manage Absence Types
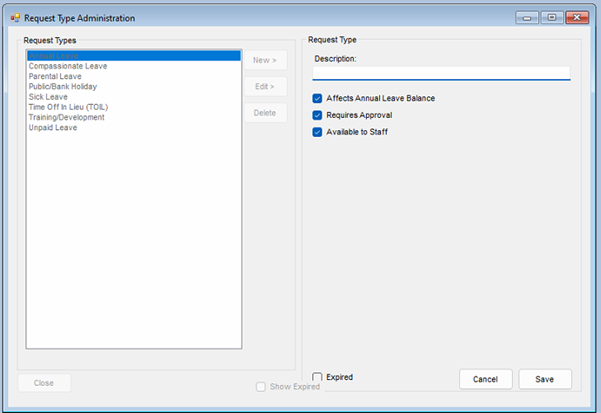
The system ships with a standard set of absence types, which you can edit or add to. For each type you control:
Affects Annual Leave Balance- whether time off of this type is deducted from the person's entitlement.Requires Approval- whether requests of this type go through the approval queues. Ticking this makes both the manager and HR stages required; unticking it makes the type effectively approved as soon as it is recorded.Available to Staff- whether staff can request this type themselves. Only types with this ticked appear on the staff request screen; everything else is recorded by a manager or HR on the staff member's behalf.
The standard types behave like this out of the box:
| Type | Deducts from entitlement | Approval | Staff can request |
|---|---|---|---|
| Annual Leave | Yes | Manager + HR | Yes |
| Sick Leave | No | None - approved on recording | No |
| Compassionate Leave | No | Manager only | No |
| Training / Development | No | Manager only | No |
| Time Off In Lieu (TOIL) | Yes | None - approved on recording | No |
| Parental Leave | No | Manager + HR | No |
| Unpaid Leave | No | Manager + HR | No |
| Public/Bank Holiday | No | None - approved on recording | No |
Note: a few standard types need only manager approval, but the edit screen's single Requires Approval tick sets manager and HR together - a manager-only type cannot currently be created or re-created from the screen.
Blackout dates
Administration > HR > Manage Blackout Dates
Blackouts are date ranges when holiday should not be booked. A staff member booking annual leave over a blackout that applies to them is warned at the point of booking - the warning does not block the request, but approvers see the clash too.
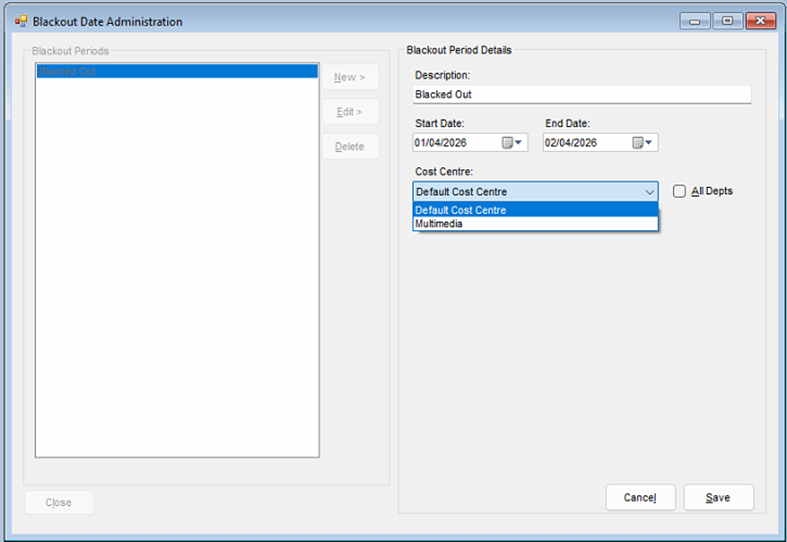
- Click New, or select an existing blackout and click Edit.
- Enter a description and set the start and end dates.
- By default the blackout applies to all departments. If it only applies to one cost centre, untick All Depts and select the cost centre.
- Click Save.
Conflict rules
Administration > HR > Manage Conflict Rules
A conflict rule caps how many people from a cost centre or salesperson group can be absent at the same time. Like blackouts, a breach warns the staff member and the approvers - it does not block the booking.
- Click New, or select an existing rule and click Edit.
- Enter a description.
- Choose whether the rule applies to a Cost Centre or a Salesperson Group, and pick which one.
- Set Max Concurrent Off - the most people from that group who may be absent at once.
- Click Save.
Entitlements
Administration > HR > Manage Entitlements
Entitlement is held per person per holiday year (always 1 January to 31 December). Staff with no entry for the selected year are listed with the default of 25 days annual leave until you save something different. To adjust:
- Pick the holiday year (the current year, two back and two ahead are available) and, optionally, a single employee.
- Click Edit, then click into any cell and make the adjustment. Each row carries the entitlement type, days, hours and hours-per-day.
- Click Save - every row in the grid is saved together.
A person's total entitlement for the year is the sum of all their rows: as well as Annual Leave, rows can be Bonus Days, Time Off In Lieu, Carry Over or Other, so extra time granted through any of those shows up here alongside the base allowance.
Holidays
Everything here is under HR > Holidays. What each person can see follows their role: staff see themselves, managers also see the staff who report to them, and HR sees everyone.
My holidays
HR > Holidays > My Holidays/Entitlement View
The staff member's own view: an entitlement summary (annual entitlement, used, pending, remaining - colour-coded when it runs low - carried forward and time off in lieu), a grid of upcoming leave and pending requests, and a request history showing who approved what and when.
From here staff can start a New Request or select one of their own requests and Cancel it (pending or approved requests only, with a confirmation). Requests declined by the manager or HR stay visible with the decision notes.
Requesting time off
HR > Holidays > Submit New Request (or New Request on My Holidays)
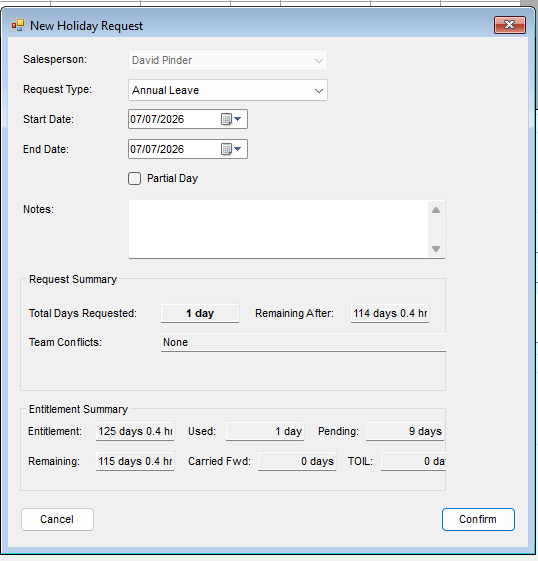
- Select the request type - staff can only pick types marked
Available to Staff, normally just Annual Leave. - Select the first and last day of the leave.
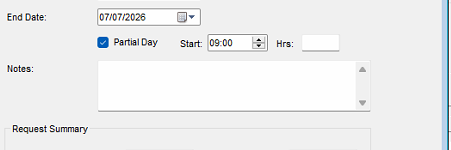
- For part of a single day, tick Partial Day and enter the start time and number of hours (available only when the start and end date are the same day).
- Check the request summary and click Confirm.
The summary shows the total days being requested - counted over working days, skipping weekends and bank holidays - along with the entitlement remaining after the request, any team members already off over the same dates (click the conflicts line for the full list), and a warning if the dates fall in a blackout period.
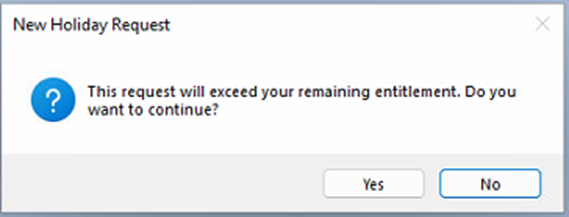
Warnings do not stop the request: it can still be submitted, with a confirmation that it may not be approved. The same applies when the request exceeds the remaining entitlement. The one hard stop is an overlap with the staff member's own existing request - that must be cancelled first.
Approving leave
The normal flow is staff member submits > manager approves > HR approves. Sickness and other absence types a manager records directly may need fewer stages - see the absence types table on the HR Rules & Entitlements page. HR can approve a request directly if a manager is unavailable.
Manager approval
HR > Holidays > Manager Approval Queue
The queue lists pending requests from all staff who report to the selected manager (either of a person's two Reports To managers can action their requests). Selecting a request shows its details and notes, the staff member's entitlement summary including what would remain after approval, and a team calendar for the same period showing who else is off.
- Highlight the request.
- Click Approve or Decline. Declining requires a note, which the staff member sees; a declined request does not go on to HR.
HR approval
HR > Holidays > HR Approval Queue
The same screen for the HR team, listing pending requests for all staff - including requests the manager has not actioned yet, so expect to see items here that are still waiting for their manager stage. Approve or decline exactly as above.
Recording an absence for someone
Managers and HR can record any absence type on a staff member's behalf - sickness being the everyday case - using the Record Absence button at the bottom of either approval queue.

- Click Record Absence.
- Select the staff member and the absence type.
- Set the start and end dates and add any notes.
- Click Save.
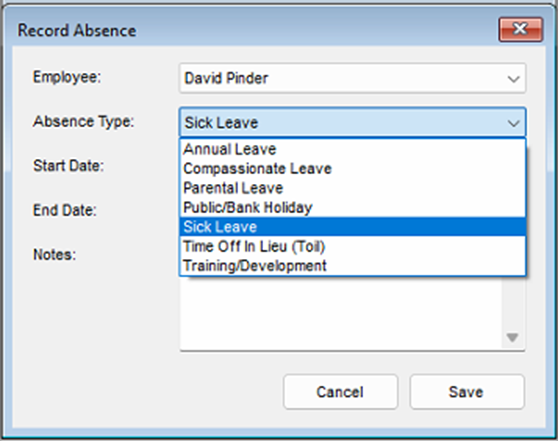
What happens next depends on the type: sickness needs no approval and takes effect immediately, while types that require approval join the queues in the usual way.
Holiday dashboard
HR > Holidays > HR Dashboard/Overview
An overview of upcoming leave, pending requests and recent decisions, shaped by role: staff get a personal view ("You Off Today / This Week"), managers see their team, HR sees everyone. Headline counts show pending approvals and who is off today and this week.
Filters: year, date range, and - for managers and HR - cost centre and salesperson; declined, cancelled and expired requests can be shown or hidden. An Entitlement panel shows the selected employee's summary, and View Calendar jumps to the team calendar.
Team calendar
HR > Holidays > Team Calendar View
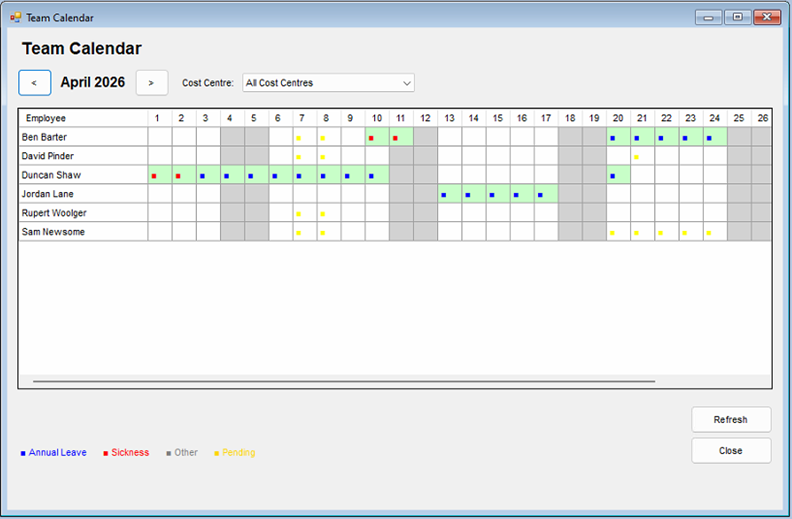
A month grid - one row per person, one column per day - showing annual leave, sickness, other absences and pending requests, with weekends shaded. Use the arrows to move between months; hover a cell for the type and status. Entries are colour-coded as per the on-screen legend: blue annual leave, red sickness, grey other absence types, yellow pending approval. An absence type that has been given its own display colour uses that instead.
Time off in lieu
HR > Holidays > Manage Time Off In Lieu (HR role only)
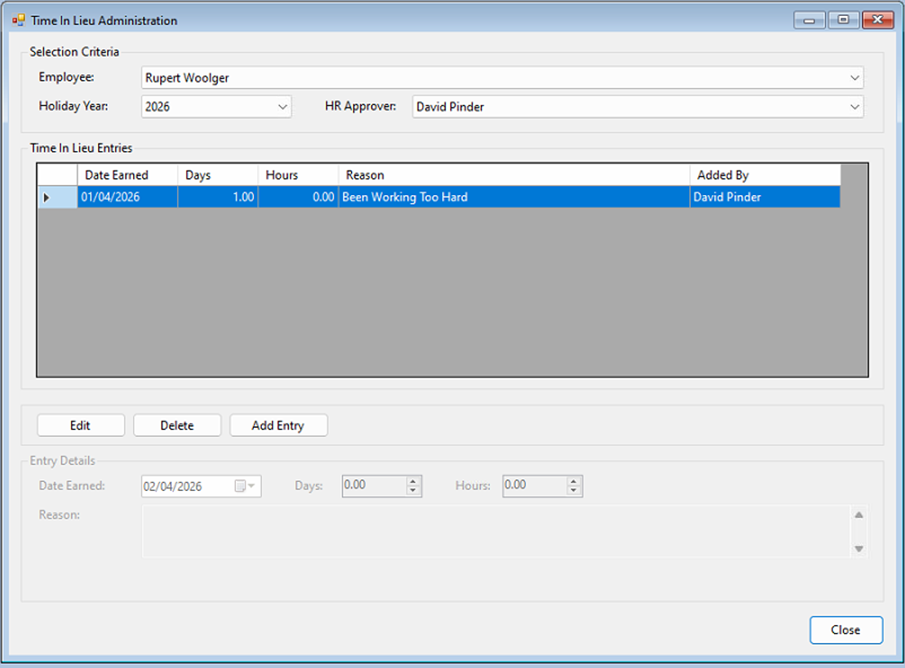
TOIL is extra leave allowance granted by HR. Select the employee and holiday year to see their existing entries, then:
- Add Entry - enter the days and hours earned and a reason; the date defaults to today. Saved entries add to the person's total entitlement for that year (they appear on the entitlements screen as Time Off In Lieu rows).
- Edit - highlight an entry, change the date, days, hours or reason, and save.
- Delete - highlight an entry and confirm the deletion.
Emails
- When a request is submitted, the staff member's manager(s) are emailed.
- When the manager or HR makes a decision, the staff member is emailed.
- Nothing is emailed when a request is cancelled, and recording sickness does not currently notify HR (see Not yet available on the Overview page).
Overtime
Everything here is under HR > Overtime. Overtime follows the same manager-then-HR approval pattern as holidays, with one extra step: after working the overtime, the staff member records the time actually taken, and HR signs off against the actuals.
Remember the security default: the Manager and HR overtime approval queues are denied by default and must be granted in Security Roles (see Configuration & Staff Setup).
My overtime requests
HR > Overtime > My Overtime View
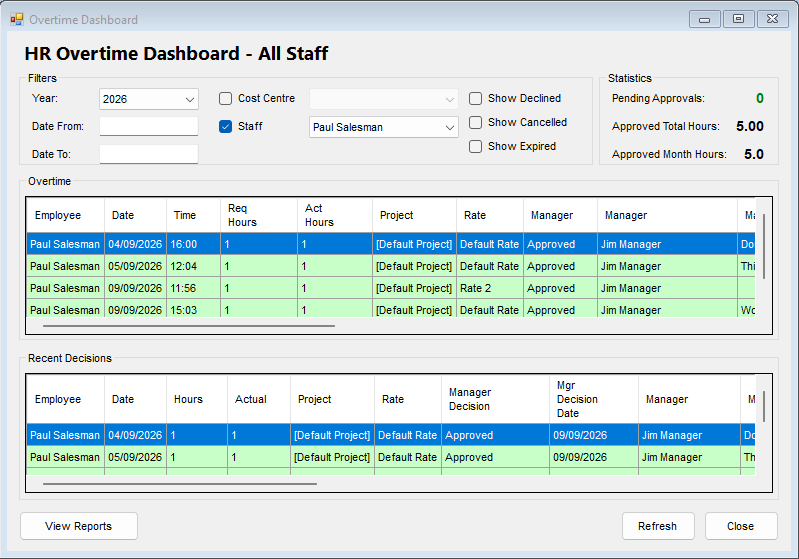
Filters: year, date range, cost centre, Staff, and whether declined, cancelled and expired requests are shown. The Staff filter lists the people the signed-in user is entitled to see - a manager gets the staff who report to them, while a user with HR status gets all staff.
New overtime request
HR > Overtime > Submit New Overtime Request (or New Request on My Overtime View)
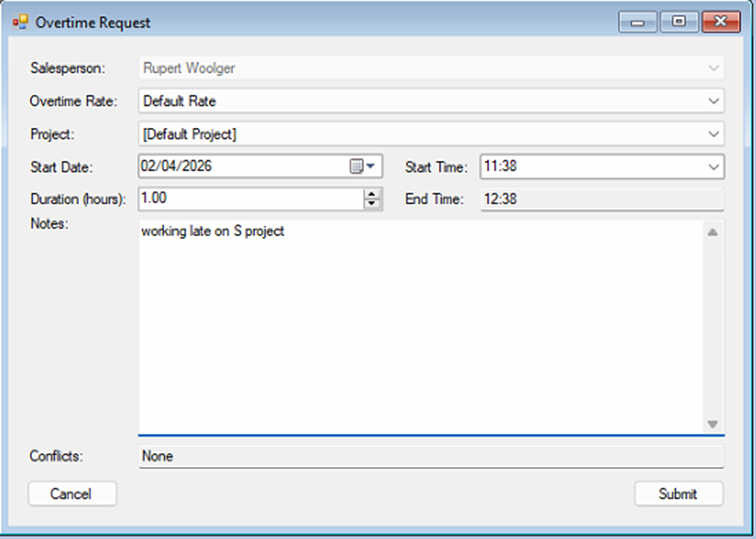
- The staff member's name is pre-selected.
- Select the Overtime Rate - if your organisation has more than one rate, pick the right one.
- Select the Project if you use NCompass project tracking; otherwise leave it on the default project.
- Enter the start date and time, and the expected duration in hours - the end time is calculated automatically.
- Add any notes and click Submit.
Any clash with the person's existing overtime is shown as a warning before submitting. The request then goes to the staff member's manager(s) for approval.
Editing and cancelling
- Edit Request - highlight the request, click Edit, change the details and save. A request can only be edited while the manager has not yet made a decision.
- Cancel Request - highlight the request, click Cancel and confirm. Pending and approved requests can be cancelled.
Recording actual time
Once the request is approved, the staff member records what was actually worked: highlight the request on My Overtime View and click Record Actual Time.
Enter the actual start time and end time (or duration). Overtime can run past midnight into the next day, up to 24 hours in total. If the actual time exceeds what was requested, the screen warns before saving.
- If the actuals are within the approved request, it moves to HR for final sign-off, and HR is emailed.
- If the actuals exceed the approved request, it goes back to the manager, who must re-approve before HR can sign off. The manager is emailed, and the request is highlighted in the manager's queue as needing re-approval.
When the actual time exceeds the request
A manager's approval only covers the hours that were asked for, so a request whose recorded actual time is longer than the approved estimate is sent back to the manager rather than straight on to HR.
- The request reappears in the Manager Overtime Approval Queue, flagged as needing re-approval and showing the actual hours alongside the original estimate, so the manager can see at a glance why it has come back. The row is highlighted in the queue.
- Opening the request shows a warning giving the actual hours against the estimated hours.
- The manager is emailed to say a request is waiting for re-approval, quoting the estimated and actual hours.
- The request is held out of the HR Overtime Approval Queue until the manager re-approves it, so HR never signs off hours the manager has not seen.
- Its overall status reads Pending Manager Reapproval - Actual Exceeded Estimate, and the hours are left out of the person's approved overtime totals until the re-approval is done.
While a request is waiting for re-approval the staff member can still go back into Record Actual Time and change the figures - they are asked to confirm they want to update the time already recorded. Correcting the actuals back to within the approved estimate clears the re-approval and sends the request on to HR in the normal way.
Re-approving passes the request to HR for final sign-off as usual. Declining at this stage ends the request and HR sign-off no longer applies, so a manager who will not accept the extra hours should decline with a note explaining why rather than leave the request sitting in the queue. Requests that already had their actual time recorded before the re-approval step was introduced are not pulled back for re-approval; they carry on through HR sign-off unchanged.
The re-approval step applies wherever overtime is approved - NCompass desktop, the NCompass Web UI and NCompass Anywhere all follow the same rule, and every check of "has a manager approved this?" takes the outstanding re-approval into account.
Approving overtime
Manager approval
HR > Overtime > Manager Overtime Approval Queue
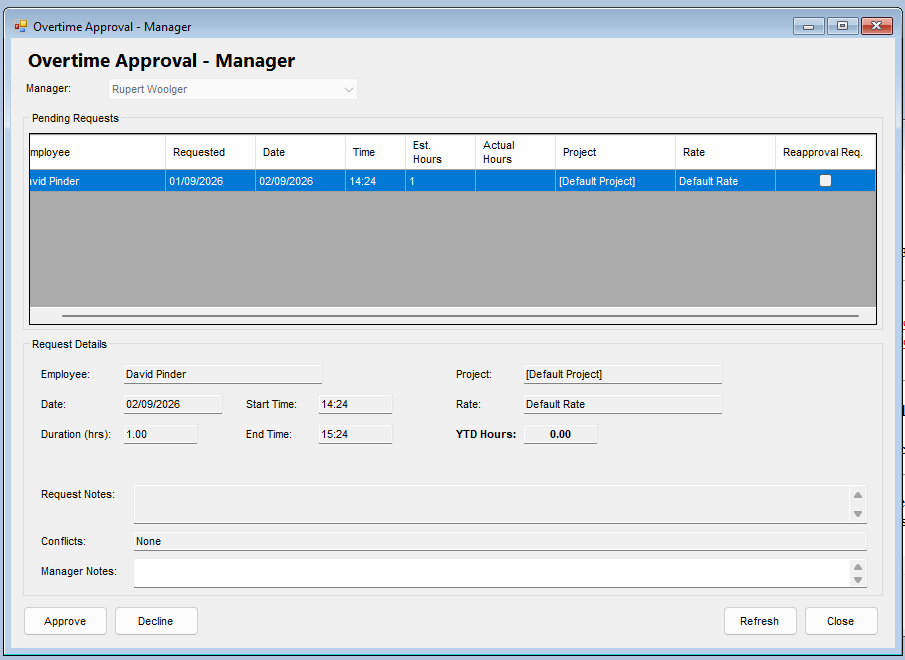
Pending requests from the staff who report to the selected manager, including any flagged for re-approval because the actual time exceeded the estimate. Selecting a request shows the project, rate, timings, the person's total approved overtime for the year, any clashes, and the request notes.
- Highlight the request.
- Click Approve or Decline. Declining requires a note and ends the request.
HR approval
HR > Overtime > HR Overtime Approval Queue
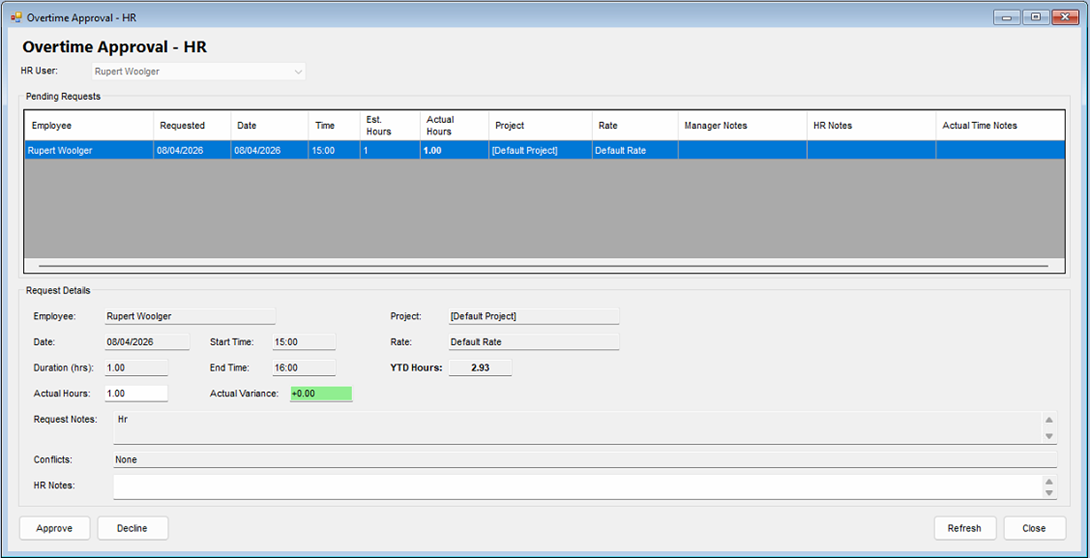
The final stage. The HR queue only lists requests whose actual time has been recorded - HR approves what was actually worked, and the screen shows the actual hours against the request with the variance highlighted. Approving a request with a variance asks for confirmation. Approve or decline as above.
Overtime dashboard
HR > Overtime > Overtime Dashboard/Overview
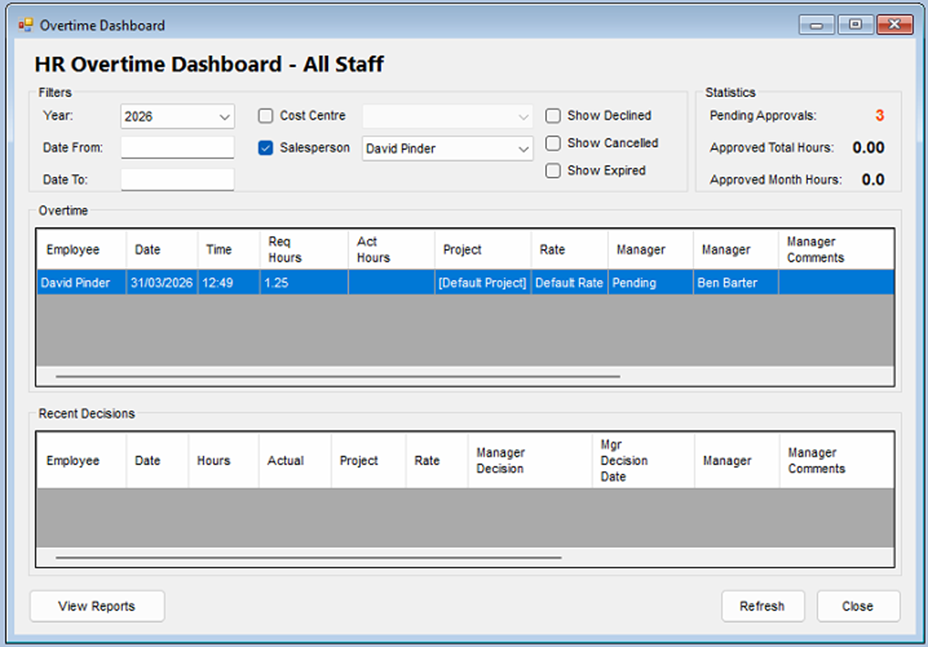
An overview of overtime booked and recent decisions, shaped by role exactly like the holiday dashboard (personal / manager / HR views). Headline figures show pending approvals and the approved hours for the year and month. Filters: year, date range, cost centre, staff, and whether declined, cancelled and expired requests are shown.
The dashboard's View Reports button is not yet available - use the Overtime report below.
Approving from the web - NCompass Anywhere and the Web UI
Both overtime approval queues are available away from the desktop, so managers and HR can clear their queues from a phone, tablet or browser. In NCompass Anywhere they sit on the HR menu (supplied as the Anywhere: HR menu), which offers Manager overtime approval queue and HR overtime approval queue. The same two screens are reached from the HR area of the NCompass Web UI. Holiday screens are desktop-only for now.
Access is controlled by exactly the same security functions as the desktop queues, so a user only sees a menu entry if their security role grants the matching overtime approval function - and remember both are denied by default. Nothing else needs configuring: a manager who can approve overtime on the desktop can approve it in Anywhere.
Screenshots of the Anywhere screens are still to be added - please capture them when reviewing this page.
The approval queue
Each queue lists the requests currently waiting for the signed-in user, as a table of employee, project, date requested, overtime date and start time, estimated hours and overtime rate. The manager queue lists requests from the staff who report to that manager and adds a re-approval column; any request flagged for re-approval because the actual time exceeded the estimate is highlighted in amber across the whole row. The HR queue only lists requests that already have their actual time recorded, and adds columns for the actual hours, the variance against the estimate, and the manager's notes.
Approving or declining
Tapping a row opens the request. The detail panel shows the employee, project, date and start time, estimated duration, overtime rate, the person's overtime hours for the year to date, the request notes and any clashes with other overtime. When a manager is looking at a re-approval, the panel opens with a warning giving the actual and estimated hours. In the HR queue an extra Actual Time panel shows the manager's notes, the actual hours, the variance against the estimate, and any notes the staff member left when recording their time.
Add a note in the Manager Notes or HR Notes box, then choose Approve or Decline. A note is required when declining and the screen will not let a decline through without one; notes are optional when approving. The decision is recorded against the request exactly as a desktop decision would be, the usual notification email is sent, and the queue refreshes so the actioned request drops off the list.
Reporting
Reports > Additional Reports, then HR in the reports tree.
The Overtime report shows overtime by salesperson and rate, as a summary of total actual hours and as a detail listing of each request's requested and actual timings, approval status and notes. Filter by overtime date range, HR approval date range, salesperson, cost centre, and manager/HR approval status (approved requests are shown by default). The Timesheet report sits in the same group but covers engineer time posting rather than HR overtime.
There are no holiday or leave reports yet - see Not yet available on the Overview page.