Onboarding Procedure
Onboarding
Domestic and General will require confirmation that the retailer's system is set up correctly, so this specific onboarding procedure must be followed
- Dealer Contacts D&G and Signs up
- Dealer Contacts our admin team and signs up, Admin Adds SJ and assigns it to support
- Support do initial set up, enter sandbox creds, download rates and categories,
- Support contacts retailer and takes them through adding categories and mapping manufacturers, instructs retailer to come back to them when this is done, parks the SJ
- When the retailer confirms the mapping are done, supports checks the data and sends a copy of the mappings to D&G, tests a warranty sale into sandbox, parks SJ
- When D &G confirm they are happy with the setup, Support update credentials, runs tagging, goes through a test warranty sale with the retailer and if all is ok, update the creds to live (production)
- Support close job, email D & G informing them that the retailer is live
First Step
D & G warranty is a chargeable module; Admin must be contacted first and the relevant paperwork completed !
Dealer Information
Check with the retailer
- Do they want to remove old warranty providers?
- Will D & G be the Primary Provider?
- Do you know the dealer ID (should already be in config as CIH dealer code)
- Do they use Accounts export? see the full customer guide for this
Please confirm with the retailer!
Credentials
Sandbox Test Environment
Use these credentials for testing
BaseAuthUrl
https://ips-domgen-auth-prod-sbx.auth.eu-west-2.amazoncognito.com
BaseApiUrl
https://apis.sbx.domgen.io
ClientId: 5dq7ok6pqg1jftdge58gbeb0ra
clientSecret:1g556ree8l2koeo3o4he98oiqfkk056e49tm30m2mprl7ps8lq64
Seller ID is Always 00322, note this is not the dealer number!
Group ID is Always 00148
Live Production Environment
DO NOT USE THESE FOR TESTING - they will generate a live warranty agreement, if you do so accidently, you must contact D&G and request the policy is cancelled
BaseAuthUrl
https://ips-domgen-auth-prod.auth.eu-west-2.amazoncognito.com
BaseApiUrl:
https://apis.prod.domgen.io
ClientID:
51vhsggqa0btrj609i6kjvledf
Secret:
90e08gcf7vdoc86kpirg73jjm92b5vrbcd07s5dacd94257fj84
Seller ID is Always 00322, note this is not the dealer number!
Group ID is Always 00148
Note the credentials are the same for all CIH dealers please ensure that the dealer code is correctly set!
Configuration Tasks
• Set Provider Availability and priority.
• Set provider details and accounting options.
• Set your dealer ID.
• Update warranty templates.
• Configure and map warranty Categories to your product department.
• Map your manufacturers to Domestic and Generals manufacturers codes.
• Ensure products have the correct manufacturers parts and labour periods set.
• Enable Activation Sweep
Setting the providers availability
NCompass supports up to four providers simultaneously, these are set in the configuration menu as providers 1-4.
Go to: Tools > configuration.
Enter ‘provider’ into the search box. ‘search all groups’ checkbox, hit search.
You should set the provider ID’s in the order you want them, and they should be set globally
Domestic and general is normally ID -5
If you have other providers, their id’s will already be populated, make a note of the ID numbers before changing them.
Check with the retailer to see if they need other providers removing
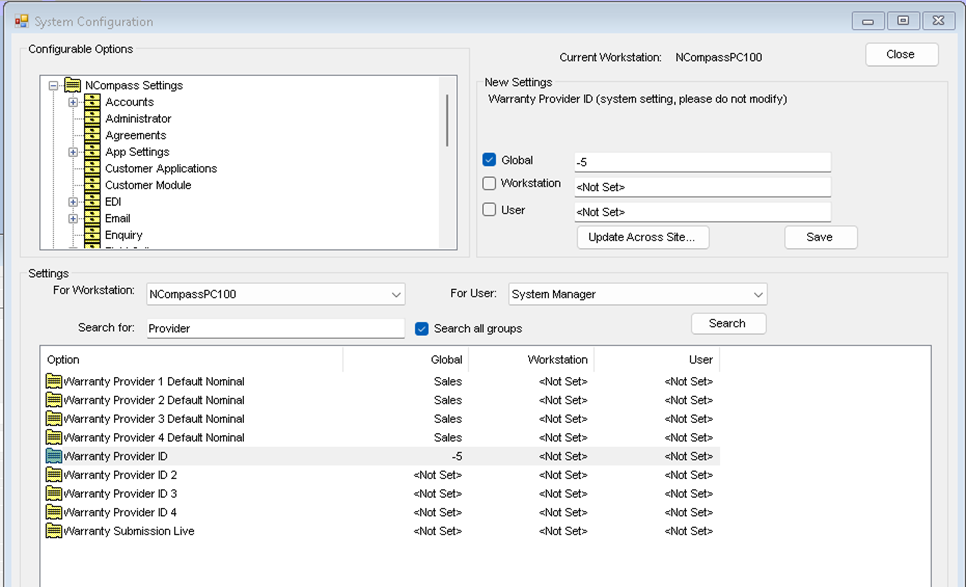
In the example above Domestic and General is set as the first provider and is the only provider
Activation Sweep
This enables server-side tasks to sweep for activations dates (when the sales are invoiced)
Search for ‘Sweep’
Ensure this is set to yes globally.
Setting up the warranty Provider
Go to: Administration > Extended Warranties > Providers.
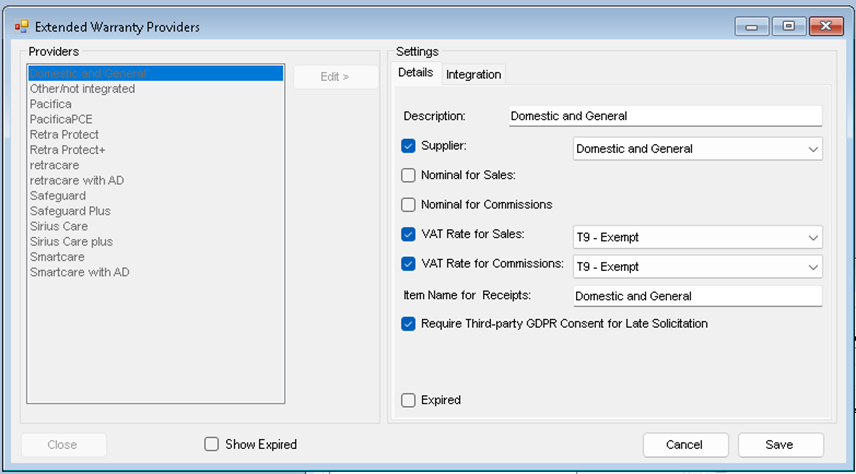
Select Domestic and General from the list.
• click ‘Edit’.
update the details.
• Click ‘Save’
Description – this how the provider appears in NCompass – there is no need to change this.
Supplier – NCompass links to accounting systems, and can supplier invoice match to sold warranties, you should link this provider to a supplier in your system, if Domestic and General is not in your supplier list, go to: Administration > Manufacturers and Suppliers and add a new entry, ensure its marked as a supplier, link it to your accounts system in the normal way
Nominal for Sales – select the nominal to link to for accounts export.
Nominal for commissions – not used.
Vat Rates – set as exempt (although this is overridden by the warranty template
Item names for Receipts – how it appears on sales documents.
Requires Third- Party GDPR consent – this should be ticked.
• When complete click ‘Saves’
Note: if your system is configured to exports account data, you should ensure that your nominals for warranty sales are set correctly, please see the accounts export guide
Now click on the Integration tab
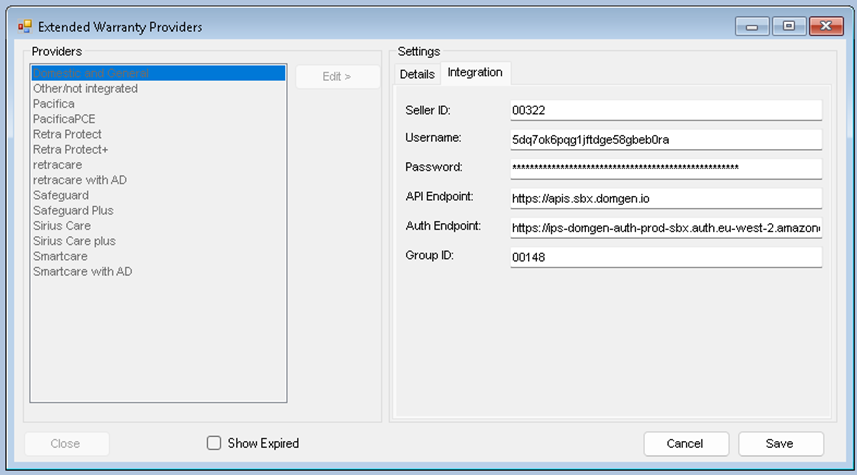
Here you need to enter the credentials supplied by Domestic and General,
Enter the Sandbox Credentials
Seller ID is Always 00322, note this is not the dealer number!
Group ID is Always 00148
Setting the Dealer ID
The dealer id can be set globally or on a branch (workstation) level.
Go to: Tools > configuration.
Enter ‘Dealer’ into the search box and check the ‘Search all groups.
• Highlight the D+G entry and tick the global box.
• Enter your dealer ID (this will be the CIH dealer code unless another has been provided by Domestic and General)
• Click Save
Warranty Templates
Warranty templates are the list of available warranties for the provider, this is managed in the Calculus cloud, our cloud download allows bulk updates to warranties and the warranty category list.
Go to: Administration > Extended Warranties > Templates.
This Will open up the extended warranty administration window, and you will see all warranty templates that are currently in the system
This administration window allows modification of the warranties, however with Domestic and General, this is all handled by the cloud services.
To download the rates and categories
• Click the ‘Cloud’ button.
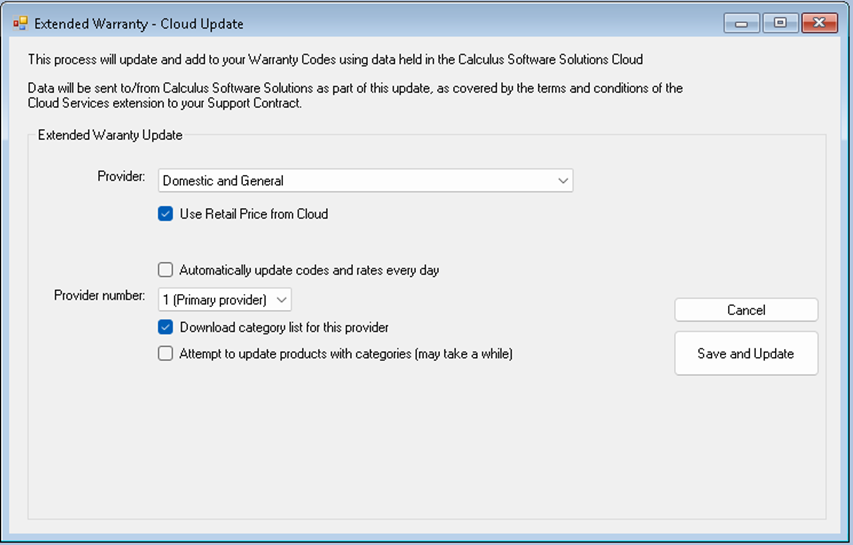
If this is the first time you have downloaded the rates, we will need to get the rates and categories first before we can add the categories to the products department.
- Ensure the Automatically updates codes and rates is unchecked.
- Download Categories for this provider is checked.
- Attempt to update products is unchecked.
• Click ‘Save and Download’
Manufacturer and Category mapping
This Task can be handed back to the retailer as it could take come time, , there could be many manufacturers and departments that need mapping!
Show the retailer the following tasks and ask them to complete them, once completed continue with the rest of the setup
Mapping your Manufacturer
Go to: Administration > Manufacturers and Suppliers
Select your manufacturer and select the warranty tab, note you may have to scroll the tabs to find the warranty tab
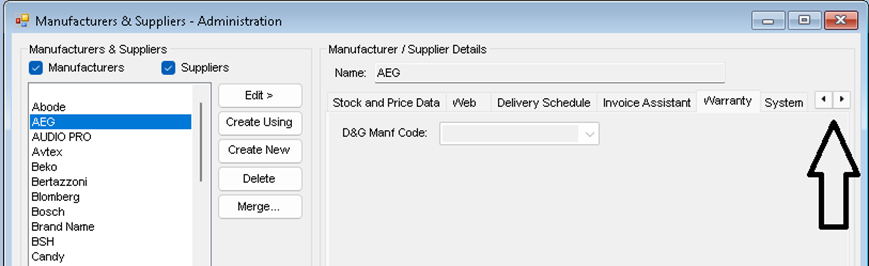
• Click ‘Edit’
Select the correct Domestic and General Code from the dropdown
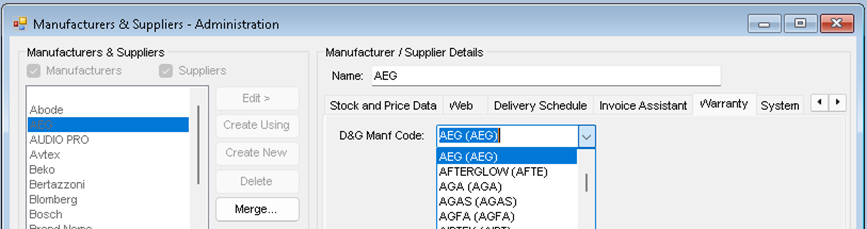
• Click ‘Save’
Repeat for all manufacturers you want to sell warranties for
Manufacturer’s part and labour periods
It’s important that manufacturers parts and labour periods are set correctly on products, The Euronics product feed will normally supply theses details, if you have product data in your system that is old or from another source you must check that these periods are set
Setting your warranty category and action on departments level
Go to: Administration > Departments Management
For each department you want to add warranties to, select the department where the warranty category changes.
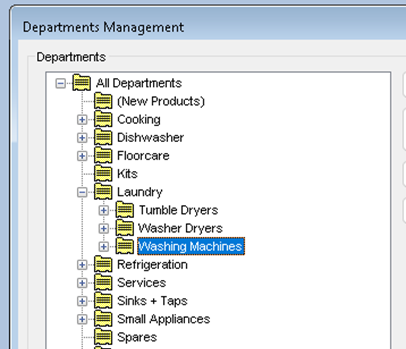
In this example above, the split in categories takes place under Laundry, where it splits between tumble dryers, washer dryers and washing machines, each of which have a different Domestic and General Category
Highlight your category and click ‘Edit’ then select the warranty tab on the right
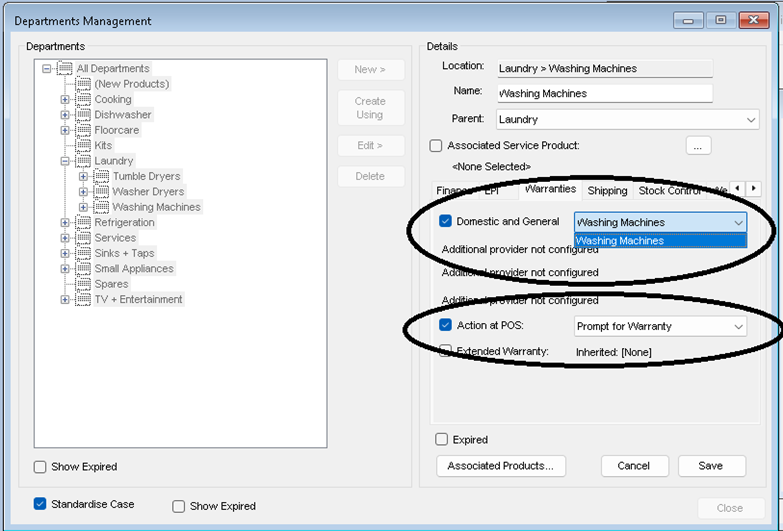
Set the warranty category for the department and your preferred action at point of sale, we recommend ‘Prompt for Warranty’.
• Click ‘Save’
Repeat for all departments where you want to tag / sell warranties.
Tagging Products
We can now get NCompass to tag warranties against products.
Go to: Administration > Extended Warranties > Templates.
• Click on the ‘Cloud’ button.
Now we will refresh the template and set the tagging.
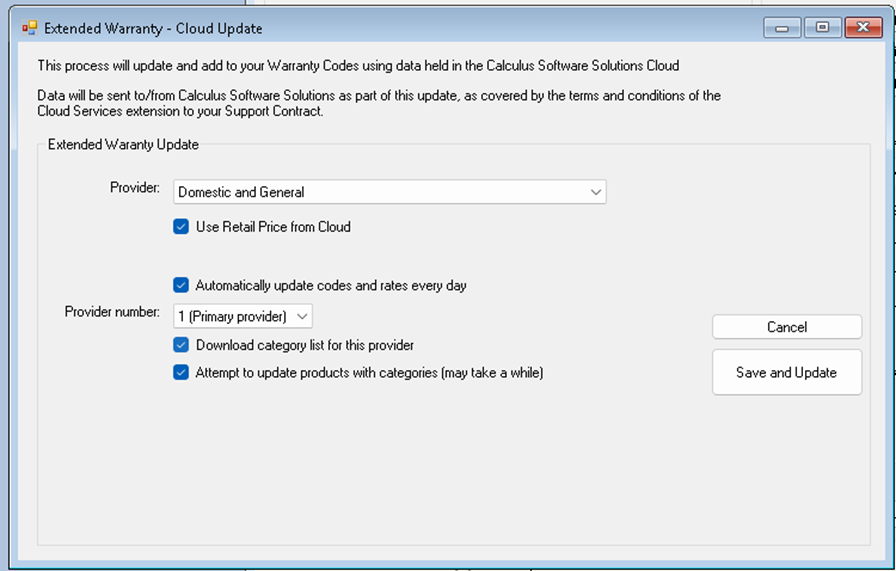
Make sure you have the selection as above ensuring you have selected the correct provider number 1-4 from the dropdown.
This process will take some time as it’s going to look at all products on your system and tag them with the correct warranty based on category and price.
• Click ‘Save and Update’
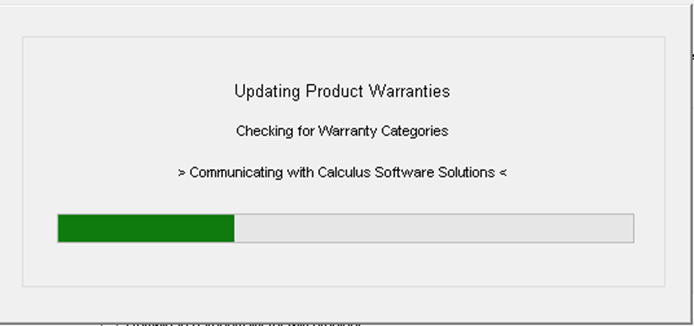
You will see progress boxes as the tagging takes place.
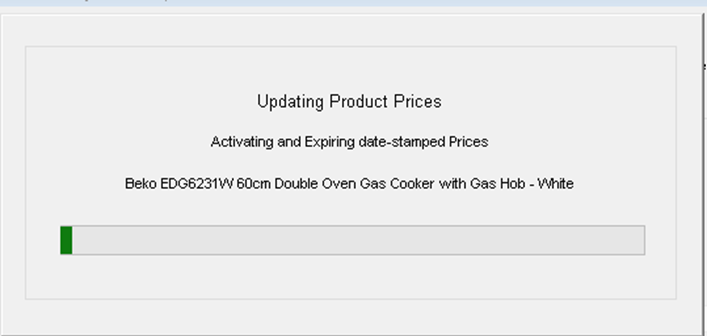
This may take several minutes to complete
Report Files
Make sure the 2 PDF files are present in the normal report's directory
EUR_IPTE_0425_66_100.pdf
And
EUR_IPMIP_0425_60_100.pdf
Final Configuration, Sign off and testing
Once the retailer has completed the mappings
Check the mappings, D&G will need to see that this is correct
Start a sales order, add an item that is tagged and when prompted for a warranty, check that the API call succeeds and you get a warranty rates back, if it error, check the setup, if all is good cancel the sales order
Add the following custom reports
D&G Manufactures Mappings
SQL
select Description, DGManfCode from ManfSupp where DGManfCode <>'' and Expired=0 and Deleted=0
D&G Department - Category Mappings
SQL
SELECT
d.Description as 'Dealer Department' ,
wc.WarrantyCategoryDescription
FROM Departments d
LEFT JOIN WarrantyCategory wc
ON wc.Code = d.WarrantyCategoryCode_Local
WHERE d.WarrantyCategoryCode_Local < -1
AND wc.ProviderID = -5
D&G Rate Tabel Check
For the first few configurations D&G may ask you to check the rate table, the following SQL should suffice
- Email the reports to D&G, you will now have to park the service job until we hear back
- Once confirmed by D&G you update the credential to the Live Production ones
- Re-start server GUI to allow the config to do the sweep to load
Pass the SJ back to Admin for invoicing
Domestic and General contact information
Contact email for our support team
admin and technical
admin use IndieCare@domesticandgeneral.com
for technical questions please use Service Desk