Did you know there is an online portal for you to check and update your open tickets? Find more information [here](https://kb.findesolutions.com/books/calculus-knowledgebase/page/calculus-software-solutions-online-help-desk).
If you need extra help at all, you can still find us at the below.| Department | Phone # | |
|---|---|---|
| Support (including Web issues) | [01892 342 916](tel:01892342916) / [0845 125 91 93](tel:08451259193) | |
| Admin | [01892 342 900](tel:01892342900) / [0845 125 91 92](tel:08451259192) | |
| Sales | [01892 342 900](tel:01892342900) / [0845 125 91 92](tel:08451259192) | |
| Accounts | [01892 342 900](tel:01892342900) / [0845 125 91 92](tel:08451259192) |
| **Last Reviewed** | 2025-05-22 |
| **Next Review Due** | 2026-05-22 |
Unless your agreement or the questions otherwise specify, the protection and security is provided only to hardware that is on an active agreement with Calculus. If you have 3rd-party hardware the protection and backups will be managed by that party.
#### NCompass ##### What protection is on my NCompass system? Leased servers and workstations will come with our EDR (endpoint detection and repsonse) platform that monitors for malicious behaviour, as well as 17 performance metrics. Purchased servers are provided with: - EDR and monitoring on the core (or "main") server. - Anti-Virus and Malware, with some core performance monitoring metrics on any subsequent servers. Local backups of the database are also performed daily. Purchased workstations are provided with: - Anti-Virus and Malware, with some core performance monitoring metrics You can extend a more comprehensive protection plan to any of your workstations, contact the [sales team](https://kb.findesolutions.com/link/1#bkmrk-department-phone-%23-e) to find out more. ##### Is my NCompass System backed up? Yes. As standard you will get a daily backup of your database locally for speed in the event of a disaster, and an offsite encrypted backup for security and safety, this is stored for a rolling 7 days. The [support team](mailto:support@findesolutions.com) can assist you with keeping your own copy of the local backup safely if you wish.If you have a 3rd-party server, Calculus will not backup your data without an express written agreement.
The backups provided can be upgraded on any servers or workstations to include more comprehensive backups. Contact the [sales team](https://kb.findesolutions.com/link/1#bkmrk-department-phone-%23-e) to find out more.Our cloud platform provides more frequent rolling backups.
##### What about remote access for NCompass Apps? Access to the API is timed token based, secured with SSL certificate on the API (Where the app talks to do exchange data). ##### What measures should I implement on my NCompass System to maximise security? By default, NCompass and its relevant infrastructure operates on a least privileged basis. What this means is that the users of your system will only be able to access parts of the system they need to without being expressly granted that permission. NCompass has a security rights option in the administration menu which allows you to grant and deny access to your users at a granular level. In the unlikely event our monitoring detects suspicious activity, the support team will start the runbook to handle the event. ##### What is the recovery time if I do have a disaster scenario with my system?Refer to your specific agreement for contractual obligations. The below is provided as an example.
Depending on the severity and nature of the failure, a backup system can be online and ready within 2-4 hours in a limited capacity for NCompass. In the event of a hardware replacement being required to get you back online, this is next business day on a like-for-like basis - limitations may occur for those of you further afield where shipping may take 48 hours, as well as the timing of the failure. Talk to our [sales team](https://kb.findesolutions.com/link/1#bkmrk-department-phone-%23-e) for more tailored options, such as cloud disaster recovery as part of our Platinum Protection plan. ##### Is NCompass PCI Compliant? NCompass does not directly take any card payments, but does integrate with systems that do. These systems are PCI compliant. You may find that you do fail PCI compliance due to things such as open ports which are necessary for NCompass Apps to work - this is perfectly normal, if you do receive a failed scan please email [support](mailto:support@findesolutions.com) with a copy of the report indicating the failures. #### WebsiteThis only applies to Calculus provided WP11 sites, i.e. Magento.
##### Is my website secure? Your website is a public facing entity, this means anyone in the world can acces and view the data on your site which differs to your NCompass system which has controlled access via tokens or credentials, or is locked down to prevent external access. Your website traffic is protected in transit by an SSL certificate, this is the **S** part of the **HTTPS** you'll see at the start of your URL. There are a number of protections in place on the site as well which prevent unauthorised access and interaction, including (but not limited to): - Captcha - this tests for robots - Access restrictions via credentials, or server policies (such as firewall ports, or file system permissions) - Hardware Firewalls - Enterprice grade DDoS mitigation - SSL/TLS encryption for data in transit ##### Is my website backed up? Yes. A full backup is peformed daily with a 2-day retention policy, with a monthly backup retained for 1 month. All backups are securely stored off-site. ##### Is my website in a secure facilty? Yes. The datacentres are dedicated facilities, that include: - 24/7/365 on-site staffing and monitoring. - No external signage indicating the nature of the facility. - Secure 3-metre-high fencing, biometric access, and CCTV with 90-day retention. - Fire detection and suppression systems (dual-zone, gas-based, and early-warning VESDA). - ISO 27001 compliant facility. ##### What is the recovery time if there is a disaster scenario for my website? In the event of a data corruption incident (this has never occurred under the current infrastructure) 1-2 hours should be allowed for a restoration the most recent good-state backup. If the there is a more complex failure, such as the hardware or operating system, recovery time can be up to 6-8 hours depending on the type of failure, for example: - Some components are hot-swappable, or easier to replace requiring minimal downtime. These can be up to 1-2 hours. - Complete system failure, whilst very rare, would require entirely new hardware and rebuild. 6-8 hours should be allowed for this. ##### Is my site PCI compliant? Your site does not directly take payments, but does handover to gateways that are PCI compliant. If you do get any PCI failures on your website, please email the [web team](mailto:web@findesolutions.com) and include the full copy of report with the failures. # Calculus Software Solutions Online Help DeskAn account must be created for you by a member of the Calculus Software Solutions Admin Team before you can log in and access the online Help Desk. However, you may still read through this guide as a reference to understand what to expect when using the Help Desk.
If you would like to request an account or are unsure of your account details, please click the following [link](mailto:admin@findesolutions.com?subject=Calculus%20Software%20Solutions%20Help%20Desk&body=Dear%20Admin%20Team%2C%0A%0APlease%20can%20I%20request%20the%20creation%20of%20an%20account%20for%20the%20Calculus%20Software%20Solutions%20Online%20Helpdesk%0A%0APlease%20create%20the%20account%20using%20the%20following%20email%20address%20as%20the%20main%20access%20account%20%3A%0A(insert%20email%20address%20here)%0A%0ARegards%2C) to generate a pre-filled email to
This section has limited functionality but offers basic visibility of your account status.
--- ### Help Desk The **Help Desk** is located in the left-hand navigation menu. When accessed, the Help Desk will display your **active service jobs**, sorted by last updated date or priority. #### Key Features 1. **Submit a Ticket** Click this button to open a slide-out window. You’ll need to provide: - Your name - The fault related to the job - A brief description of the fault 2. **Job Filter Dropdown** Allows you to toggle between: - **Active Service Jobs** (default view) - **Completed Service Jobs** (recently closed) 3. **Quick Search** Use this field to enter a **service job number**.**Tip:** Ensure the correct filter (Active or Completed) is selected before searching.
4. **Page Selector** If you have many service jobs listed, they will be divided across multiple pages. You can navigate between pages manually or use **Quick Search** to locate specific jobs faster. 5. **Job List Window** Displays your current tickets based on: - Your selected filter (Active/Completed) - Recent activity or job priority [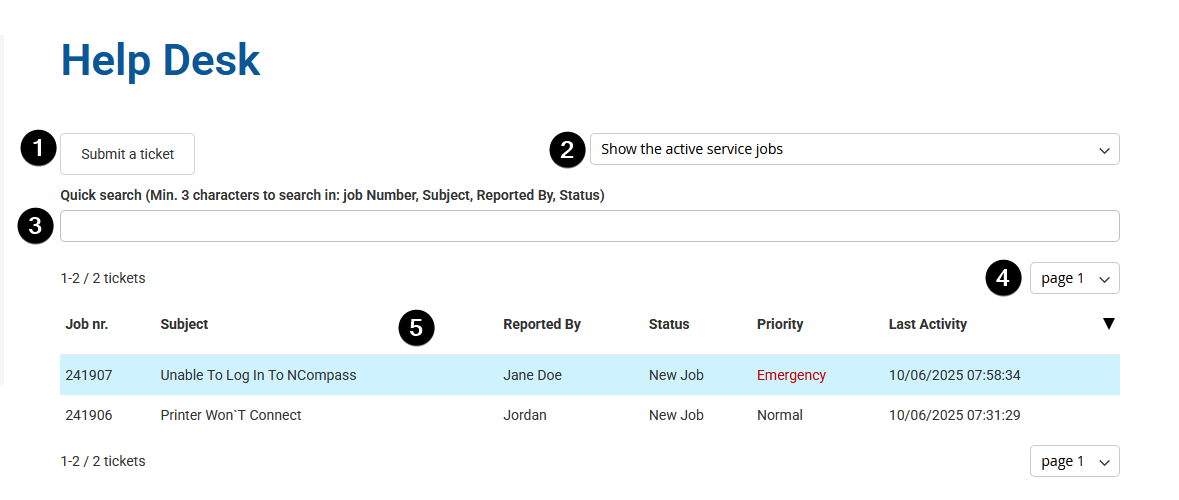](https://kb.findesolutions.com/uploads/images/gallery/2025-06/bY1q8eahwkTIiF3M-image.png) #### Raising a New TicketPlease raise **1 ticket per issue**. This helps you keep track of issues in a controlled manner, as well as the support teams to provide focused support on the issue at hand.
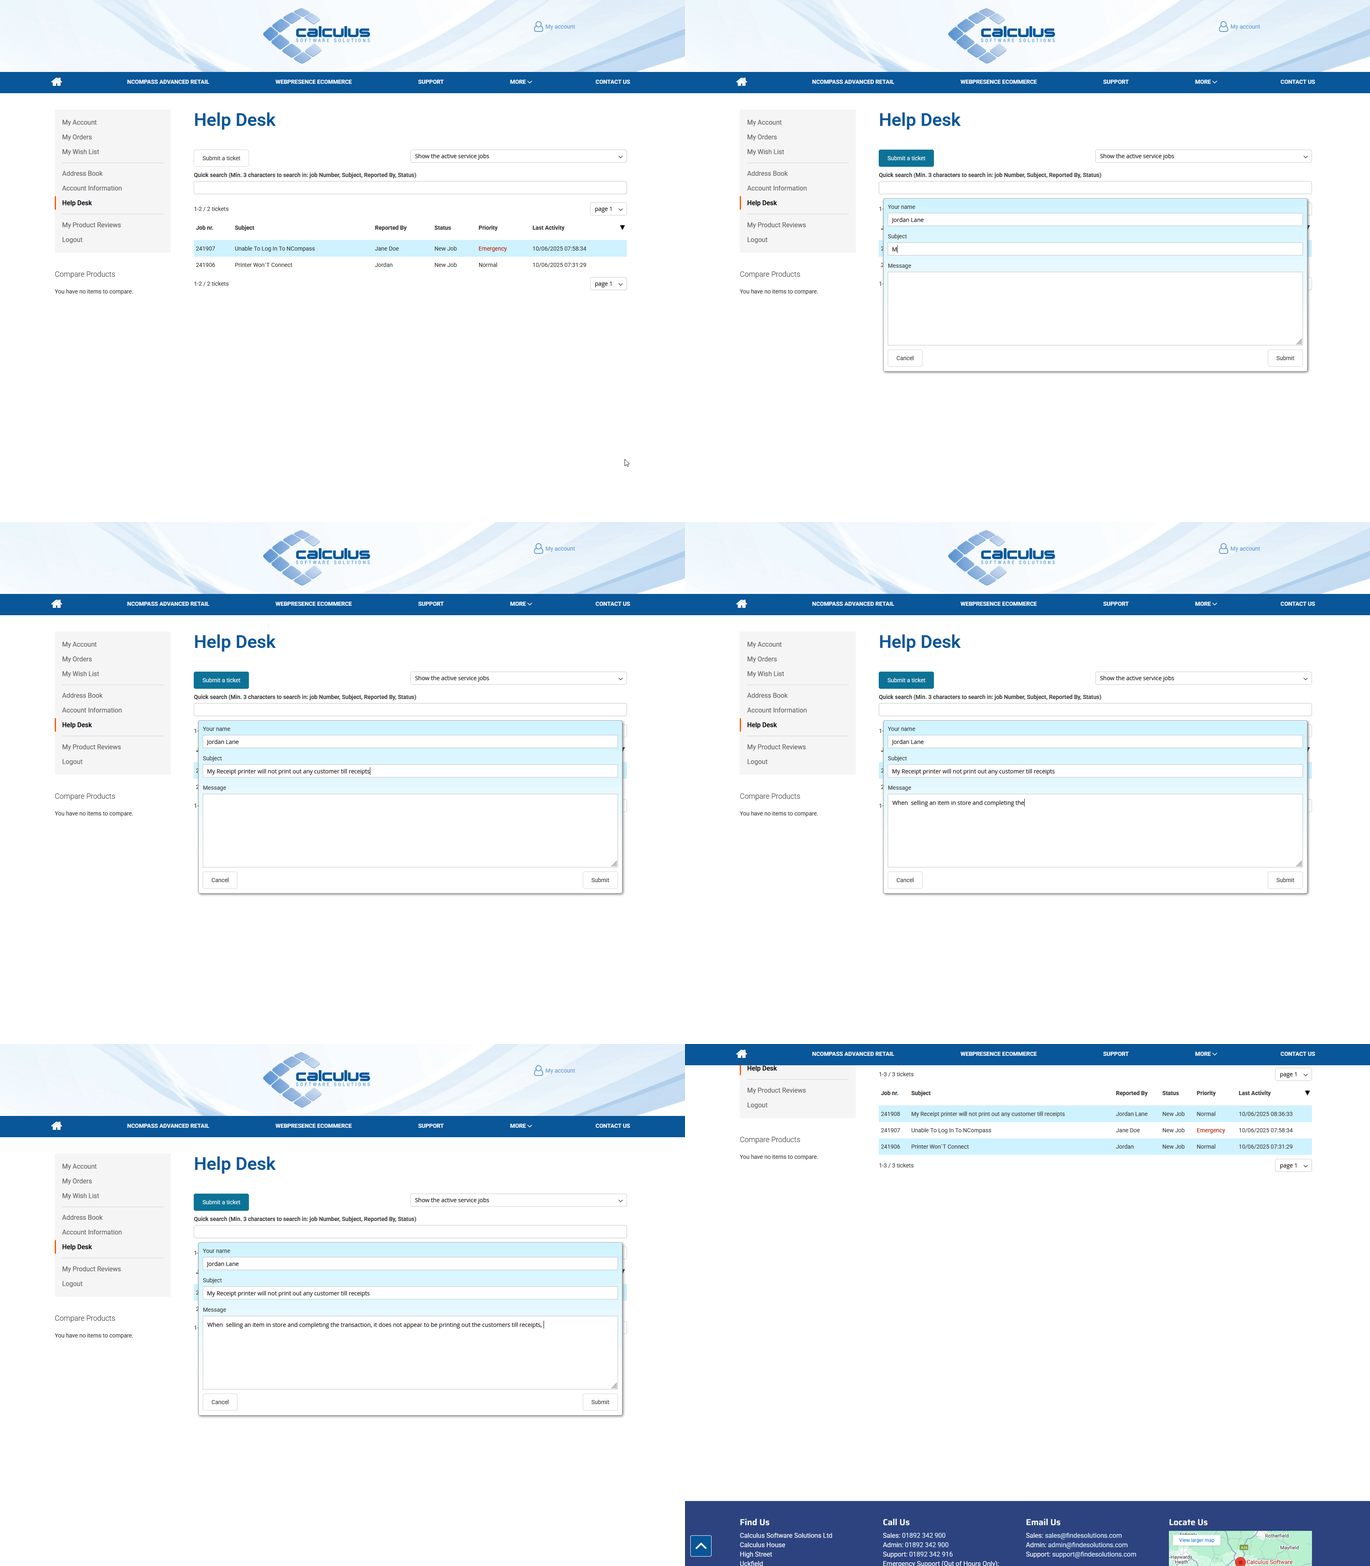
To raise a new service job: 1. Navigate to the **Help Desk** from the left-hand menu. 2. Click the **Submit a Ticket** button in the main Help Desk window. 3. A slide-out form will appear where you need to provide: - **Your Name** - **Subject** – A brief title for the issue - **Message**– Detailed information about the problem or fault 4. Once all fields are completed, use the submit button in the bottom right of the form to create the new service job.The new job will then appear in your **Active Service Jobs** list, sorted by most recent update, this list will automatically refresh upon submission
[](https://kb.findesolutions.com/uploads/images/gallery/2025-06/nZaqquIj7QyJqc5y-firefox-qxmek0htq7.gif) #### Adding an Entry to an Existing Ticket Step 1: Select a Service Job - From the list of service jobs, **click** on the job you want to update. - You will be shown the current details of the selected job, including: - **Job Number and Title** - **Priority Level** - **Status of the Job** - **Assigned Personnel** - **Creation Date** Step 2: Post a New Entry - Click on the **“Post a New Entry”** button. - Enter the **details of your update** in the input field provided. - Once done, click **“Submit”**. Step 3: Identifying Your Entries - After submission, your entry will appear in the job’s history window. - Entries you create as a customer will be labeled as **“Me”** in the job history list. [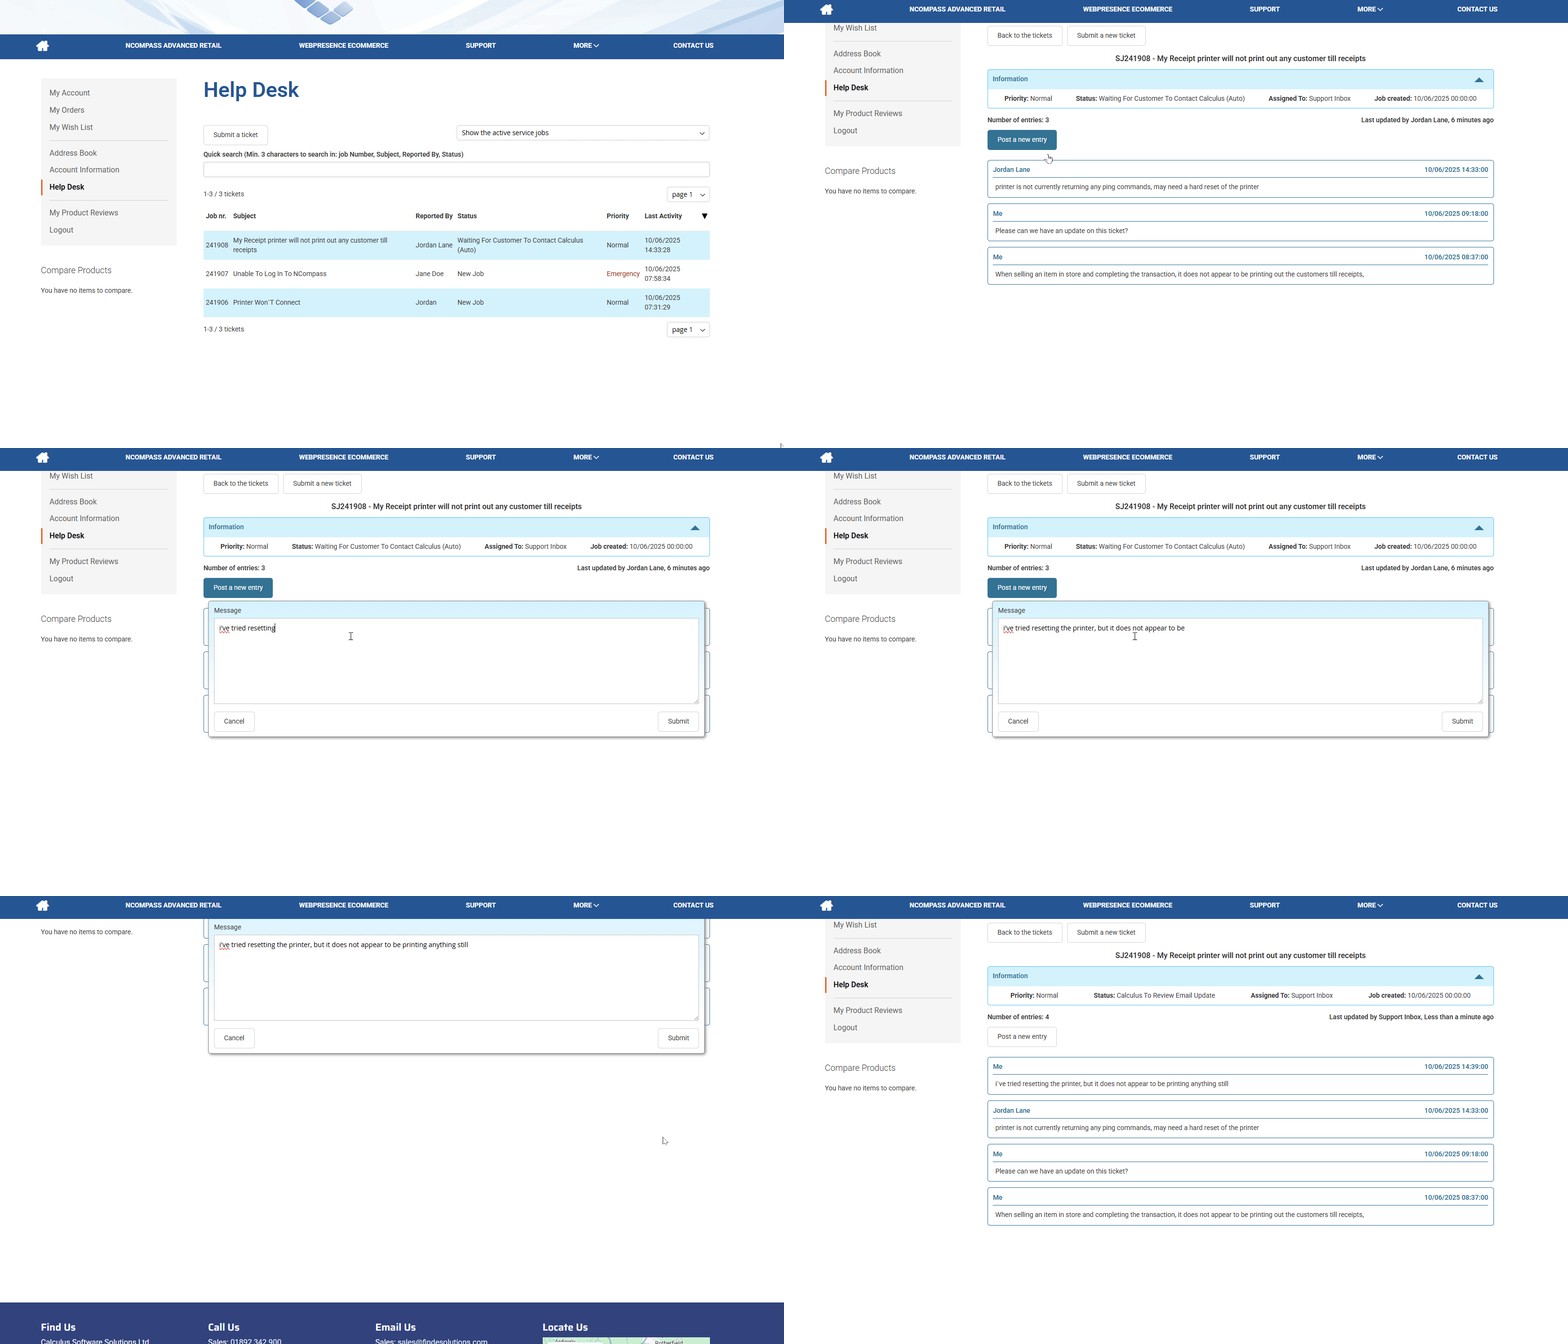](https://kb.findesolutions.com/uploads/images/gallery/2025-06/5hrFA5D6fjoHmhtb-chrome-5znkmogk5s.gif) # Website Integrations (3rd Party) # Membership Pricing Support # Routing # NCompass Advanced Retail: Routing and Planning > Version: NCompass v11.15+ > Purpose: This guide explains how to configure and use Routing and Planning in NCompass Advanced Retail. ## Contents - [Introduction](#introduction) - [Configuration](#configuration) - [Google API Key](#google-api-key) - [Routing Wizard](#routing-wizard) - [Engineer Settings](#engineer-settings) - [Changing Routing Settings](#changing-routing-settings) - [Automatic Text Messages](#automatic-text-messages) - [Routing & Planning](#routing--planning) - [Automatic Routing Explanation](#automatic-routing-explanation) - [Access via Two Week Planner](#access-via-two-week-planner) - [Access via Scheduled Calls](#access-via-scheduled-calls) - [Routing Options](#routing-options) - [Suggested Routes](#suggested-routes) - [Manually Route Calls](#manually-route-calls) - [Move Calls from Other Engineers](#move-calls-from-other-engineers) - [Add Field Calls Ready to be Booked](#add-field-calls-ready-to-be-booked) - [Saving a Route](#saving-a-route) - [Additional Planning Tools](#additional-planning-tools) - [Flag Tags](#flag-tags) - [Weight](#weight) - [Fleet Tracking](#fleet-tracking) - [Planned Route vs Actual Route](#planned-route-vs-actual-route) - [Map GPS Location and Current Call](#map-gps-location-and-current-call) - [GPS History](#gps-history) --- ## Introduction The **Routing** module helps optimise field calls into the most efficient order, reducing travel time and distance. In the latest release, NCompass uses Google’s upgraded **Routing API** to improve routing accuracy and optimisation, including support for **Northern Ireland** and the **Republic of Ireland**. The module can automatically organise and time calls, making it easier to notify customers of their estimated appointment window. It can also route calls automatically and, when used with the points-based system, lock an engineer’s day once travel time pushes them beyond their working hours. This adds protection against overbooking. --- ## Configuration Before using the Routing module in NCompass, complete the initial setup. ### Google API Key Follow the internal guide for setting up your Google API key: [**Setting up Google API ... | Calculus Knowledge Base**](https://kb.findesolutions.com/books/general-it/page/setting-up-google-api-for-routing-and-mapping) > **Note:** This may already be configured if you use **NCompass Mobile** or have previously used routing in NCompass. ### Routing Wizard Go to: **Tool > Licencing and Quick Configuration** On the **Routing** line, select **Click for wizard**. #### Step 1: API Key - Enter the API key obtained in the previous step. - Click **Save & Next >** #### Step 2: Engineer Timings and Locations For each engineer you want to route, set: - **Start Time** (`HH:MM`) - **Start Postcode** - Tick **Enabled** Optional: - Highlight engineers you want to limit by working hours. - Enter the number of **minutes worked** for each day at the bottom of the window. - Click **Update Selected** > **Note:** You can edit these settings later for each engineer individually after completing the wizard. Click **Save & Next >** #### Step 3: Padding, Rounding, and PM Calls Configure field call padding for the customer appointment window: - **Start**: Add this many minutes to the start of the call - **End**: Add this many minutes to the end of the call - **Base Duration**: Add this many minutes to the duration of the call Configure **rounding times**: Google’s Routing API may return exact times such as **9:57 AM**. Use the rounding setting to round these times to your preferred option. Configure **afternoon calls** to either: - Start immediately after the AM calls - Start after lunch, with a delay if needed Click **Save & Next >** #### Step 4: Automatic Routing > **Recommended:** Speak to the implementation team before enabling automatic routing. Automatic routing will route **every enabled engineer**, on **every day** where a new call is booked or an existing call is amended. > **Important:** This may increase usage against your Google account if you exceed your monthly call allowance. If you want to enable automatic routing: - Set **NCompass automatically update routes** to **Yes** - Choose a **Default Standard Route**: - **Fastest** *(recommended)* - **Furthest Call First** - **Furthest Call Last** - Set **Finalize Route X Days Before** to lock field calls from amendment and route calls on the configured day/time - Set **Lock Field Calls After Routing** if field calls should be locked once manual routing is completed Click **Finish** ### Engineer Settings After completing the wizard, you can update engineer-level routing details. ### Changing Routing Settings Go to: **Salesperson & Engineers > Edit** #### Engineer tab Update: - **Default Start Time** - **Default Start Postcode** #### Routing tab Update: - **Total duration of working hours per day** ### Automatic Text Messages To configure customer SMS notifications with estimated field call windows: Go to: **Salesperson & Engineers > Edit** In the **Engineer** tab, configure: - **Auto SMS Times Today** Sends messages to all customers with a mobile number for field calls booked for **today**. Example: `07:00` on the morning of the call. - **Auto SMS Times Tomorrow** Sends messages to all customers with a mobile number for field calls booked for **tomorrow**. Example: `18:00` on the evening before the call. > **Note:** These settings must be configured for each engineer individually. --- ## Routing & Planning ### Automatic Routing Explanation NCompass can automatically route each enabled engineer for every day they have calls booked, if this has been configured in the routing wizard. Whenever an engineer’s diary changes, that engineer and date are added to a **re-routing queue**. Once processed, NCompass recalculates the total duration of the day. If the new total exceeds the engineer’s working hours, NCompass prevents any further calls from being booked for that engineer on that date. This allows estimated travel time to be considered when preventing overbooking. ### Access via Two Week Planner Go to: **Field Calls > Two Week Planner** Then: - Right-click the engineer and day you want to route ### Access via Scheduled Calls You can also access routing from **Scheduled Calls**: - Open **Scheduled Calls** from the **Quick Links** bar or the **Field Calls** menu - Select the **Engineer** and **Date** - Click **Engineer >** ### Routing Options Available options include: - **Show engineer locations** Opens the live map showing engineer locations and booked calls. - **Show Current Route** Opens the Route Planner in **view-only** mode. - **Suggest Fastest Route** Opens the Route Planner with the optimum route. - **Edit Current Route** Opens the Route Planner with editing tools. ### Suggested Routes Use the **Suggest** buttons on the right-hand side of the window to re-route calls using Google’s API. #### Suggest Fastest Route Optimises the calls in the order Google determines is best. #### Suggest Other Route Additional routing options: - **Fastest Route Starting with Furthest Call** Makes the furthest call the first stop. - **Fastest Route Starting with Selected Call** Highlight a call in the grid to make it the first stop. - **Fastest Route Ending with Furthest Call** Makes the furthest call the final stop. - **Fastest Route Ending with Selected Call** Highlight a call in the grid to make it the final stop. > **Note:** NCompass will use the system defaults (such as first call / last call) if these have already been set on the field calls. ### Manually Route Calls To manually re-order calls: - Use the grid at the bottom of the window - Click and drag calls into the order you want - A blue line shows where the call will be dropped - After reordering, click **Update Map** NCompass will then calculate the estimated travel time and distance for your manual route. ### Move Calls from Other Engineers You can overlay field calls booked on the same day for other engineers. To do this: - Tick **Show calls booked for other engineer(s)** - Optionally choose a group of engineers to display - Click **Update Map** This shows **purple pins** on the map for calls booked to other engineers. Click a pin to view: - Postcode - Weight of call - Who the call is booked for - Flag tags Additional actions: - Click **Field Call ...** to open the full field call details - Click **Book to this Engineer** to move the call to the engineer currently being planned The route will then refresh to include the newly added call. ### Add Field Calls Ready to be Booked You can also overlay sales that are in stock and ready for delivery booking. To do this: - Tick **Show sales ready for delivery to be booked** - Click **Update Map** This shows **green pins** on the map for calls ready to be booked. Click a pin to view: - Postcode - Weight of call - Who the call is booked for - Flag tags > From **v11.16 onwards**, this planning information is displayed directly on the pin details. Additional actions: - Click **Field Call ...** to open the full field call details - Click **Book to this Engineer** to assign the call to the engineer currently being planned The route will then refresh to include the newly added call. ### Saving a Route Click **Round Times & Save Route** to save the route against the engineer/day and apply times to each call using the padding settings defined in the wizard. > **Note:** If configured, NCompass will lock the route at this point so no new calls can be booked. --- ## Additional Planning Tools ### Flag Tags Flag tags can be configured against **Skills** so a character is displayed when a skill is assigned to an item on the field call. This is useful for highlighting calls involving: - Large or heavy items - Specific installation types (for example built-in or gas) Go to: **Administration > Item Groups and Engineer Skills** Then: - Click **Edit** on a skill - Enter a character in **Flag Tag** - Click **Save** Example: If a skill such as **Large Item Delivery** has a flag tag of **L**, any call containing an item with that skill will display **L**: - On the planning grid - On the map pinpoints ### Weight If van weight restriction is being used: - Pins display the **weight** of each call - The route planner displays: - **Total weight** for each booked call - **Total van weight** If you want to enable this on your system, contact the **Calculus Implementation Team**. ### Fleet Tracking These features require **NCompass Mobile**. If you want to learn more about the delivery app, contact the team for a demonstration. ### Planned Route vs Actual Route Use **Route Plan Enquiry** to compare planned distance and duration against actual travel distance and duration. Go to: **Field Calls > Route Plan Enquiry** You can: - Apply filters for engineers and dates - Sort by any column, such as the largest time overrun - Click **Show Route** to overlay expected vs actual route on a map - Click **Details** to view more information for the selected row ### Map GPS Location and Current Call The **Current Call** feature shows where the engineer is and how long the current call marked as **Travelling** will take from their current position. From the **Scheduled Calls** screen: - Click the engineer you want to review - Click **Engineer >** - Click **Map GPS Location and Current Call...** A window will display: - The engineer’s current GPS location - The distance to the customer property - The estimated travel time ### GPS History NCompass stores GPS history for each engineer for each day they are using **NCompass Mobile**. This lets you: - View routes taken throughout the day - Track engineers in real time while travelling Go to: **Field Calls > Show GPS History** Then: - Click the engineer you want to view - Change the date or date range if needed (defaults to today) - Click **Show Locations** --- ## Engineer Route Limits and Overbooking Protection Route limits cap the length of an engineer's working day by the **planned duration of the route** - travel time plus the time spent on each call - rather than by a simple count of calls or points. Once the planned day reaches the limit, NCompass stops offering that engineer for further calls on that date. ### Setting the Limits Go to: **Administration > Salespersons > Edit > Routing tab** In the **Route Limits** section, enter the maximum number of minutes for each day of the week, **Monday to Sunday**. Leave a day blank if that day should not be limited. > **Note:** Limits are held per engineer, so a van doing long-distance work and a van doing local drops can have different working days. ### How the Limit Is Applied - When a route is planned for an engineer and date, the limits in force at that moment are **copied onto that day's route plan**. The day is then judged against the copied value, so later changes to the engineer's standard limits do not move the goalposts on days that have already been planned. - When NCompass looks for available engineers, it excludes any engineer whose planned route duration plus the **Route Limit Offset** already meets or exceeds the limit for that day. - A call added while the day is still under the limit is accepted in full, even if it then takes the day past the limit. This is intentional: a day planned to 7h50 against an 8h limit will accept another call and may then plan to 8h45. The limit prevents the **next** booking rather than truncating the one being made. ### Route Limit Offset Go to: **Tools > Configuration > Field Calls** Set **Route Limit Offset Minutes** to the buffer you want to hold back. When checking availability, NCompass requires the engineer to have at least this many free minutes on the day before another call can be booked. The default is `0`, meaning no buffer. ### Overriding the Limit for a Single Day Because the limit is copied onto the day's route plan, a one-off change is made **against the route, not against the engineer**. Open the route for that engineer and date and amend the maximum duration there. Change the engineer's **Routing tab** values only when you want to alter the standard working day for all future dates. ### Finding Days That Are Over the Limit - In **Field Calls > Route Plan Enquiry**, tick **Only Planned Time Over Route Limit** to list only the engineer/day combinations whose planned route exceeds the limit recorded against that plan. The remaining filters (engineer, date range) can be combined with it. - In the **Two Week Planner**, days planned beyond the limit are shown in the overbooked warning colour, alongside days over their points or weight allowance. --- ## Automatic Route Updates, Finalising and Locking ### Keeping Routes Up to Date Automatically With **Route Calls Automatically** set to **Yes** (see the [Routing Wizard](#routing-wizard)), NCompass keeps each engineer's route in step with their diary instead of waiting for someone to re-plan it by hand. Whenever the contents of an engineer's day change, that engineer and date are added to the re-routing queue. The changes that trigger this are: - A call added to the day - A call removed from the day, or moved to another engineer - A change to an existing call - its date, its timing, or the items and points on it A background sweep works through the queue and re-plans each affected engineer and date. The recalculated total duration is what the diary displays and what the availability and route limit checks then use. > **Important:** Each re-plan calls Google's Routing API, so automatic routing increases usage against your Google account. Discuss expected volumes with the implementation team before enabling it. ### Finalising a Route Two settings under **Tools > Configuration > Field Calls** decide when a day stops being re-planned automatically: - **Route Calls Automatically - Finalize Route X Days Before** - how many days ahead of the delivery date the route is finalised - **Route Calls Automatically - Finalize Route Time of Day** - the time on that day at which the final route is run, in `HH:mm` format At that point NCompass runs a **final route** for every enabled engineer for the date in question. After the final route has run, that day's route is no longer updated automatically, so the running order given to the engineer and the times quoted to customers stay put. Leave both settings unset if you do not want routes to be finalised automatically. ### Locking Field Calls After Routing Locking a field call fixes its schedule - the call can no longer be edited or rescheduled from the field call window. Use it to stop staff moving calls after the day has been planned and customers have been told their time window. Go to: **Tools > Configuration > Field Calls** Set **Lock Field Calls after routing** to **Yes**. The default is **No**. With the setting on, saving a route from Scheduled Calls locks every field call on that route. Which routes lock calls, and which do not, follows the same principle: | Route type | Locks the calls on it? | | --- | --- | | Manual routing - a route planned and saved by a user | Yes | | The final route, run at the configured finalise point | Yes | | Automatic re-planning between now and the final route | No | Automatic re-planning deliberately does **not** lock calls: if it did, the first automatic route of the day would close the diary and no further calls could be booked. > **Note:** If a locked call has to be changed, it must be released on the field call window before its schedule can be edited. Expect to see locked calls whenever this setting is on and a day has been routed - it is the setting working, not a fault. --- ## Routing Coverage: Great Britain, Northern Ireland and Ireland NCompass plans routes over the **road network**, using actual driving distance and time between calls rather than the straight-line distance between postcodes. This matters most where the nearest call as the crow flies is not the nearest call to drive to: - Towns with one-way systems and restricted turns - Addresses either side of a river, estuary or firth - Sparse rural road networks, where two calls a few miles apart can be a long drive round Coverage includes: - **Great Britain** postcodes - **Northern Ireland** postcodes (BT) - **Republic of Ireland** addresses, using Eircodes - **Cross-border routes**, in both directions - Northern Ireland to and from the Republic of Ireland, and the UK mainland to and from the Republic of Ireland > **Note:** A call can only be plotted and routed if its postcode is complete and recognised. An incomplete or mistyped postcode - or an Irish address with no Eircode - will leave the call off the map and out of the planned route, so check the customer address first when a call will not plot. # NCompass Anywhere # What is NCompass Anywhere? NCompass Anywhere is our latest application that brings essential reporting and management features to your fingertips. Designed to enhance your work on-the-go, the app offers a streamlined and user-friendly experience. This document will cover how to gain access to the application, and how to use these exciting new features.Please note: Before using NCompass Anywhere, your NCompass System needs to be running version 11.15 or newer. If you believe you are not already running this version, you can book a slot for your system to be updated using our booking link [here](https://bookings.cloud.microsoft/book/CalculusSupport@findesolutions.com/s/zVliccVttUeDpARgqqkX2Q2?ismsaljsauthenabled).
#### What you can do in NCompass Anywhere The first release of NCompass Anywhere is deliberately focused on the things people most often need when they are away from a desk. It covers: - **Reports** - run any report that is set up under **Reports > Additional Reports** in Desktop NCompass. Reports can be filtered, refreshed, emailed, and downloaded as PDF or Excel. - **Product and stock enquiry** - find a product by searching for it or by scanning or entering its barcode, then see its current retail price and how much free stock there is for the company and for the branch. - **View Online** - jump straight from a product to that product's page on your own website, so you can check images and technical specification. This option only appears where your system has a website link configured; on systems without one it is not offered. - **Helpdesk** - view your open support tickets and raise new ones without having to phone. The interface is a simplified one designed for smaller screens, so it does not attempt to reproduce everything Desktop NCompass can do. #### Two ways to use it NCompass Anywhere can be used either as an app installed on a phone or tablet, or as a website in any browser - including on a PC. Both use the same login and show the same information, so it is a matter of preference which one a user chooses. Step by step instructions for each are on the [NCompass Anywhere - Mobile App](https://kb.findesolutions.com/books/calculus-knowledgebase/page/ncompass-anywhere-mobile-app) and [NCompass Anywhere - Website](https://kb.findesolutions.com/books/calculus-knowledgebase/page/ncompass-anywhere-website) pages. #### Logging in Users log in with their System Code together with their normal NCompass username and password - the same credentials they use for Desktop NCompass. The System Code is found in Desktop NCompass under **Help > About NCompass** and is the same for everyone at the company. Every existing Desktop NCompass login is permitted to use NCompass Anywhere by default, and what a user can see and do in Anywhere comes from their Desktop NCompass permissions. Both login access and report access are controlled from Desktop NCompass - see [Configuring your NCompass Users For Anywhere](https://kb.findesolutions.com/books/calculus-knowledgebase/page/configuring-your-ncompass-users-for-anywhere). #### If NCompass Anywhere has not been enabled for a systemNCompass Anywhere has to be enabled for a customer's system before anyone there can log in. Where it has not been enabled, the user is not shown a login failure or an error - they are shown a message explaining that the app is not yet available for their system and asking them to contact Support. If a customer reports seeing this, they have entered valid details and nothing is wrong with their password; Support need to get NCompass Anywhere enabled for that system before the customer tries again.
# NCompass Anywhere - Mobile App The NCompass Anywhere Mobile App is currently only available on the Play Store for Android Devices, however we are in the process of deploying the application to the App Store so it can be installed on iOS devices. If you want to use NCompass Anywhere on an iOS device today, you can do so via a Web Browser on the device by following the instructions in the [NCompass Anywhere - Webpage](https://kb.findesolutions.com/books/ncompass-anywhere/page/ncompass-anywhere-website) section #### Getting Logged In To install the NCompass Anywhere App, simply search for 'NCompass Anywhere' on the Play Store, and tap to install the highlighted option below: [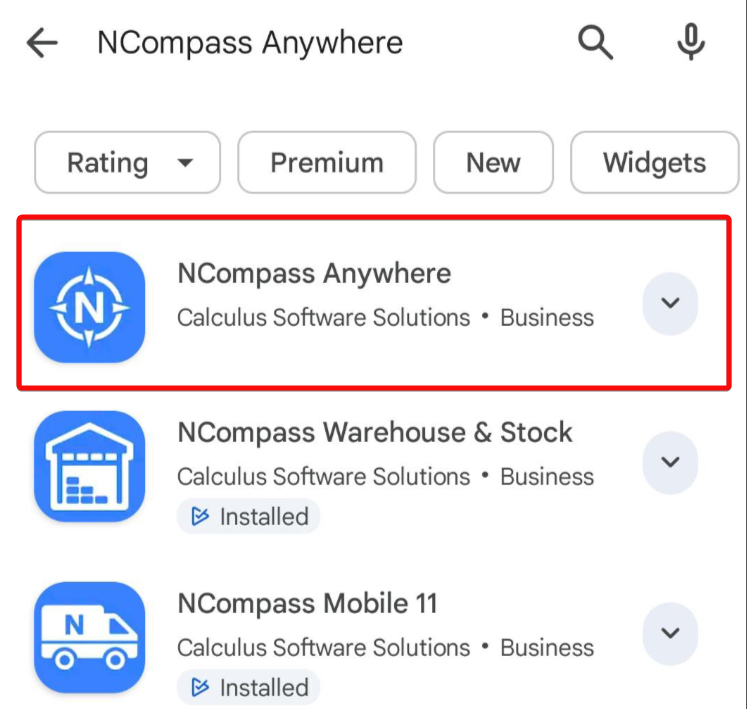](https://kb.findesolutions.com/uploads/images/gallery/2026-04/IOdQXgk79EZ3f2l2-image.png) Once the App has been installed, tap onto it to open it. You will then be presented with the below screen, and prompted to login to the app: [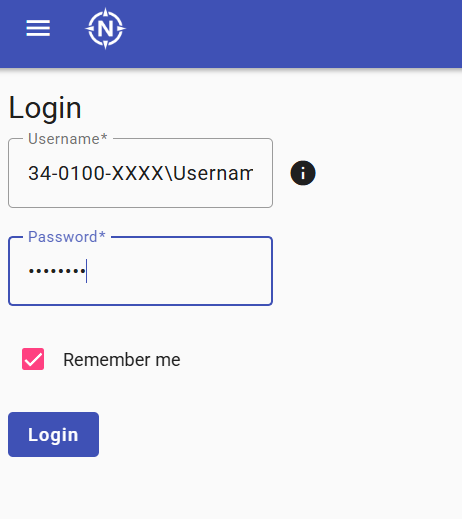](https://kb.findesolutions.com/uploads/images/gallery/2026-06/yI0YczeDESv9J6XJ-image.png) Once the setup has been completed, you can log in using the following format: ``` SystemCode\Username ``` **Example:** ``` 34-0100-1234\JohnSmith ``` ##### Finding Your System Code 1. Open **Desktop NCompass**. 2. Go to **Help** → **About NCompass**. 3. In the highlighted section of the window, locate your **System Code**. 4. It will look similar to: ``` 34-0100-1234 ``` [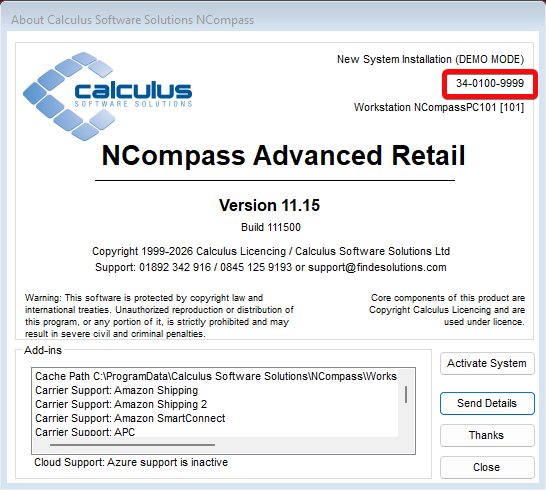](https://kb.findesolutions.com/uploads/images/gallery/2026-04/bI893hHrIrq7d4Jh-image.png) ##### Entering Your Login Details When prompted to log in: - Enter your **System Code**. - Type a backslash (`\`). - Enter your **NCompass username,** this is the same name you select when logging into the desktop version of NCompass.. **Login format:** ``` 34-0100-1234\YourUsername ```**Note:** Replace `34-0100-1234` with your own System Code and `YourUsername` with your NCompass username.
Please Note: the `System Code` is the same for all Users wanting to login to the App at your Company.
Your Username and Password are the same Username and Password you use to Login to Desktop NCompass. By Default, any existing Login for Desktop NCompass will have access to login to Anywhere. However, it is possible to control which Users do or do not have access to Login to Anywhere, which is covered more in the ['Configuring your NCompass Users for Anywhere'](https://kb.findesolutions.com/books/ncompass-anywhere/page/configuring-your-ncompass-users-for-anywhere) section. Once you have successfully logged in, the app will take you to the home page below: 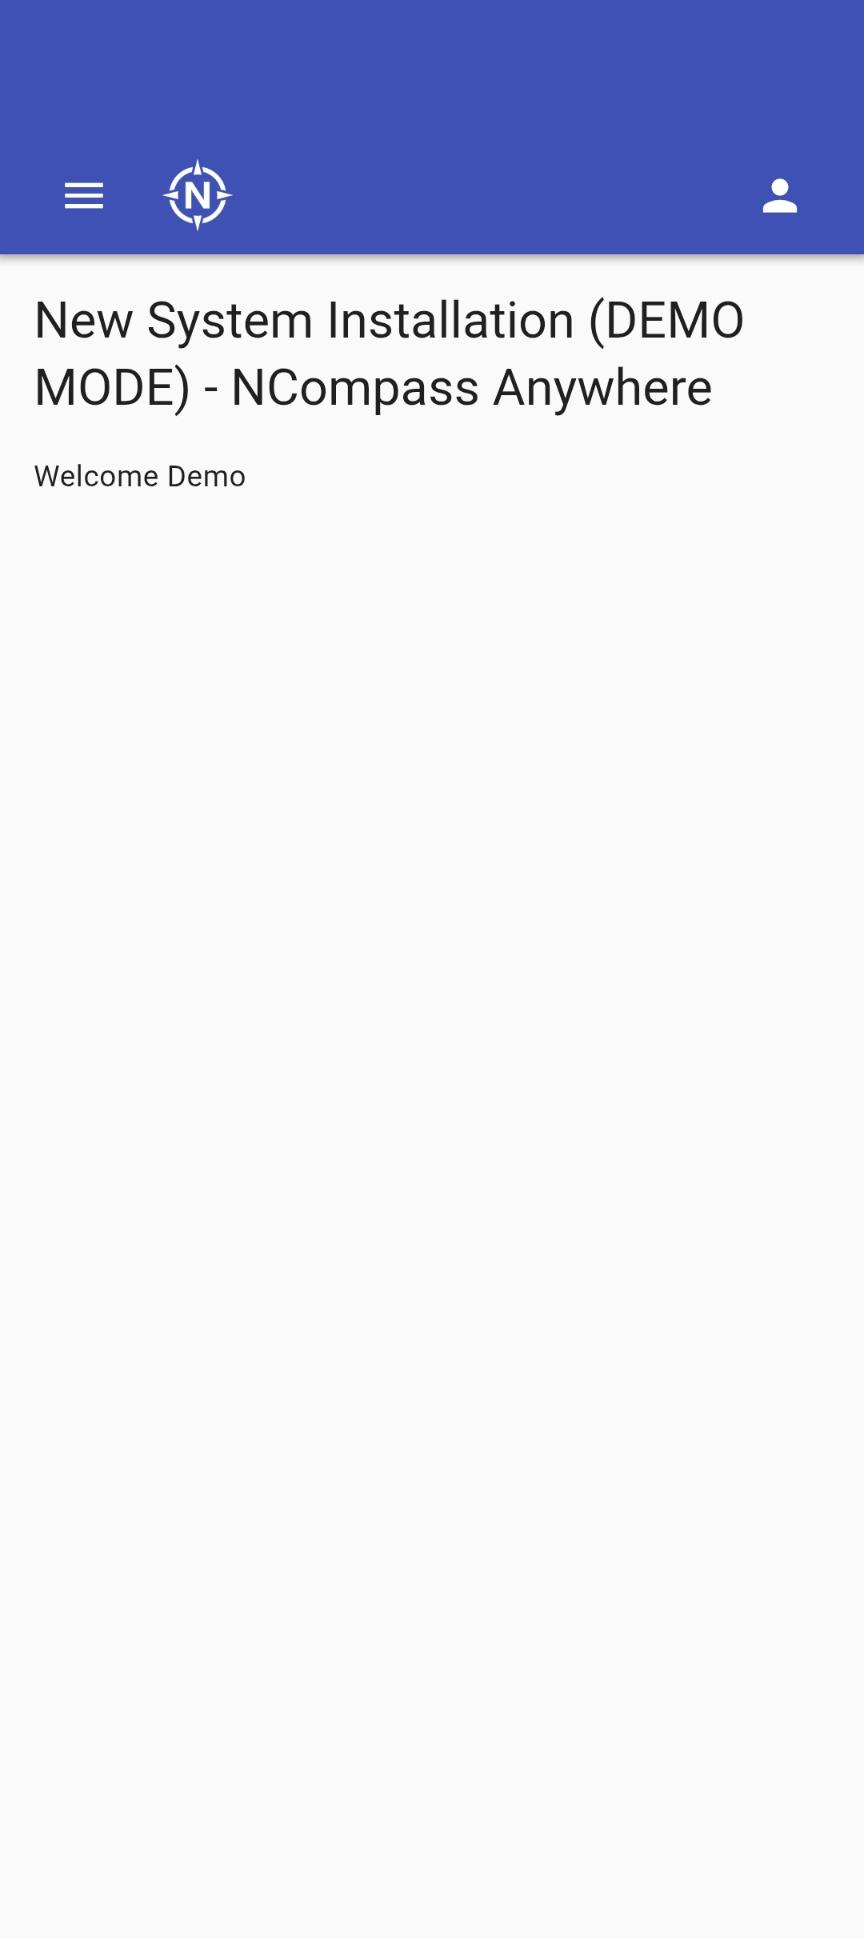 If you need to Logout at any point, simply press the Person Icon in the top left hand screen, and press Logout. #### Running Reports The NCompass Anywhere Application has the ability to run any Report that is configured as an Additional Report inside Desktop NCompass (Reports > Additional Report).Please Note: The user you are logged in as needs to have permissions inside Desktop NCompass to be able to run Additional Reports. The ['Configuring your NCompass Users for Anywhere'](https://kb.findesolutions.com/books/ncompass-anywhere/page/configuring-your-ncompass-users-for-anywhere) section covers in more detail the tools that are available to control if a User does or does not have the ability to run these reports
To run these inside NCompass Anywhere tap the menu ( ☰ ) icon > All Reports > Pick a Report Group > And then select the report you wish to run. The below is an example of All Reports > Field Calls > Incomplete Field Calls 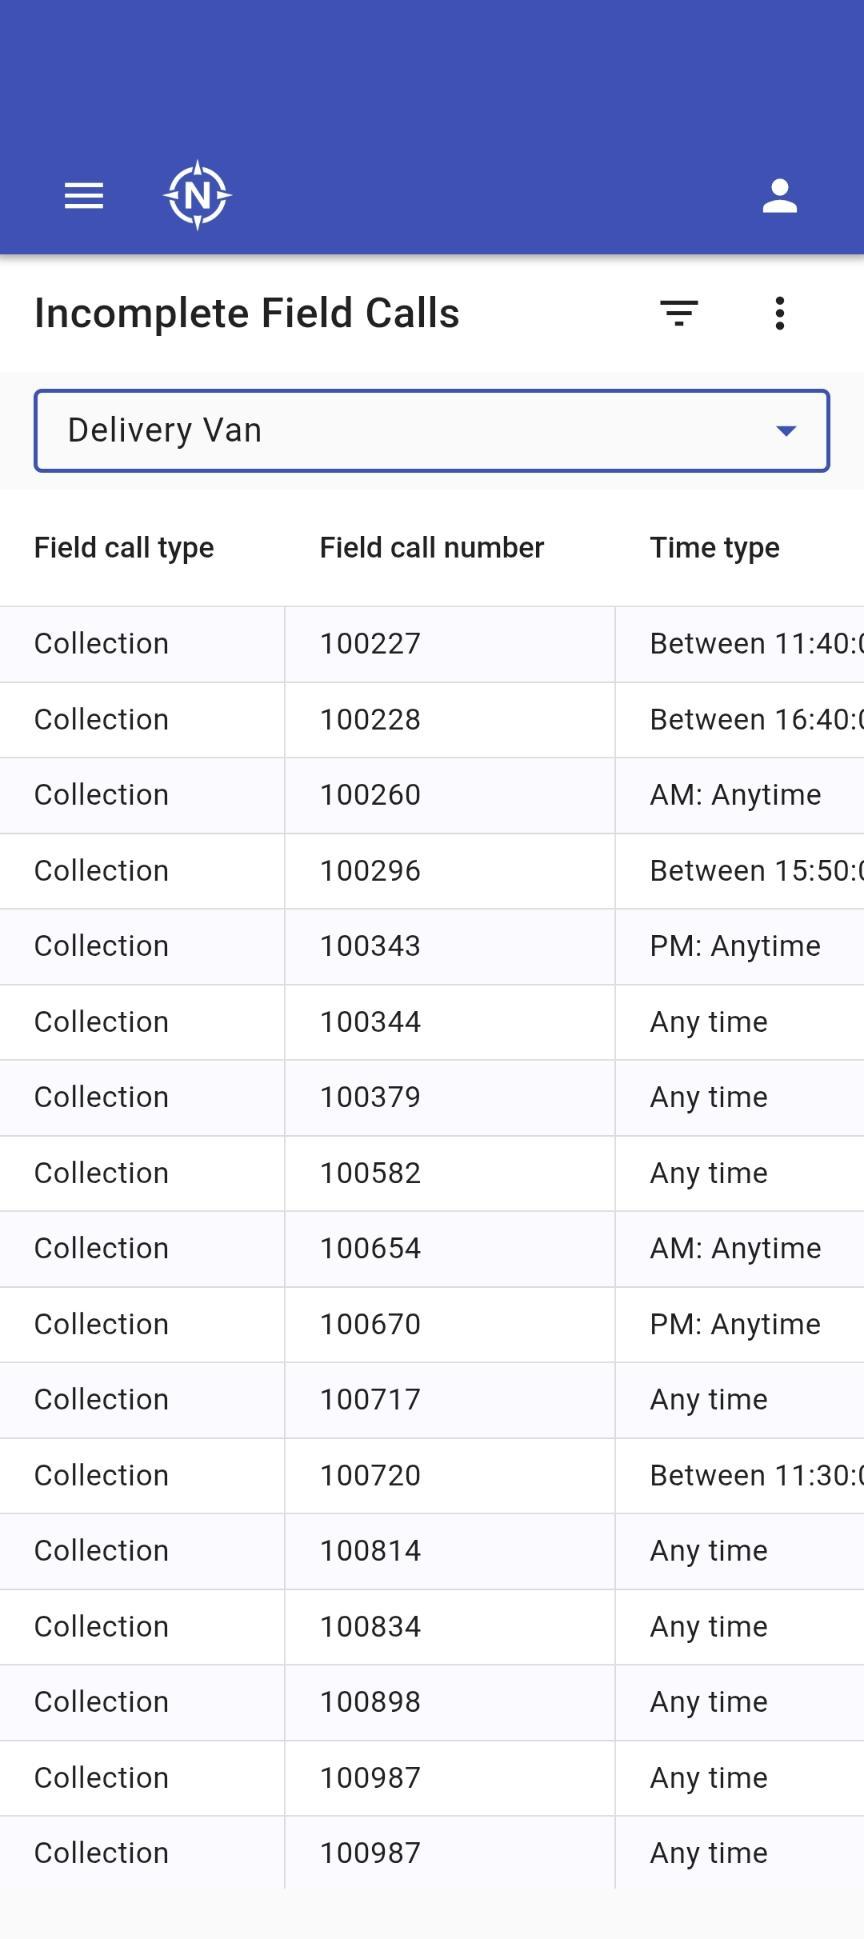In the event that a report has multiple columns, you can use your finger to swipe left/right across the screen to scroll through these columns. Next to the title of the report, you will see a Filter Icon and another Menu Icon (in the form of 3 vertical dots) The Filter Icon will open a new window that allows you to apply filters to your report: 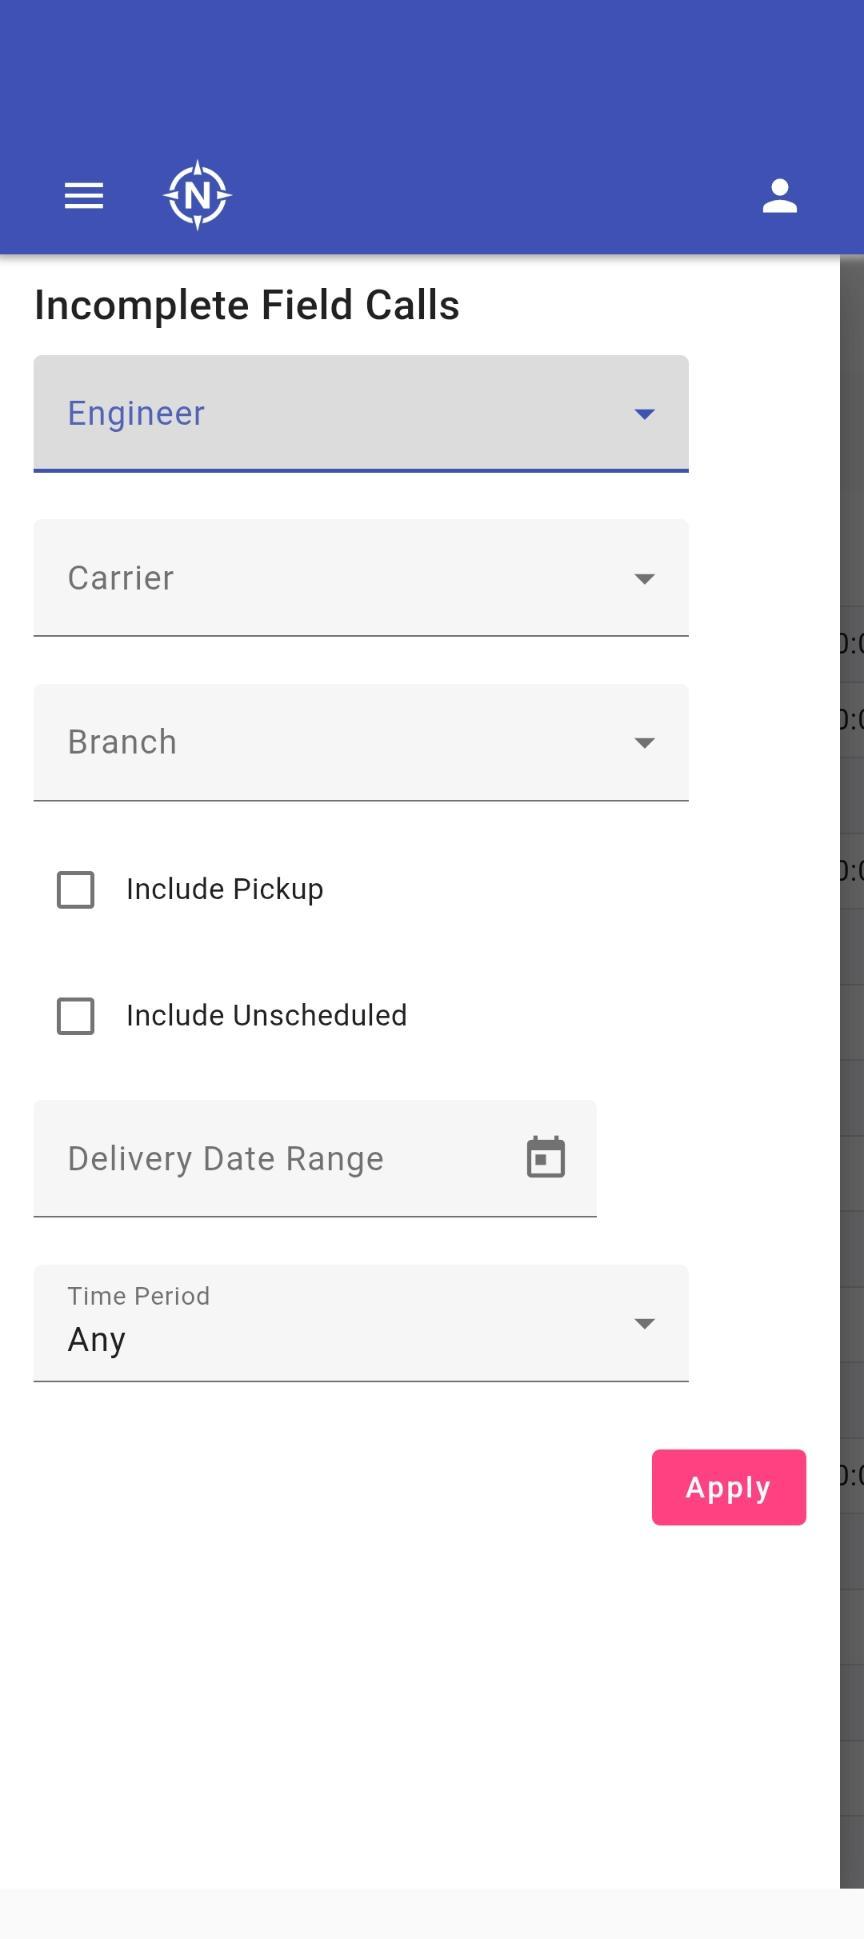 The Menu button gives us options to; - Send the report via email - Download the report as PDF - Download the report to Excel - Reload the Data in the report 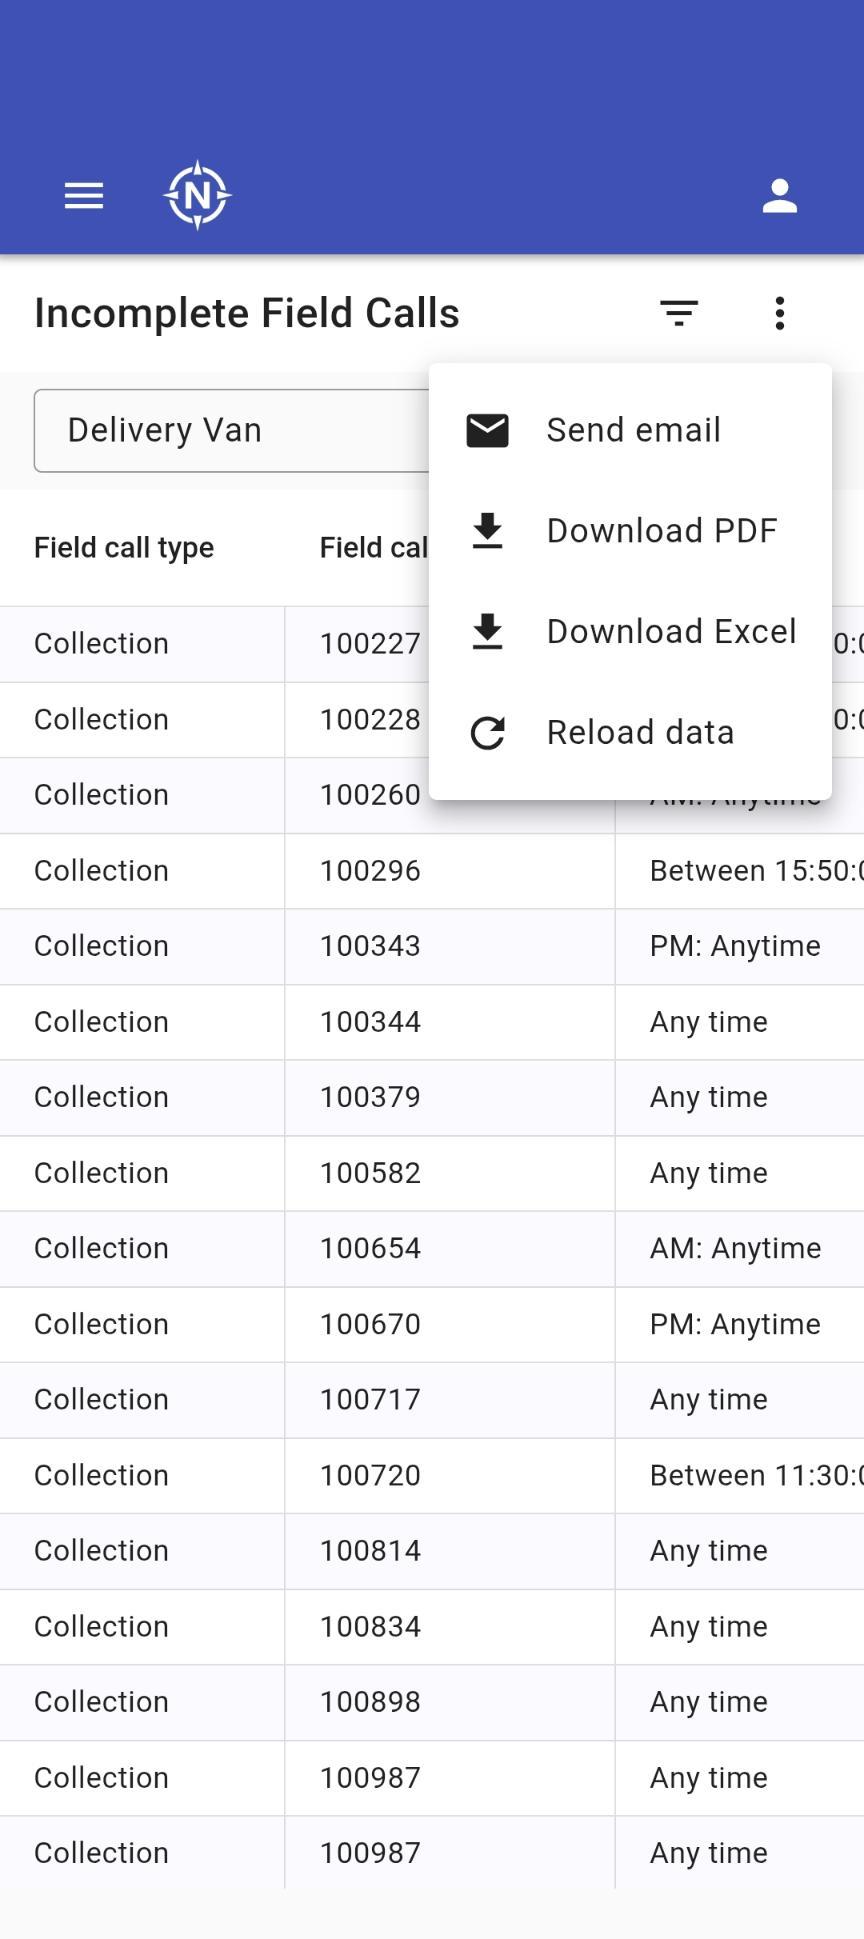If you require a new Report adding to the system, please contact our Support team with a Specification of what you require, and we will be happy to review this request further for you
#### Stock Management The Stock Management screen allow you to search for a product either Scanning a Barcode, or by a Search [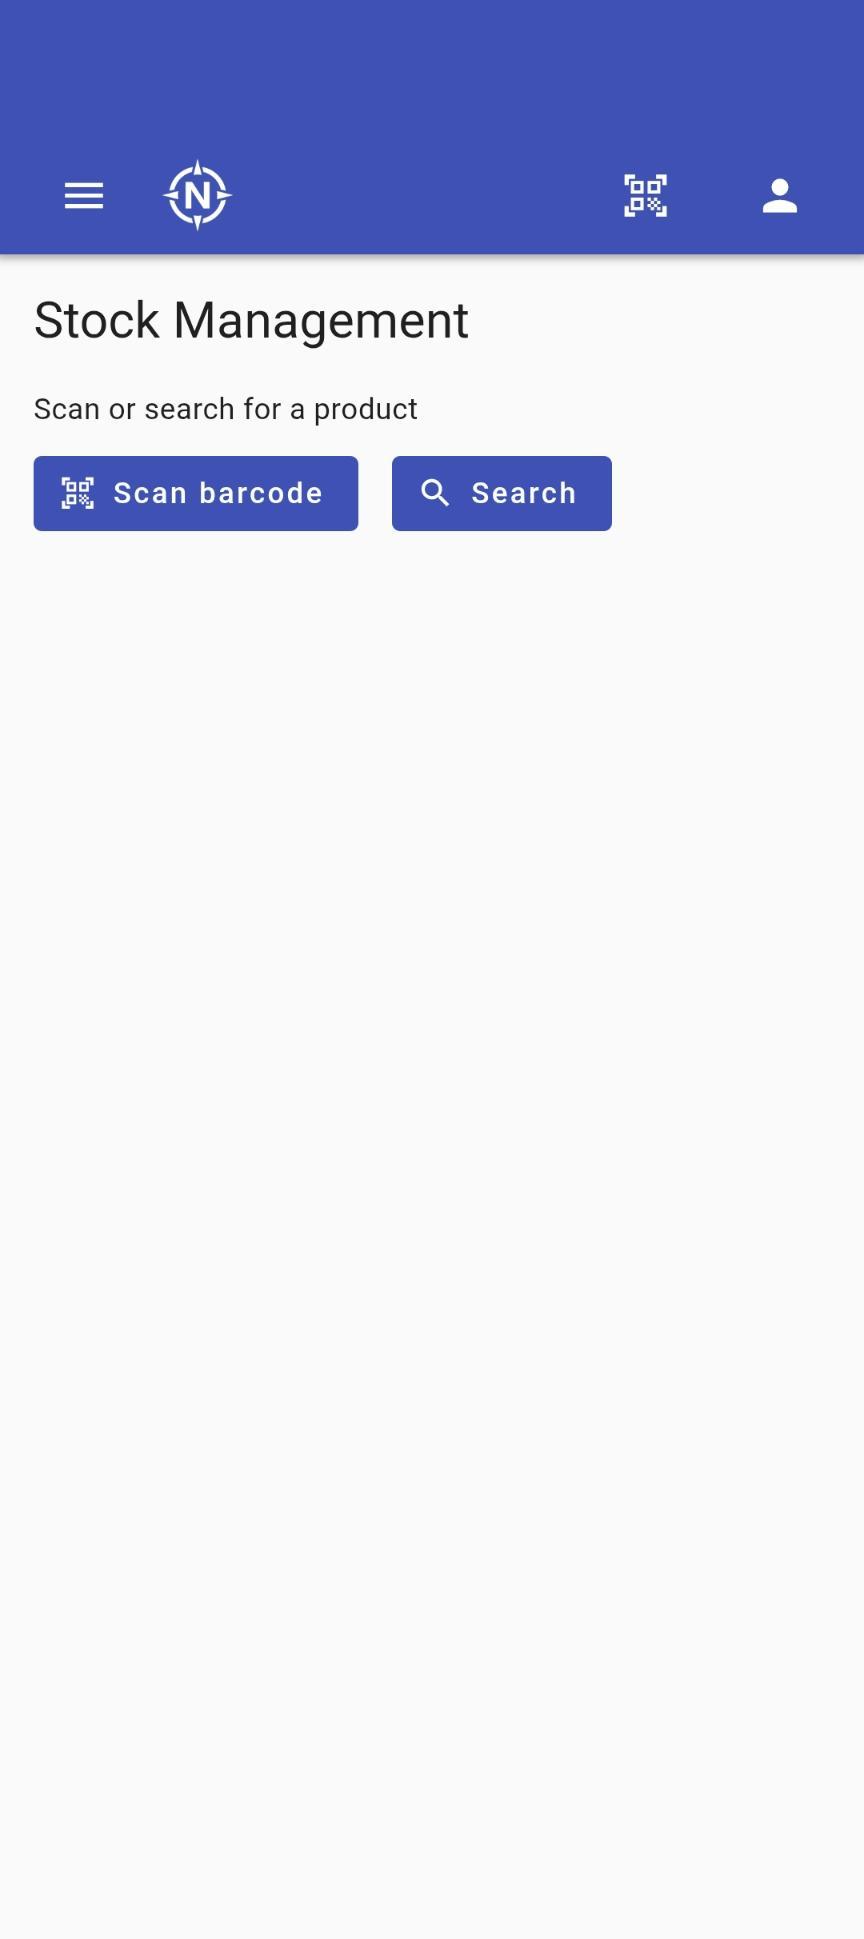](https://kb.findesolutions.com/uploads/images/gallery/2026-04/TuAEmjrbNUjPGRuY-image.png) To scan a Barcode, simply press the Scan barcode button, and ensure that you allow NCompass Anywhere the correct permissions to use the Camera on your device if prompted to do so: [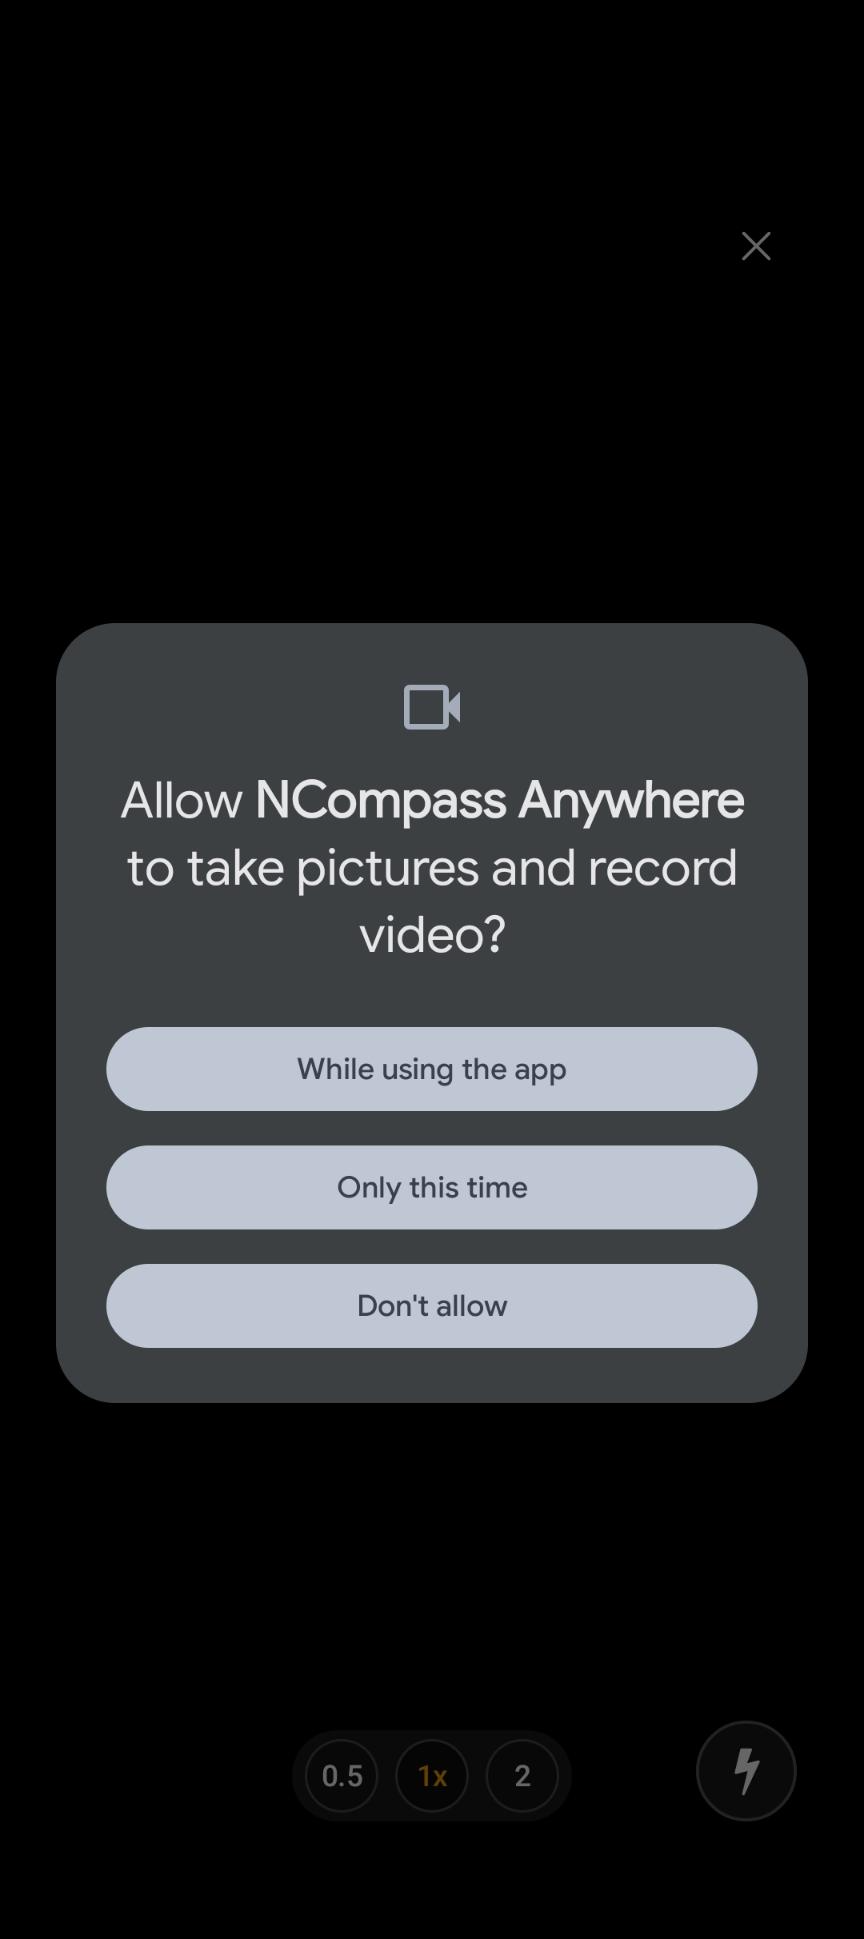](https://kb.findesolutions.com/uploads/images/gallery/2026-04/nlkrtpL6HdjaGp6E-image.png) Then, simply place the barcode for the product in front of the camera, and the app will then bring information about that product up on the screen. To Search for a product without using it's barcode, press the Search button, and in the Search Query box, search for the product in question. If required, you can press the 'Show advanced filters' button to have more granular levels of filtering 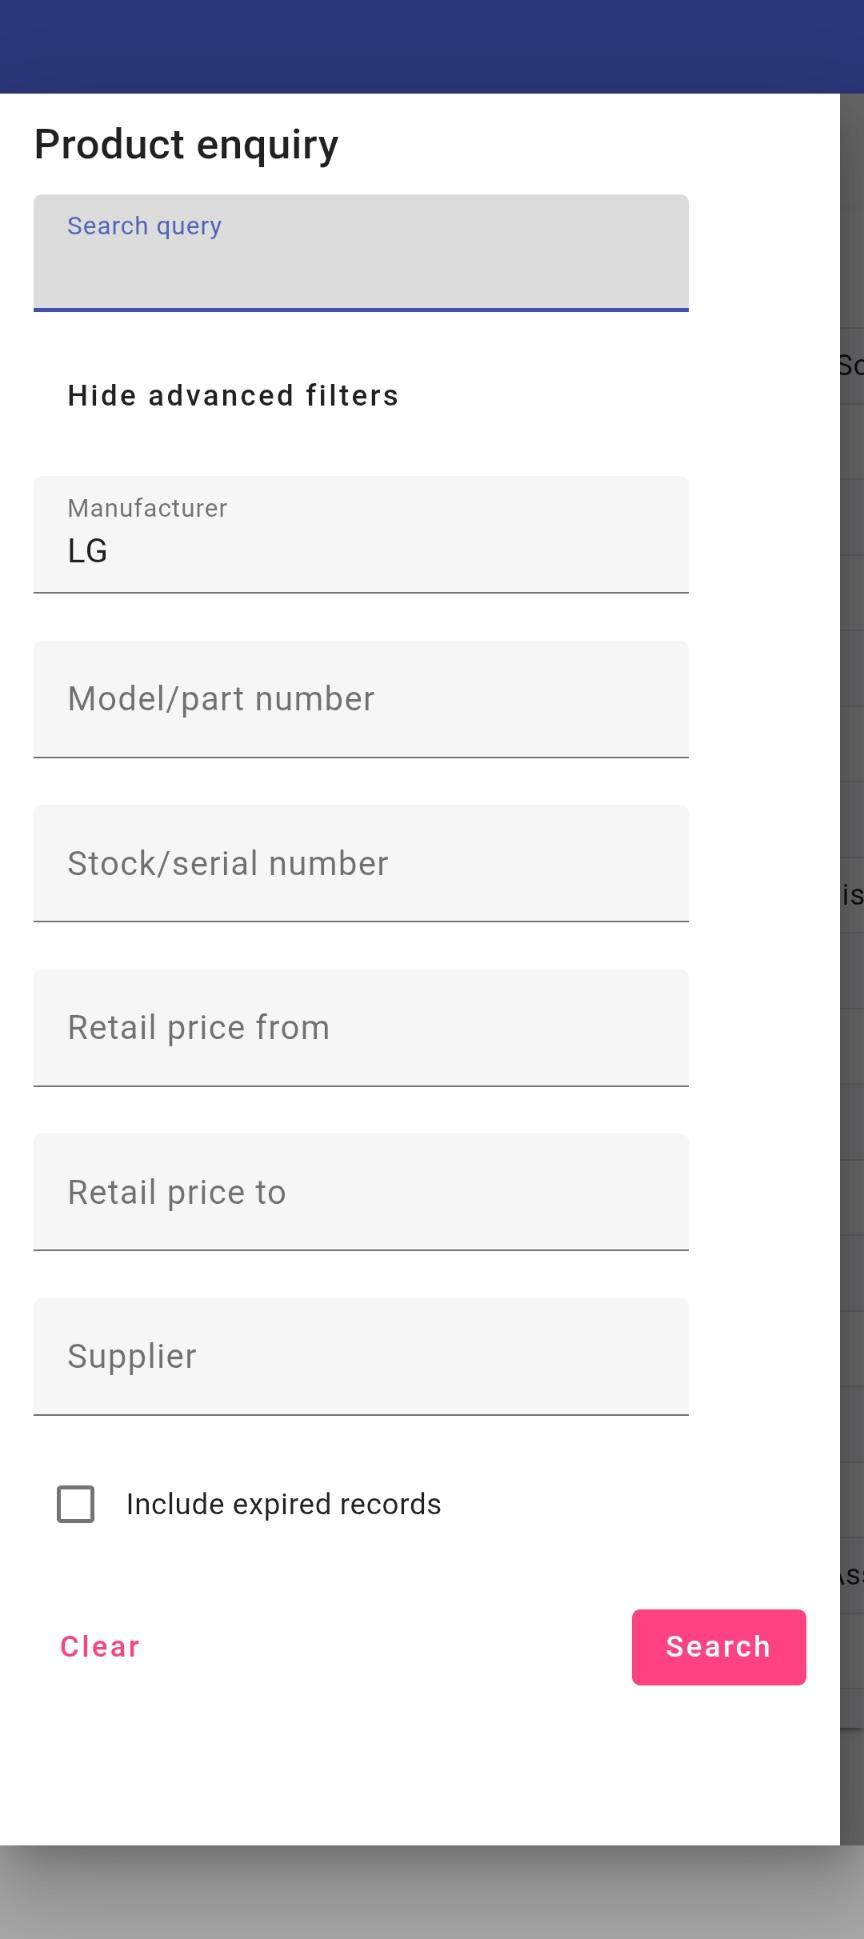 Press Search, and a list of products that match your search criteria will appear. Tap onto a search result, and press Select, and you will then be taken to a new screen that shows you information about that Product. From this new screen, you can see information such as: - View the product on your website - Product Pricing - Stock Levels - Print Stock labels #### Helpdesk Helpdesk is a new platform that allows you to see any existing tickets you have open with us at the moment, and create new tickets from this platform, without needing to phone our Support team. You do not need to be setup for NCompass Anywhere to be able to use Helpdesk, but we have added the option to be able to login to it through NCompass Anywhere to help have everything in one easy to use place.If you require assistance logging into the Help desk, please contact our Support team who will be happy to assist further
# NCompass Anywhere - Website As well as being mobile app, NCompass Anywhere is accessible in a Web Browser of your choosing by visiting [anywhere.findesolutions.com](https://anywhere.findesolutions.com/) This can be loaded on any device that has a Web Browser installed, be that a mobile phone, tablet, or PC. Getting Logged In Browse to [anywhere.findesolutions.com](https://anywhere.findesolutions.com/) and you will be presented with a login screen asking for just two things - a `Username` and a `Password`. [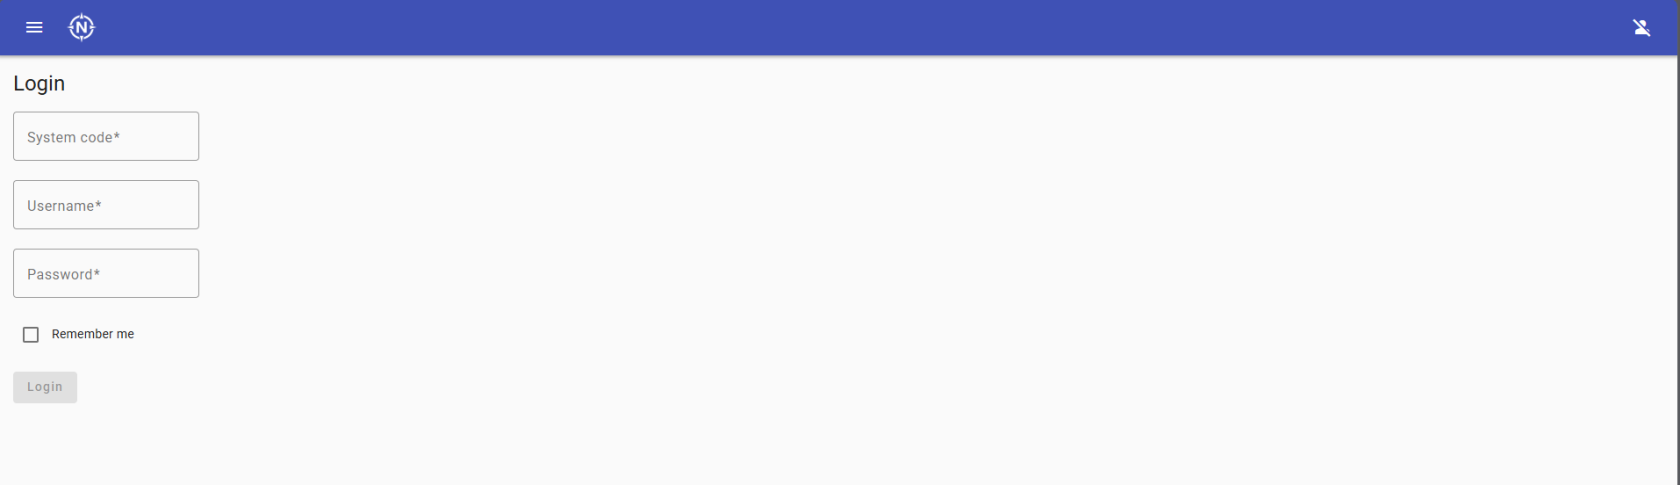](https://kb.findesolutions.com/uploads/images/gallery/2026-04/tUKMglG8PS6pdN1z-image.png)The screenshot above still shows the older login screen with a separate `System Code` box. The login form now has only the two fields described below - a replacement screenshot is still to be captured.
##### Entering your username Your System Code and your NCompass username are typed into the single `Username` box, separated by a backslash: ``` SystemCode\Username ``` **Example:** ``` 34-0100-1234\JohnSmith ``` So, when prompted to log in: - Enter your **System Code**. - Type a backslash (`\`). - Enter your **NCompass username** - the same name you select when logging into the desktop version of NCompass. - Enter your **Password** - again, the same password you use for Desktop NCompass.If you are unsure of the format while you are on the login screen, tap the information icon next to the `Username` box and a **Username format** message will explain it.
Because the login screen is now just a username and a password, your browser's built-in password manager can save and autofill your NCompass Anywhere details in the same way it does for any other website. The old three-box login could not be autofilled reliably, so if a browser has remembered a partial set of details from before, clear the saved entry and let it save the new combined username.
##### Finding your System Code Your `System Code` can be found on Desktop NCompass under Help > About NCompass > find in the highlighted section that appears in the new window, and take note of the number that shows (this will be in the format of 34-0100-xxxx): [](https://kb.findesolutions.com/uploads/images/gallery/2026-04/bI893hHrIrq7d4Jh-image.png)Please Note: the `System Code` is the same for all Users wanting to login to the App at your Company.
Your Username and Password are the same Username and Password you use to Login to Desktop NCompass. By Default, any existing Login for Desktop NCompass will have access to login to Anywhere. However, it is possible to control which Users do or do not have access to Login to Anywhere, which is covered more in the ['Configuring your NCompass Users for Anywhere'](https://kb.findesolutions.com/books/ncompass-anywhere/page/configuring-your-ncompass-users-for-anywhere) section. #### Running Reports The NCompass Anywhere Application has the ability to run any Report that is configured as an Additional Report inside Desktop NCompass (Reports > Additional Report).Please Note: The user you are logged in as needs to have permissions inside Desktop NCompass to be able to run Additional Reports. The ['Configuring your NCompass Users for Anywhere'](https://kb.findesolutions.com/books/ncompass-anywhere/page/configuring-your-ncompass-users-for-anywhere) section covers in more detail the tools that are available to control if a User does or does not have the ability to run these reports
To run these inside NCompass Anywhere tap the menu ( ☰ ) icon > All Reports > Pick a Report Group > And then select the report you wish to run. The below is an example of All Reports > Field Calls > Incomplete Field Calls 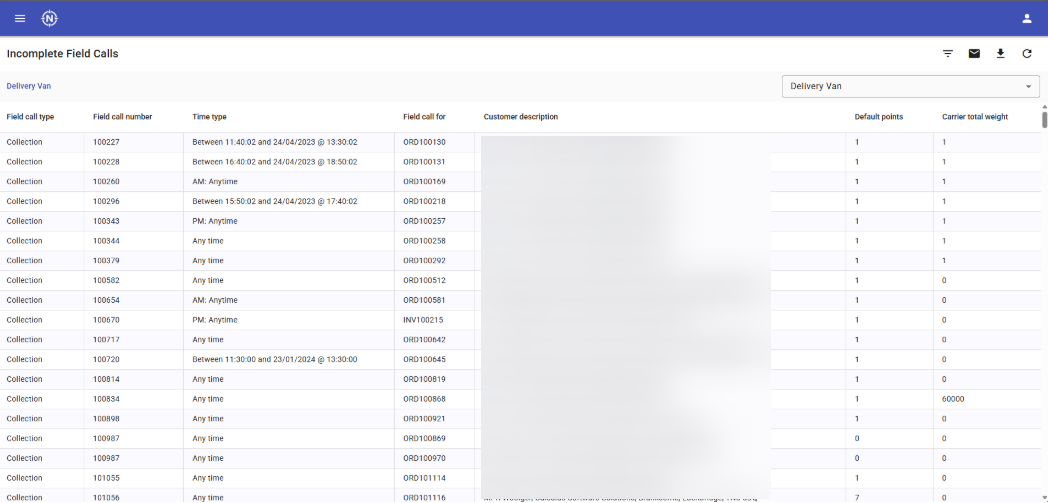 Next to the title of the report, you will see a Filter Icon, an Email Icon, a Download Icon, and a Refresh Icon. The Filter Icon will open a new window that allows you to apply filters to your report: 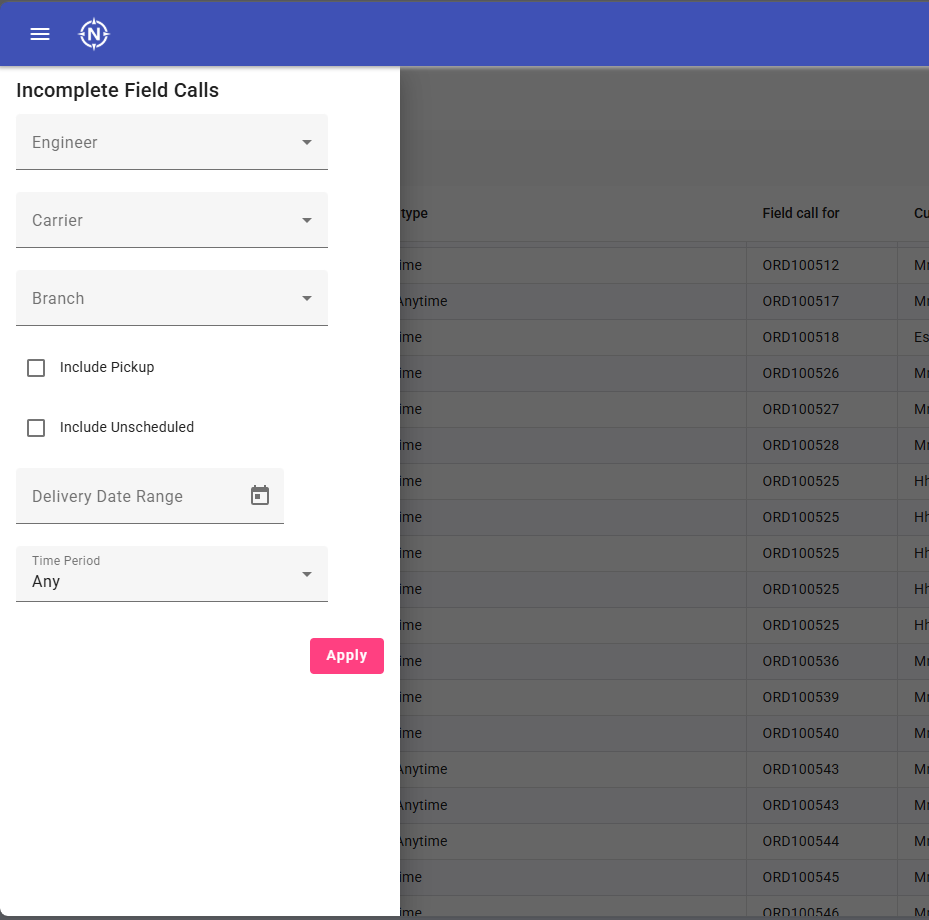 The Email Icon will allow you to send the report to a specific email address, in a specific file format [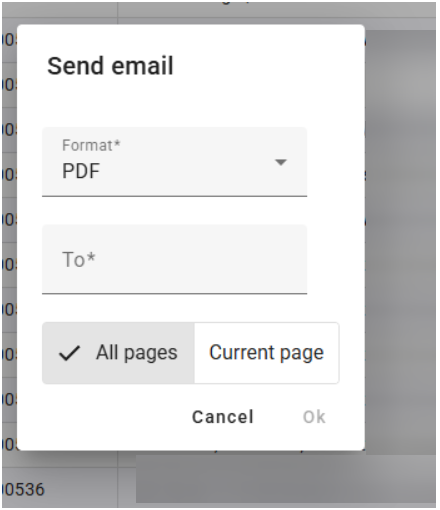](https://kb.findesolutions.com/uploads/images/gallery/2026-04/xGxPtbw3sCasgyF8-image.png) The Download Icon will allow you to download the report either as PDF, or to Excel 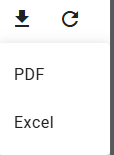 The Refresh Icon will re-run the report, in the event that any data has changed.If you require a new Report adding to the system, please contact our Support team with a Specification of what you require, and we will be happy to review this request further for you
#### Stock Management The Stock Management screen allow you to search for a product either by Entering a Barcode, or by a Search [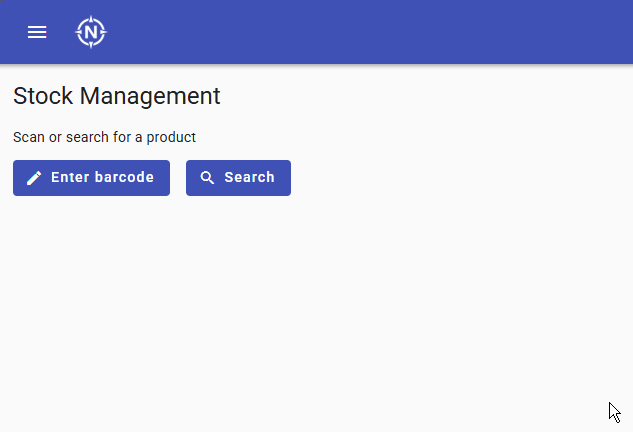](https://kb.findesolutions.com/uploads/images/gallery/2026-04/plrjSbfylboOilAC-image.png) If you know the Barcode/EAN of the product, then you can simply press the Enter barcode button and Press Ok. This will then take you to a page containing information about the product. If not, press the Search button, and in the Search Query box, search for the product in question. If required, you can press the 'Show advanced filters' button to have more granular levels of filtering 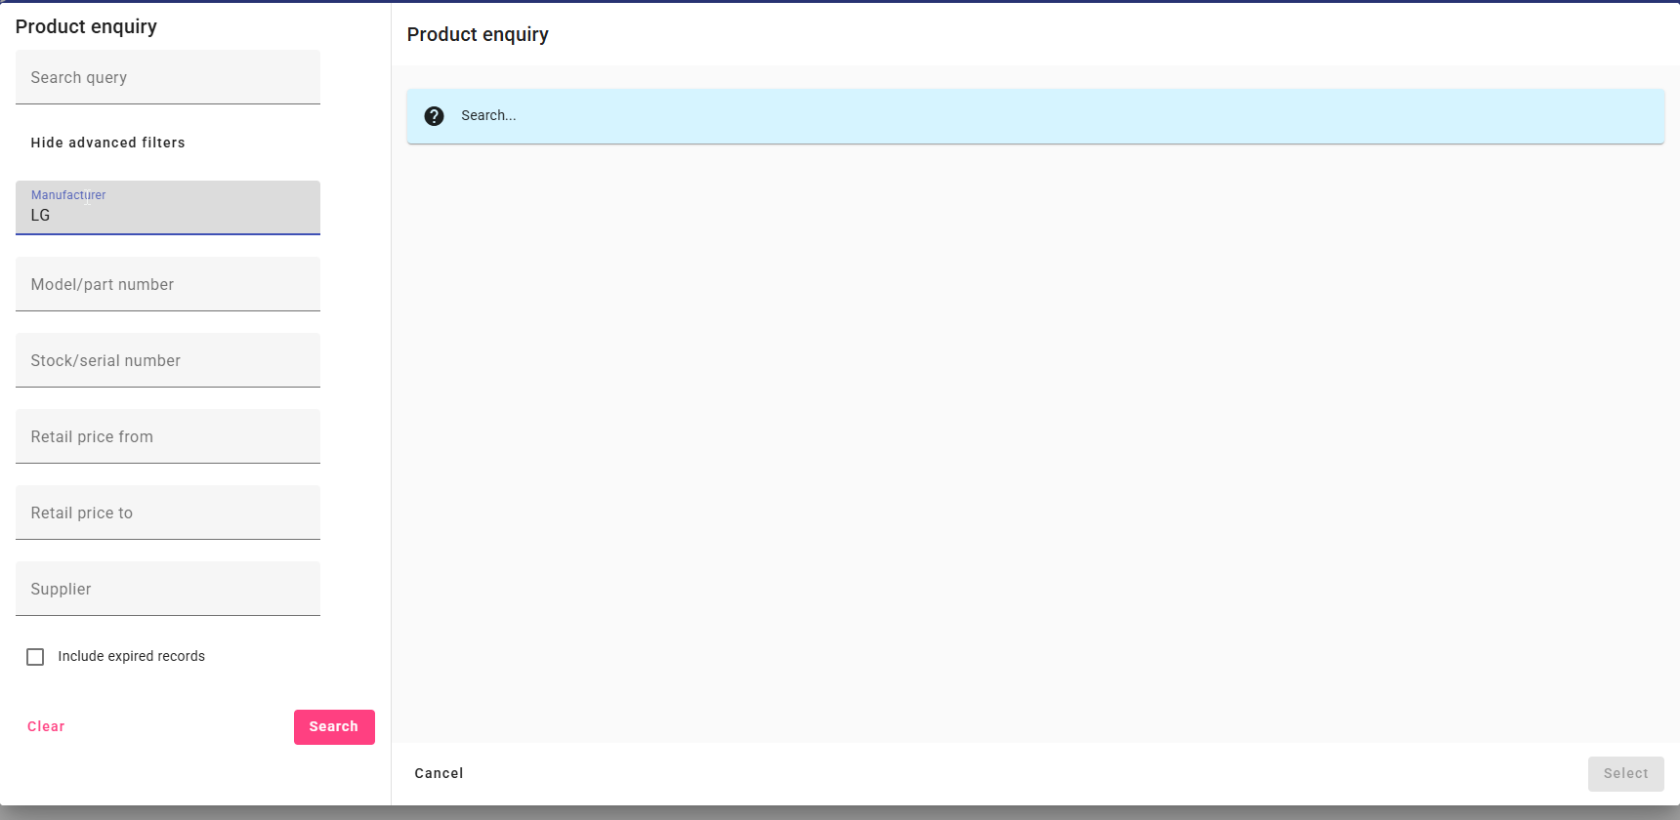 Press Search, and a list of products that match your search criteria will appear. Click onto a search result, and press Select, and you will then be taken to a new screen that shows you information about that Product. From this new screen, you can see information such as: - View the product on your website - Product Pricing - Stock Levels - Print Stock labels [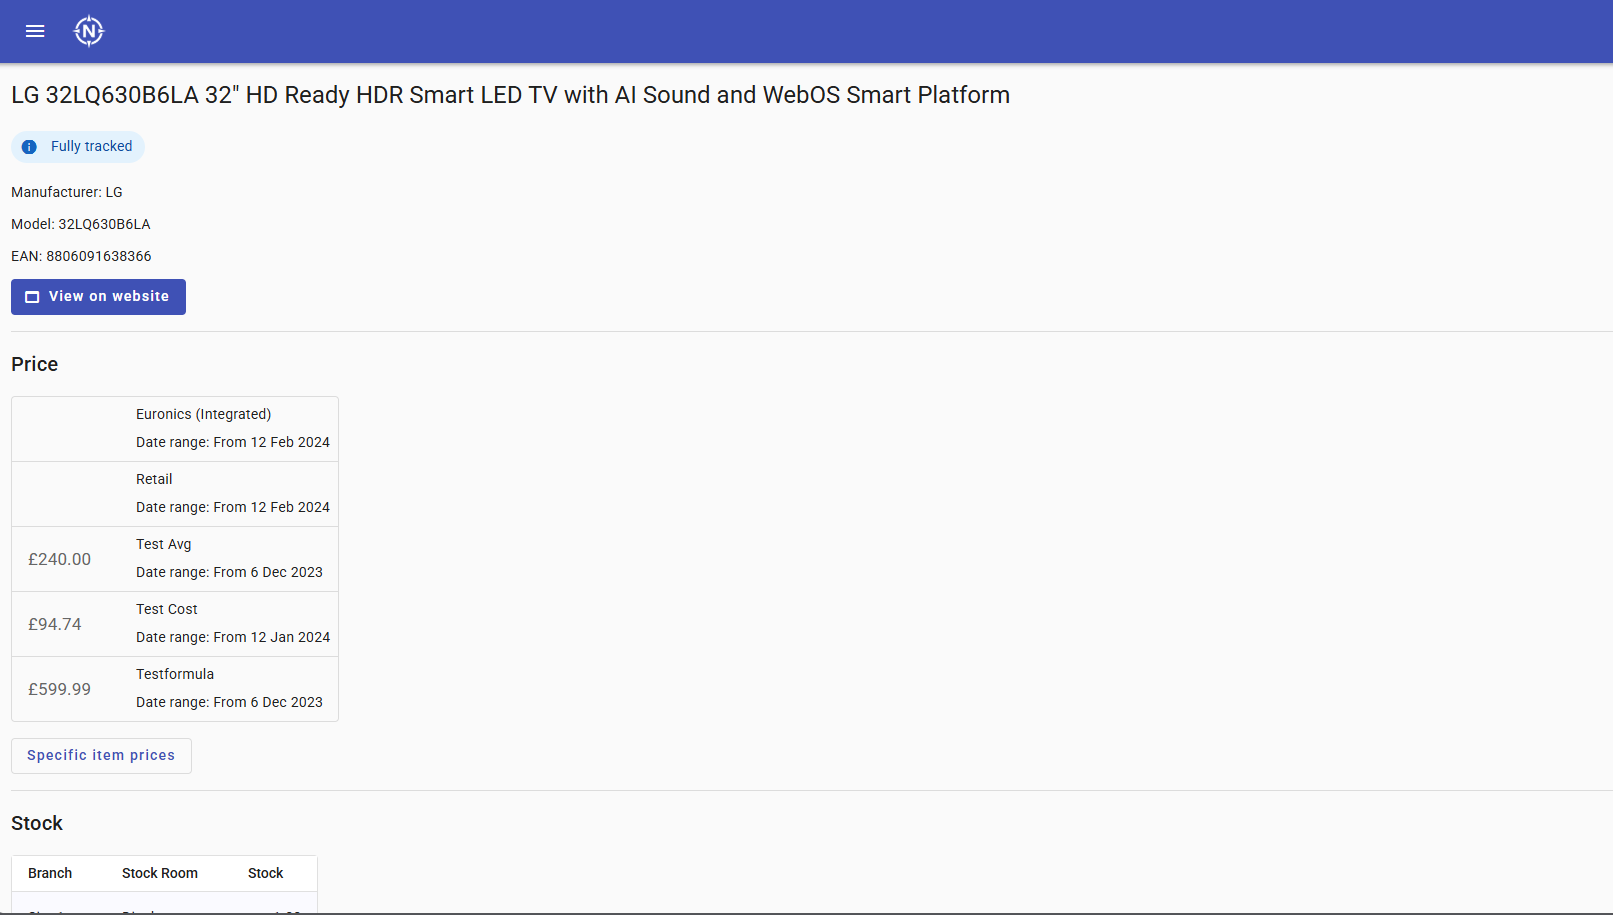](https://kb.findesolutions.com/uploads/images/gallery/2026-04/fslHia9UUSo44mgO-image.png) #### Helpdesk Helpdesk is a new platform that allows you to see any existing tickets you have open with us at the moment, and create new tickets from this platform, without needing to phone our Support team. You do not need to be setup for NCompass Anywhere to be able to use Helpdesk, but we have added the option to be able to login to it through NCompass Anywhere to help have everything in one easy to use place.If you require assistance logging into the Help desk, please contact our Support team who will be happy to assist further
# Configuring your NCompass Users For Anywhere As all permissions surrounding what a User can and can not access in NCompass Anywhere are controlled in NCompass Desktop, you will need to be logged into NCompass Desktop as a User that has the relevant permissions to able to access 'Administration > Security > User Management' menu to be able to change these permissions .Please be aware that NCompass Anywhere inherits the permissions set against a User in NCompass Desktop. So changing any permissions so the User can run Reports in Anywhere, means they will able to run the same reports in Desktop NCompass, as the two systems are linked.
If you do not currently have the relevant permissions to change these settings against a User, pause here, and discuss with your manager to confirm if access can be granted to this section or not.Please Note: Our Support team are happy to assist you in configuring these permissions if help is required, but will only do so if they have be granted permission by a senior member of staff at your company.
To edit the permissions of a User, first select the User in question and press Edit. Using the navigation arrows, browse to the 'NCompass Desktop' tab. From here, you can control if a User has access to run Reports or not via the Reports tickbox highlighted below [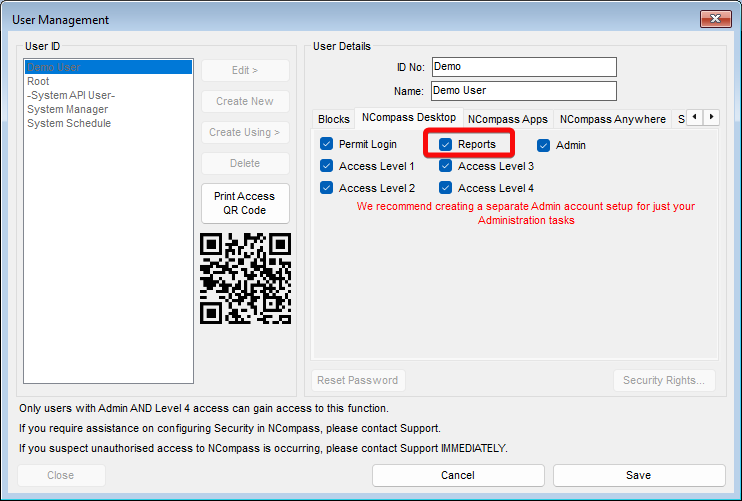](https://kb.findesolutions.com/uploads/images/gallery/2026-04/re4qLpMIsHGKSWzD-image.png) If you require a member of Staff to be able to run any Reports configured under Reports > Additional Reports (which are the reports that can be run on NCompass Anywhere) but not be able to run any other type of report, then it is possible to do this via the Security Rights button in the bottom left hand corner of this screen.Please contact Support if you require assistance setting this up
If you then use the Navigation Buttons to browse to the NCompass Anywhere tab, you can control if the user can Login to NCompass Anywhere or not via the Permit Login Button [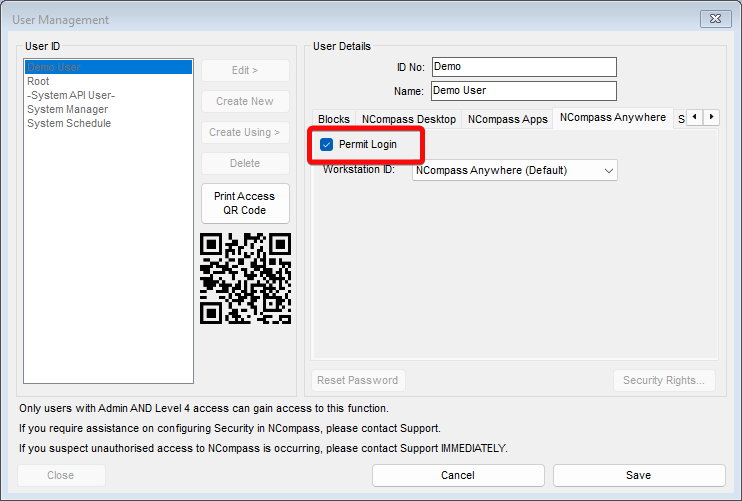](https://kb.findesolutions.com/uploads/images/gallery/2026-04/GhzzXyhb7rOBwnxW-image.png) By Default, all users are permitted to login to Anywhere. So if you only want select staff to be able to login to the application, then you will need to change this setting against each user. # WebPresence # Product Search AdvisorThis module is a chargeable module, if you are interested in this module, please reach out to our admin team on the following link to inquire [Click Here ](mailto:admin@findesolutions.com?subject=WebPresence%20WPCAT25%20Product%20Search%20Advisor%20Interest&body=Hi%0A%0A%20i%27d%20like%20to%20register%20my%20interest%20in%20purchasing%20the%20module%20WPCAT25%20Product%20Search%20Advisor%20Interest%20for%20my%20webpresence%20website.%0A%0AKindest%20regards) If you have already purchased this module, please continue.
### Introduction Our product search advisor is a powerful tool that allows your customer to quickly search and find a product using and advanced configuration of your filters across your products to drive this quick catalogue search using a smart intuitive interface. Please see a basic user interaction using the advisor below. To briefly explain the video, this allows the user to select a category, and using your own configuration of the advisor you can guide your customers to shop by relevant results related to those category. for example, TVs to be shopped by size, laundry to be filtered by load size, and/or installation type, and this can all be configured using our smart front end utility. [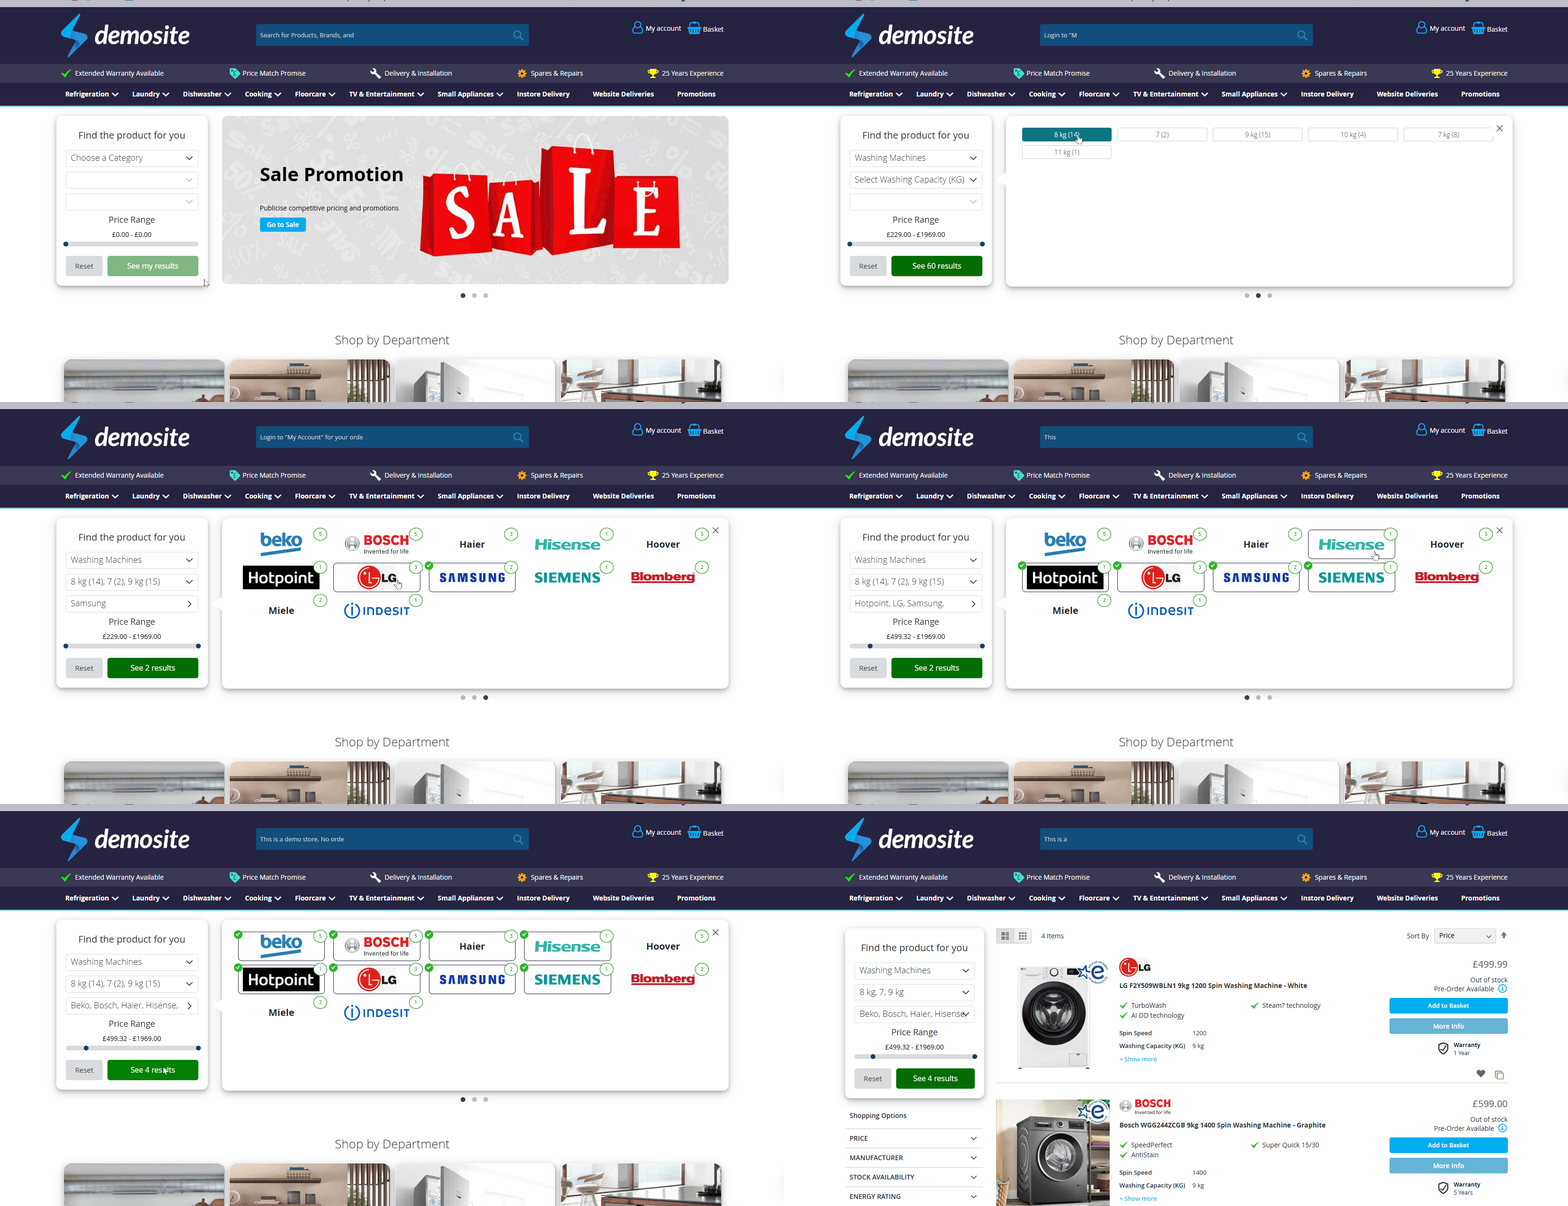](https://kb.findesolutions.com/uploads/images/gallery/2025-05/x0qxZ7zyoCjVCh5s-chrome-hpwdza4ltr.gif) once this module is enabled for you, a front-end utility becomes available to you to use in a variety of different configurations. it will display by default all categories available to you. #### Dynamic Filters Configuration ##### Open the Configurator Navigate to **Calculus > Product Advisor** [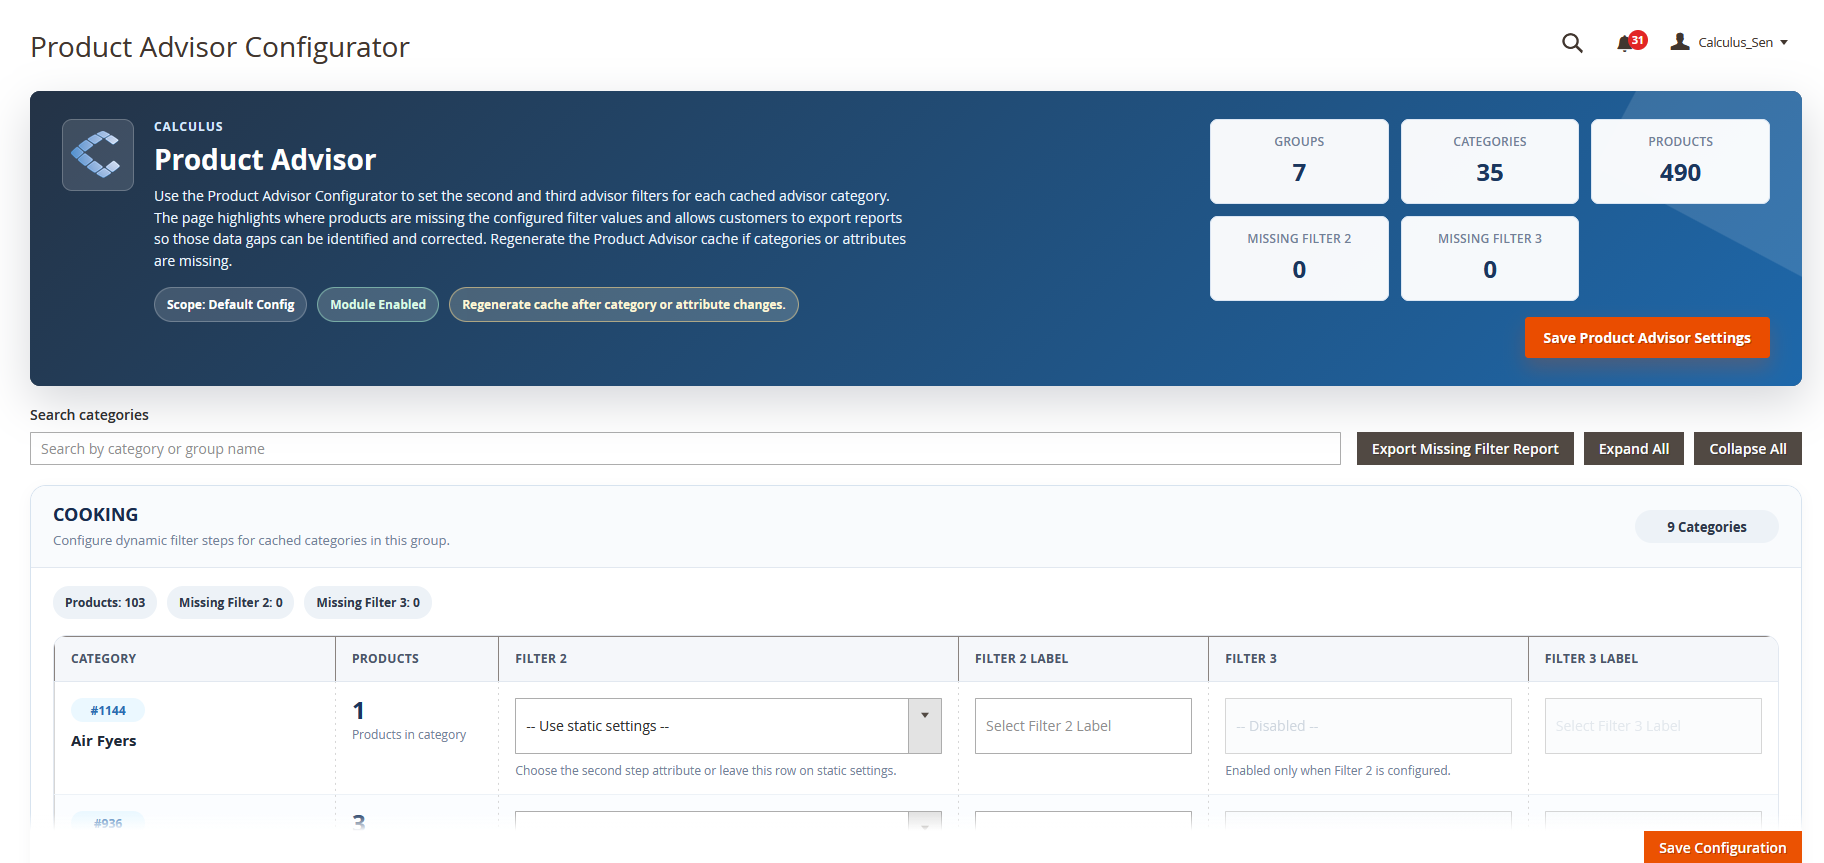](https://kb.findesolutions.com/uploads/images/gallery/2026-06/GYYL0yDV5KBSnUiR-image.png) From here you will see each parent category separated into its own block. Within each block you will configure the specific attributes which will be used for the sub department. ##### Configure Attributes In the example bellow we have used the Washing/Drying Capacity attributes as Filter 2, the manufacturer as Filter 3 and adjusted the labels accordingly. [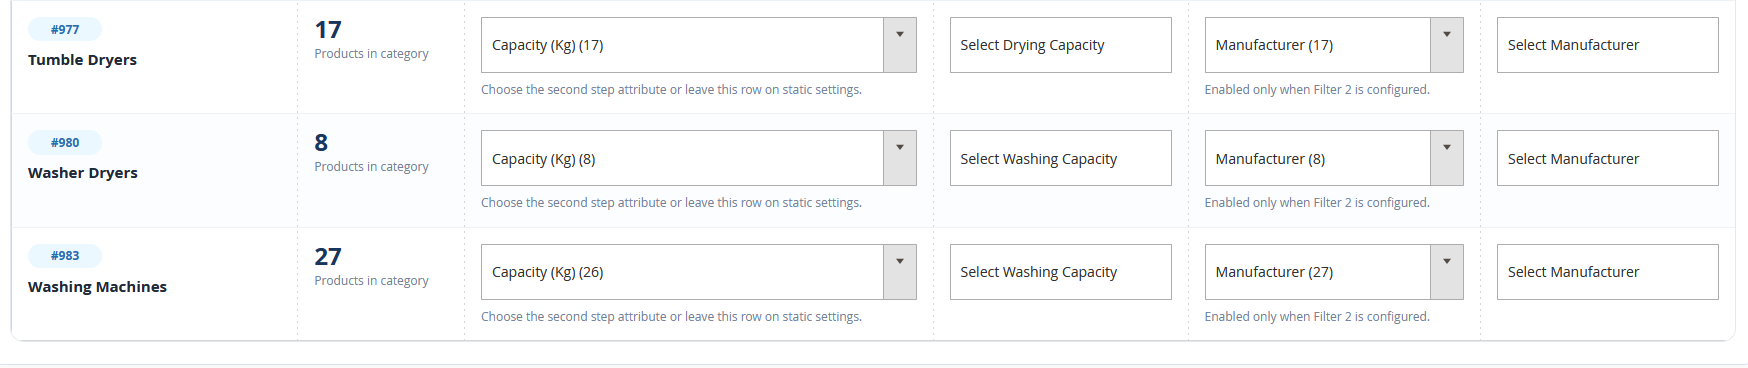](https://kb.findesolutions.com/uploads/images/gallery/2026-06/U7jEC3M9h3IHc536-image.png) You can see how this will look on the website here: [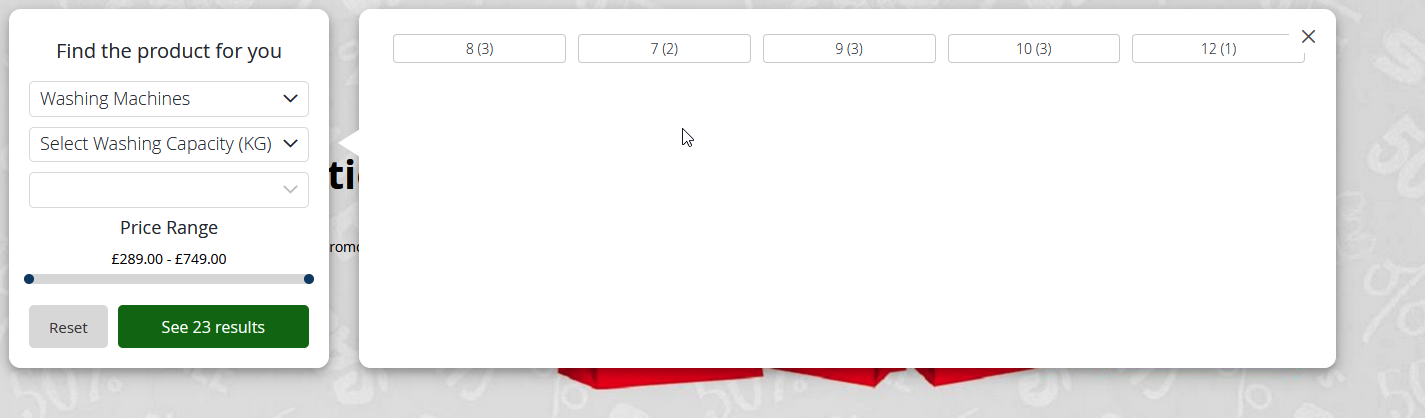](https://kb.findesolutions.com/uploads/images/gallery/2025-10/zldAY1y9HQ5csc0f-image.png) ##### Missing Attributes You can see here that there are 13 products in **Floorcare** but only 10 have the **Colour** attribute. [](https://kb.findesolutions.com/uploads/images/gallery/2026-06/AYz7cYI8xEa2JOkZ-image.png) To view all products that are missing filter attributes, click **Export Missing Filter Report** in the top right of the page. [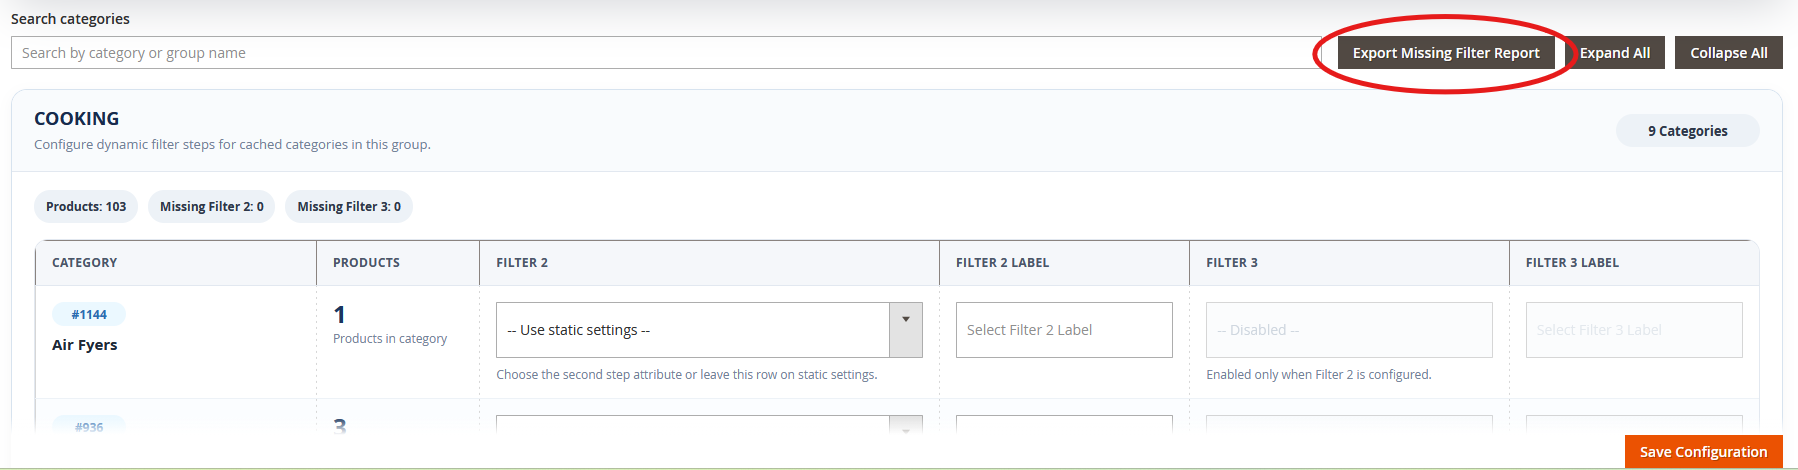](https://kb.findesolutions.com/uploads/images/gallery/2026-06/rtYJ512uWOg7R7h9-image.png) This will then generate an Excel file of all missing attributes from individual products. ##### Save Changes Once you have finished configuring your filters you must press **Save Configuration** at the bottom of the page and flush the cache. [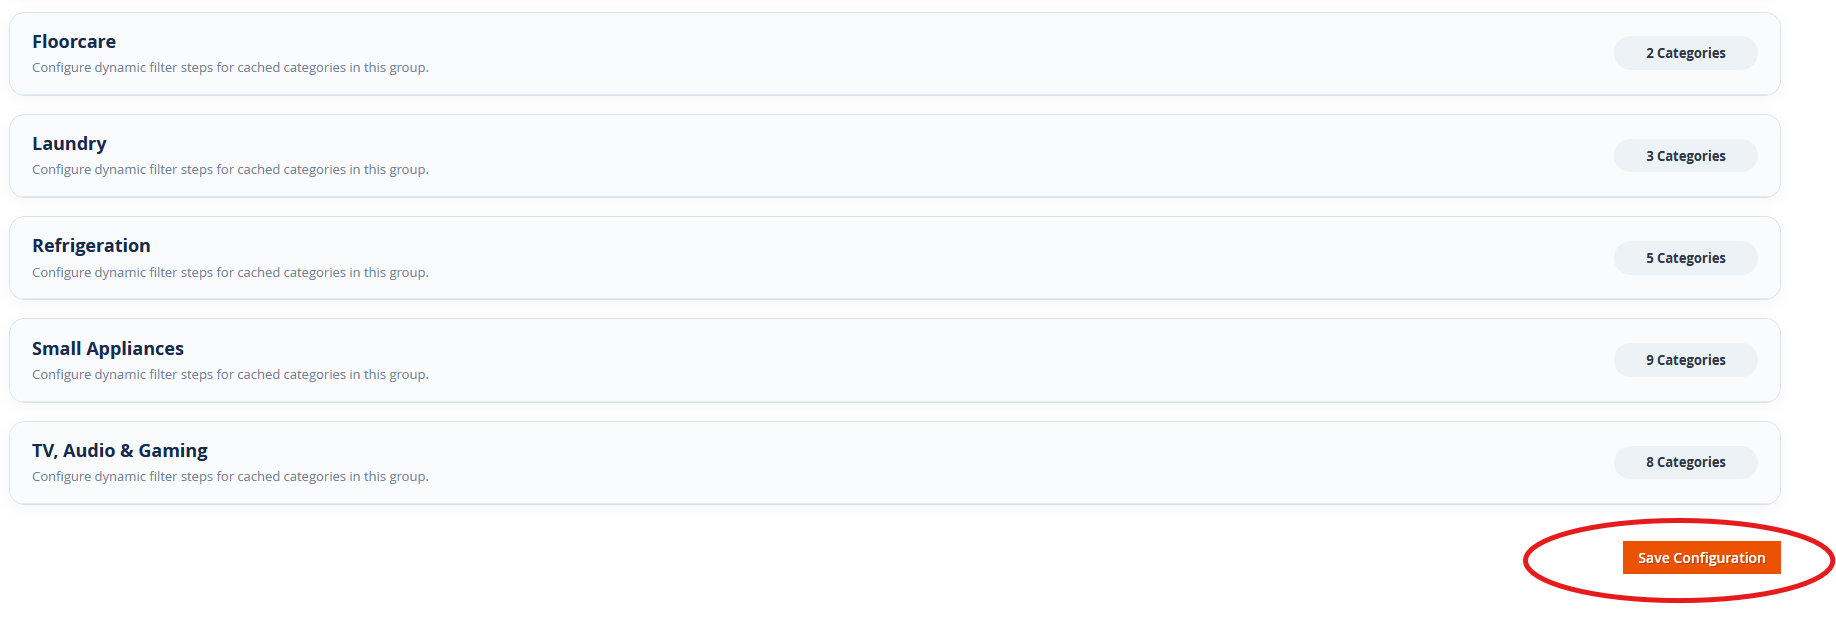](https://kb.findesolutions.com/uploads/images/gallery/2026-06/wlZhyWHIMJaPOZuv-screenshot-2026-06-02-160704.png) ### Optional: Search Advisor Widget With the Products Search Advisor enabled you will also have the ability to inject the advisor as a widget throughout the site but with some caveats. [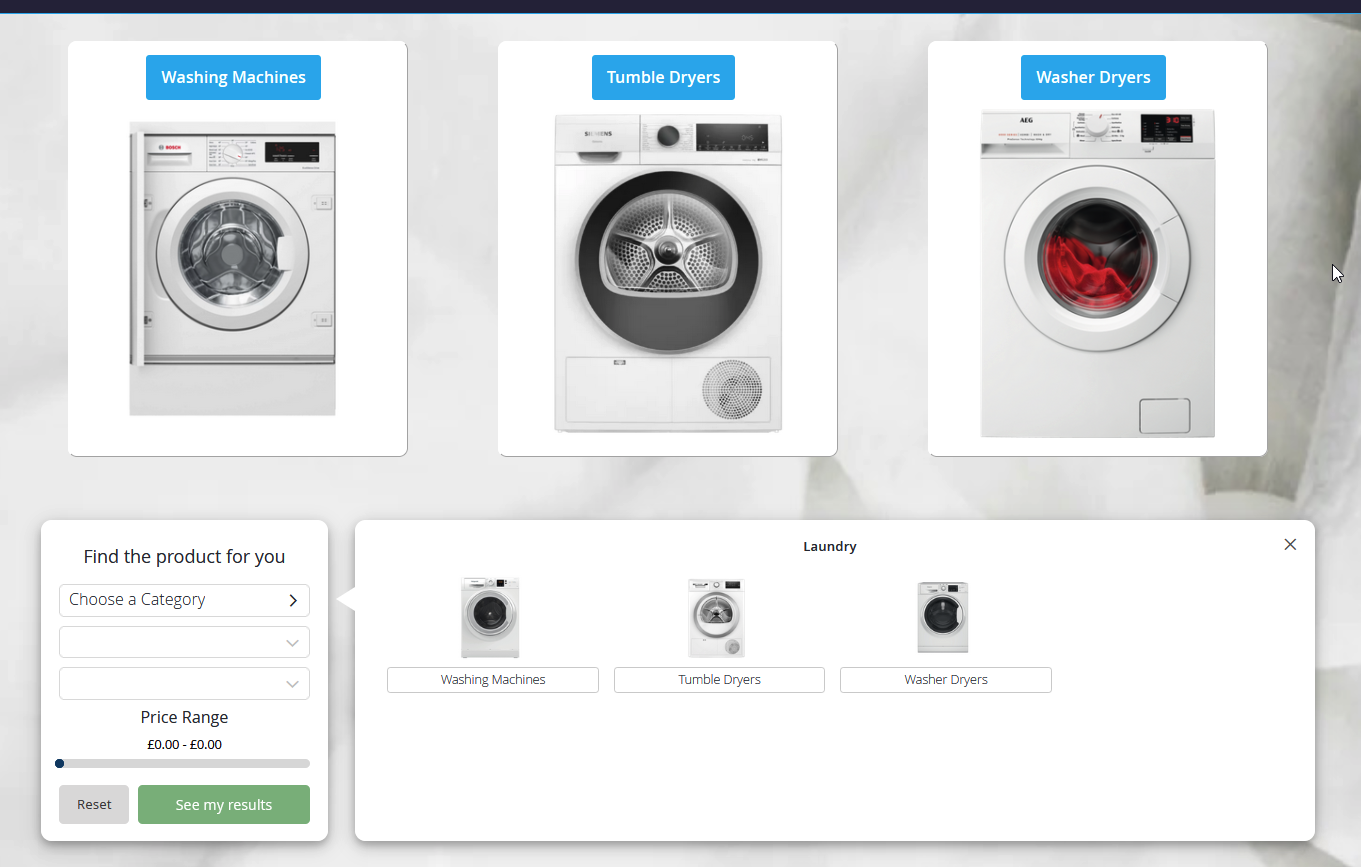](https://kb.findesolutions.com/uploads/images/gallery/2025-10/tJiIgtD4ABADXjqA-image.png) In the example above the advisor has been added to a laundry landing page and displays just the sub departments of Laundry in the first filter. This is achieved using a HTML code element in Magento's page builder. Start with adding a HTML code element to your block or page. Once added, select the [](https://kb.findesolutions.com/uploads/images/gallery/2025-10/IzndPP7m7gBdVkEm-image.png) icon that appears when hovering over the element. In here you will select  and select product advisor from the Widget Type dropdown. [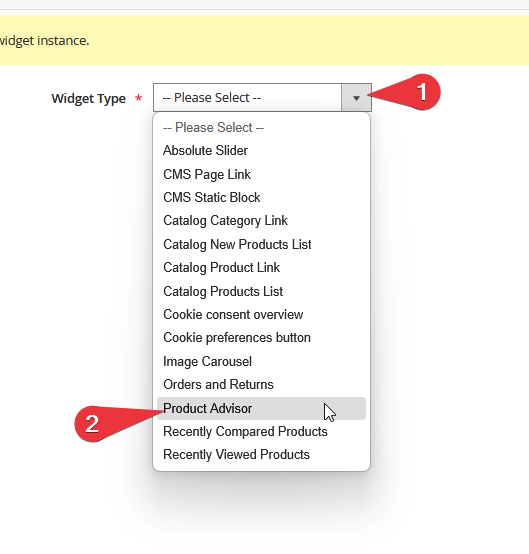](https://kb.findesolutions.com/uploads/images/gallery/2025-10/lAHZ1zrsk6DBywrO-image.png) You should no see a new dropdown called Category. Select the parent department you want to use for the first filter.NOTE: The advisor can only use a single department when used as a widget.
[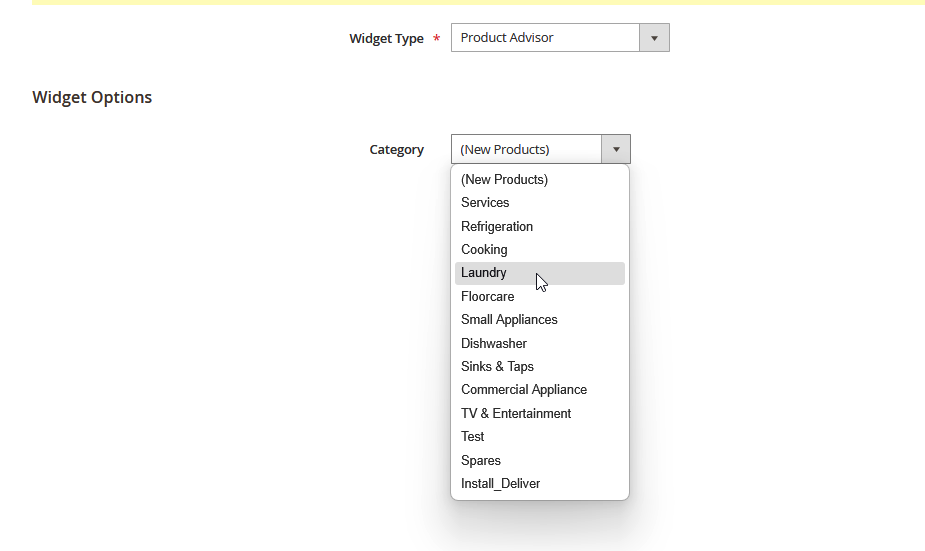](https://kb.findesolutions.com/uploads/images/gallery/2025-10/OhHTah1PpjWUIct4-image.png) Once you have selected your department, now press  and save your block/page. # Calculus Product Labels (WIP) Use Product Labels to add clear product messaging across your storefront. You can create either standard image badges or flexible service rows for delivery, finance, promotions, availability and other customer-facing information. #### Product Label Library The Product Label Library is the central place to find, filter, create and manage labels. Open it from **Content > Product Labels**. 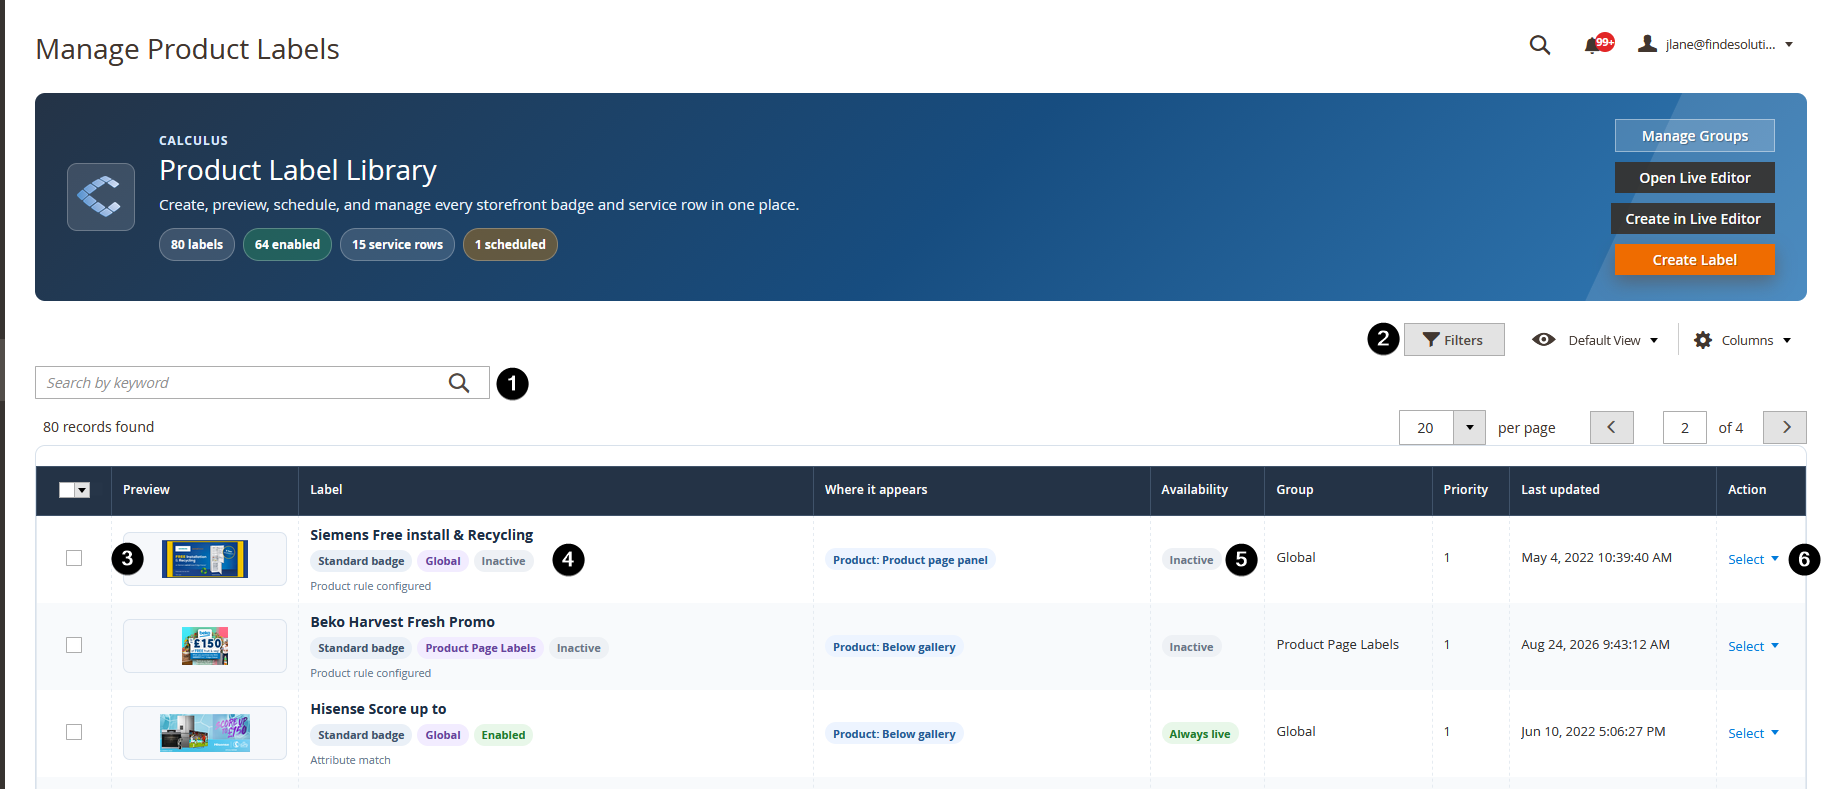 1. **Keyword search** - Find a label by its internal title. 2. **Filters** - Narrow the library by label type, status, group or availability. 3. **Image preview** - Shows the image currently assigned to the label. 4. **Label type and status** - Shows whether it is a standard badge, service row or branch availability row, and whether it is enabled. 5. **Availability** - Shows whether the label is currently live, scheduled or inactive. 6. **Label action menu** - Open Live Editor, edit or delete an individual label. 7. **Header actions** - Manage groups, open Live Editor, create in Live Editor or create a standard label in Admin. Use **Open Live Editor** when you want to browse the storefront and choose a label there. Use **Live Editor** from an individual label action when you already know which label you want to edit. If you switch to another label while you have unsaved changes, Live Editor asks whether you want to **Save then switch**, **Discard and switch**, or **Cancel**. This prevents accidental loss of work. #### What you can create| Label type | Best for |
|---|---|
| **Standard image badge** | Warranty badges, sale graphics, finance logos, promotion graphics and product data-sheet markers. |
| **Service information row** | Flexible rows containing an icon or image, title, supporting copy, optional tooltip and optional link. |
| **Branch availability row** | A service row which can display configured branch availability information. |
| Destination | Available locations |
|---|---|
| **Catalog (Grid Display)** | **Within grid card** or **Top of card (above product image)** . Top-of-card rows can be full, half or flexible width. |
| **Catalog (List Display)** | **First column: above product image** , first column below product image/brand, middle column below product details, or right column (flex ordered). The above-image choice stays within the first column; it never spans into the other columns. |
| **Product page** | Top of information panel, below price and delivery, or below add-to-basket actions. |
| **Calculus Product Display** | Compatible Calculus Product Display cards or widgets where labels are enabled. |
| **Product Sliders** | Supported Page Builder product sliders: top of card, above price or below availability/delivery. |
This section applies when Live Editor has not been enabled for a site. Standard image badges can still be created and edited through the normal Admin form. This is the established configuration route for traditional badges placed over product or catalog images, in product-page panels and in legacy row locations.
It does not provide the newer visual editing, service-row placement, device preview or page-selection tools. Contact Calculus support if you would like Live Editor enabled for your site.  1. **Image preview** - Shows the image currently used by the badge. 2. **Upload** - Upload a new GIF, JPG, JPEG or PNG badge image. 3. **Badge position on product page** - Choose where the badge appears on product pages. 4. **Badge position on catalog cards** - Choose where the badge appears on catalog and compatible product cards. 5. **Save Label** - Saves the standard badge configuration. #### Before publishing: quick checklist #### Is the label itself enabled? - Do its schedule dates include today? - Do its conditions match the intended products? - Is the right label group selected for easy administration? - Is the correct destination enabled? - Are the expected device pills selected? - Does the label look right on desktop, tablet and mobile? - If it is an image-only row, is its width and image alignment correct? - Has the final version been **saved**, not only previewed? #### Need help? If Live Editor is unavailable, a secure session expires unexpectedly, or a label does not appear after all of the checklist items have been confirmed, contact Calculus support with: - the label name; - the page URL and product SKU being tested; - the selected destination and device profile; and - a screenshot of the label form or Live Editor tray.